Code Project – Python Flask Top Ten Movies Site

So, I mentioned dumping the Flask Blog a while back, but then I decided that since I had managed to get it all working, it would be somewhat trivial to get it working on a subdomain, instead of a main domain, which had been my original plan to start with.  I was never too excited about dropping this project because I have a few ideas for little projects that I wanted to build that would actually work pretty well in Python and Flask, since it essentially adds a direct path to running a back end style script and a front in interface.  Part of my frustration had come from trying to integrate OTHER Flask projects into the same website and Python code.  Specifically the Top Ten Films website.  

So I stripped out all of the work I had done on integrating the Top Ten movies site, and got the bare Blog running on smallblog.bloggingintensifies.com.  That’s not a link, don’t bother trying to go there, there is nothing there (More on that in a bit).  In this process, I got to thinking, I could run separate Flask Instances, one for each project, though I feel like that’s probably kind of super inefficient for server overhead.  I went and did it anyway, with the Top Ten Movies site.

Which worked fine.

At this point, I realized, I had a working copy of this website to work with and test.  A lot fo my previous frustration was adapting and merging two Python files, which share some redundancy, which share the same names on some secondary files and variables.  I could now, modify the Top Ten Movies code, and test it, to remove the problem duplication.  Satisfied, I shut off the Flask Blog, and merged the code again, and, it worked!  Worked as expected.  I did update the code a bit more again to add in the user/admin features of the Blog to the Movies page, so no one else can change the list.  

I also changed the subdomain from smallblog.bloggingintensifies, to flask.bloggingintensifies.com.  I mostly plan to use this sub domain to show off Flask Python projects, not just this blog I’m never going to fully utilize, so the name change makes more sense.

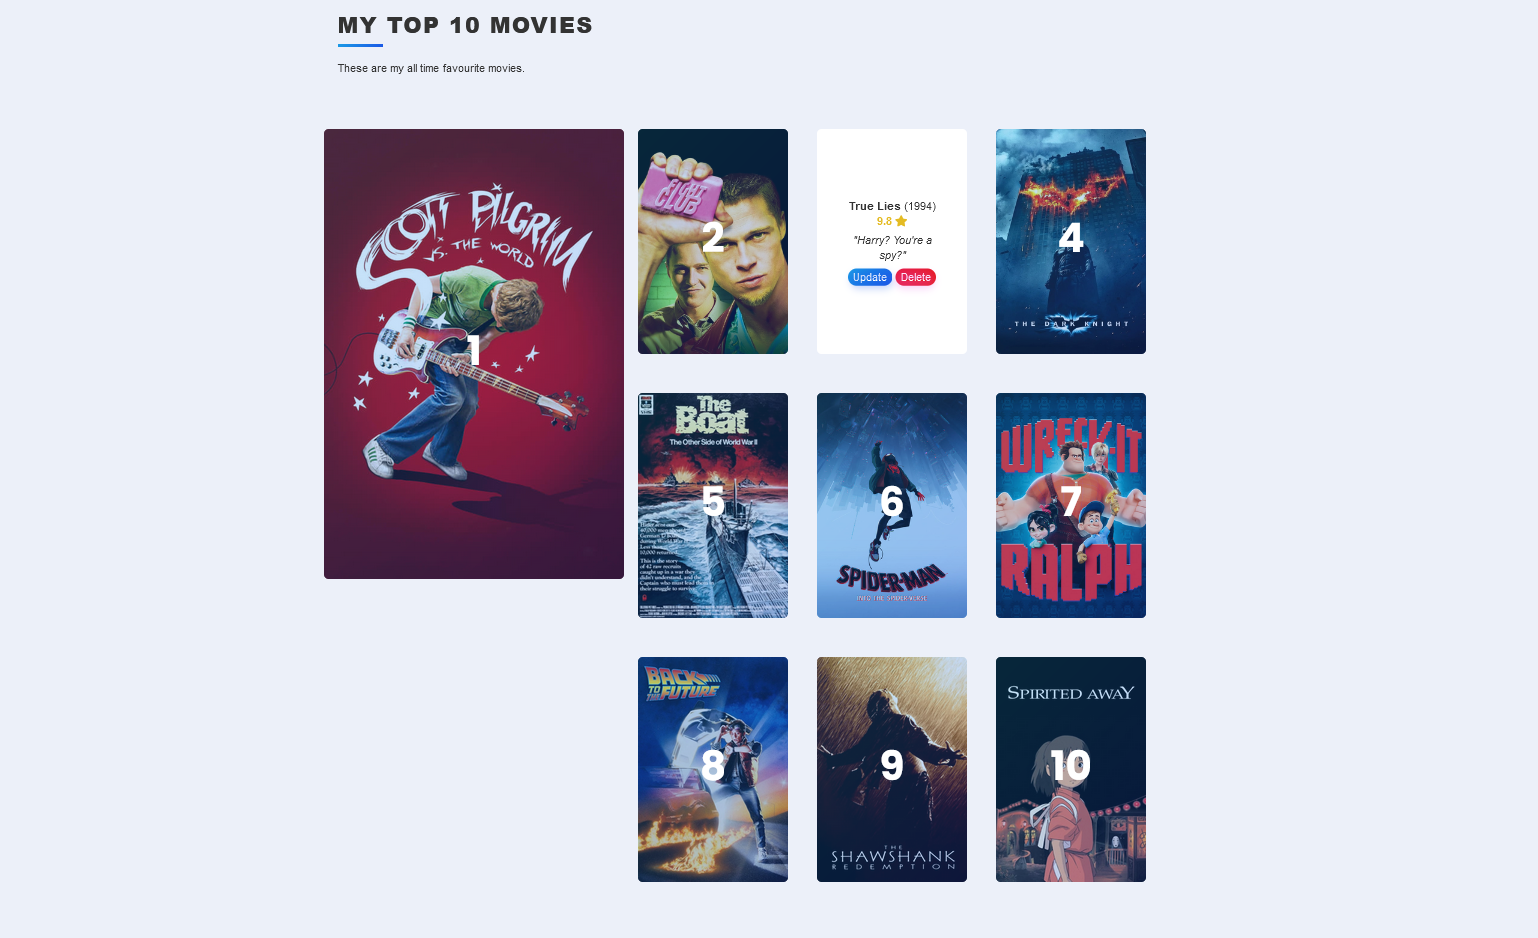
I also used some of the other HTML knowledge I’ve gained, well, the modern HTML knowledge, to reformat the Movie Site from how it was built in the class.  The class just had a long single column with ten movies.  I’ve changed it so number 1 is large and everything else is a smaller grid.  It’s much prettier looking now.  I doubt it changes much, if at all, but it’s a neat and fun project.

Code Project – JavaScript Drum Kit

The second actual project from the class I’ve been doing is a simple clickable drum kit. Part of the purpose was to work with signs and to work with clickable elements. Like the dice roller game, the basic HTML and images were provided, though there was some freedom in arranging the icons and sounds.

It feel a bit flaky, when it comes to overlapping sounds, but that also feels like a bit of a limitation with the code itself, or at least, the simplicity of what is being done here. I’m sure it’s “fixable” with some more advanced work. But for now it’s pretty neat. Works with clicks and keyboard presses.

It can be played by going here, and the full repository can be found here.

var w = new Audio('sounds/snare.mp3');
var a = new Audio('sounds/tom-1.mp3');
var s = new Audio('sounds/tom-3.mp3');
var d = new Audio('sounds/kick-bass.mp3');
var j = new Audio('sounds/tom-4.mp3');
var k = new Audio('sounds/tom-2.mp3');
var l = new Audio('sounds/crash.mp3');

for(var i=0 ; i < document.querySelectorAll(".drum").length; i++) {
    document.querySelectorAll(".drum")[i].addEventListener("click", function(event) {
    clickHandler(event.target.innerHTML)});
}

document.addEventListener("keydown", function(event) {
    clickHandler(event.key);
});

function clickHandler(which_sound) {
//    console.log(which_sound)
//    alert("Clicked!"); 
    flashButton(which_sound);

    switch (which_sound){
    case "w":
        w.play();
        break;
    case "a":
        a.play();
        break;
    case "s":
        s.play();
        break;
    case "d":
        d.play();
        break;
    case "j":
        k.play();
        break;
    case "k":
        k.play();
        break;
    case "l":
        l.play();
        break;
    default:
        console.log(which_sound)
        break;
    }
}

function flashButton (whichFlash) {
    var activeButton = document.querySelector("."+whichFlash);
    activeButton.classList.add("pressed");
    setTimeout(function(){ activeButton.classList.remove("pressed"); },0.3);
}

The large bulk of the code here is handling the sound. I feel like there could almost be a more elegant way of handling this process with a list, but I’m not positive since it would mean taking the text of a list element and using it as the name of a variable. The top chunk of definitions manages creating the sound elements themselves, and the switch statement in the middle plays one based on what the user did.

This function:

function flashButton (whichFlash) {
    var activeButton = document.querySelector("."+whichFlash);
    activeButton.classList.add("pressed");
    setTimeout(function(){ activeButton.classList.remove("pressed"); },0.3);
}

Makes the flash happen. Like I did for the Python class, I tried to construct most of these on my own, so had to do a bit of research to find a way to make the button add the “pressed” class, to get the bright effect, then shortly after, remove it. This seemed to be the appropriate method based on a couple of sources.

The real “meat” of this lesson was this bit of code.

for(var i=0 ; i < document.querySelectorAll(".drum").length; i++) {
    document.querySelectorAll(".drum")[i].addEventListener("click", function(event) {
    clickHandler(event.target.innerHTML)});
}

document.addEventListener("keydown", function(event) {
    clickHandler(event.key);
});

Specifically, using the event listener function, to call an embedded function in order to pass data around. Its similar in concept to some things I’d done in Python, and I am sure it’s nothing super fancy in technique, but its “new to me” in the Javascript sense. Also, I think the instructor handled this a different way, but I’ve set these two event listeners, one for the buttons for clicks, and one for the page for key presses, in a way that made the clickHandler a lot simpler, since they both work off of the same bit of data.

Code Project – JavaScript Dice Roller Game

I mentioned in my Python Class posts that I really enjoyed the instructor and I planned to eventually move to doing her Web Dev Course. Well, I’ve started working on that one. It’s not a “100 Days of Projects” so I’ve not been quite blitzing through it like I did the Python Course, and it’s a lot of material I am already way more familiar with. Hell, I skipped over the first third of the course because it was the same HTML/CSS content included int he Python Course.

My main goal here, is to get much more familiar with JavaScript. I have dabbled, lightly, in JavaScript (ok, let’s go with JS from here on), and well, it’s a coding language, so I already have a lot of the “logic” side down. At some point, learning new programming languages just becomes about learning the syntax and maybe some of the special uses for a particular language. I’d only say I am Intermediate or above in Python and HTML/PHP, but I’m familiar with several other languages including BASIC, C, C++, LSL (Linden Scripting Language), Arduino (mostly just C), Bash Shell scripting, SQL, Cold Fusion, and probably some other I am forgetting.

It all mostly works the same on the base level, a loop is a loop, conditionals are conditional, and it’s just a matter of remembering if the language uses braces or parenthesis or semi colons and if tabs matter. And that’s where Google becomes your friend.

Anyway, the first real stand along project of this course is a simple Dice rolling game. And I have to say, “game” is the loosest sense of the word. It’s a webpage you refresh to see if Player 1 or Player 2 has the higher dice face. I might actually try to make a more complex version of this later where you select from different Dice and it rolls them, for you know, gaming. Sure there are plenty of D&D Dice roller apps, but it would be a fun exercise.

The class provided the basic HTML Structure and graphics, since the focus was on the JavaScript side of things. It’s not an overly complex project, but here is the JS Code.

function setImage(diceImage, roll) {
    console.log(roll);
    if(roll === 1) { rolled = "images/dice1.png"; }
    else if(roll === 2) { rolled = "images/dice2.png"; }
    else if(roll === 3) { rolled = "images/dice3.png"; }
    else if(roll === 4) { rolled = "images/dice4.png"; }
    else if(roll === 5) { rolled = "images/dice5.png"; }
    else { rolled = "images/dice6.png"; }


    diceImage.src = rolled;
}

let player1Roll = Math.floor(Math.random()*6)+1;
let player2Roll = Math.floor(Math.random()*6)+1;

let dice1Image = document.querySelector("img.img1");
let dice2Image = document.querySelector("img.img2");

if( player1Roll > player2Roll) {
    document.getElementById("headtext").textContent = "Player 1 Wins!";
}
else if (player2Roll > player1Roll) {
    document.getElementById("headtext").textContent = "Player 2 Wins!";
}
else {
    document.getElementById("headtext").textContent = "Its a Tie!";
}

setImage(dice1Image,player1Roll);
setImage(dice2Image,player2Roll);

So what’s the process here. Let’s skip the function at the top for now. Step one is to roll two dice. This is done with Math.random, which selects a random value between 0 and 1. Dice have 6 sides, so we multiply this by 6, to get a number between 0 and 6. But technically it’s a number between 0 and 5.999999~ into infinity, not 6. And Math.floor rounds things down, so it’s actually between 0 and 5. So we need to add one.

let player1Roll = Math.floor(Math.random()*6)+1;
let player2Roll = Math.floor(Math.random()*6)+1;

After this is some selectors to pick the the two dice images off the page, so they can be updated to reflect the rolls later.

let dice1Image = document.querySelector("img.img1");
let dice2Image = document.querySelector("img.img2");

Next we get to use a conditional chain to determine the winner and update the h1 tag on the webpage to display the winner, or if it was a tie. I’m not going to repeat that code here again.

Lastly we make two calls to that function I mentioned before, the one at the top of the script, that updates the image for each dice. The function takes the document selector, and the value of each roll as an input. It runs the roll value (1-6) through a selector and then sets the dice image on the HTML document to the appropriate image.

Could this code all be cleaner, probably, but it gets the job done and is easy to follow. There is probably a simpler way to set the images. The image selector could also just look for 0-5 mapped to 1-6 instead of adding 1. But what if I needed this function to do more based on these rolls. Maybe it becomes part of a larger game and deals damage or something. Personally, this is why I prefer code like this, that isn’t perfectly compact, because it becomes functionally more useful down the road.

Also, the game is available to play at this link.

Code Project: VLC Portable Playlist to Text Dump

It’s kind of funny how one post can lead to another sometimes.  This one is pretty basic but it also just shows a bit how useful I find knowing my way around computer systems to be.  Yesterday I posted about my little annual music playlists.  And as part of that, I wanted to actually post the playlist. I am pretty sure there is a fairly universal “playlist file type” out there and being open source, I had assumed that VLC on my phone stored the playlists somewhere in playlist files.

That assumption was wrong, it uses a .db file.  A little portable database.  There is an option to dump this file to the root of the phone, presumably for backup purposes, but it’s also useful to just browse it like I am doing here.  The file itself can be opened and browsed with SQL Lite’s DB manager.  It’s standard databases inside for tracks and artists and playlists.

Fortunately, I have had some experience dealing with database queries, so I set about building what was needed tog et the data I wanted.  Pull the Playlist I want, in this case “2023 Best” but I could change that to do any available Playlist.  This gives the tracks by id, but the tracks themselves are stored in a separate table for media.  So that needs joined in.  The media table stores track names, but not artist names, so an additional join is needed to get the artist names.  This complicated things a bit because both the playlist table and artist table have a column “name” so more clarity needed to be added.

The result was this little query that dumps out a basic table of Artist and Song title.

SELECT Artist.name, Media.title 
FROM Playlist
Inner Join playlistmediarelation ON playlist_id=id_playlist
Inner Join Media ON id_media=media_id
Inner Join Artist ON media.artist_id=Artist.id_artist
WHERE Playlist.name = '2023 Best'
ORDER BY Artist.name

Now, I could have done some cute clever trick now to merge the two into a new column and add in a ” – ” between but it was easier to drop it all into a notepad file and do a fine/replace on the weird space character that it stick in between the Artist and track title.

The added bonus here is I can easily use this query again anytime I want to dump a Playlist to text.

Advent of Code 2022, I’m Done

Well, I made it farther than my last “in real time attempt” in 2020 by 3 starts. I may check in one the puzzles each day, but my experience is, they only get more complex as time goes on, so I doubt I’ll be completing any more of them. Each day is starting to take a lot more time to solve out, the solutions are getting a lot more finicky to produce. We’ve also reached the point where the puzzle inputs also feel ridiculously obtuse. Like the Day 15 puzzle, where every number was in the millions, basically, for the only purpose of making everything slow without some sort of magic reduction math. Though skimming through other’s solutions, there didn’t seem to really BE any “magic reduction” option there. \

Which is fine. It’s not supposed to be easy. I don’t expect it to be easy.

But I have long ago accepted that things I’m doing for relaxation or enjoyment, should at least be relaxing and enjoyable. And These puzzles have reached a point where the amount of enjoyment and relaxation I get from them is no longer worthwhile.

So I’m choosing to end this year’s journey here.

Maybe I’ll go back and finish them some day, but more at my own leisure. I mean, I had started doing the old 2015 puzzles in the week leading up to this year’s event. I was never doing this in any attempt to get on the leader boards or anything anyway, hell I didn’t even start most day’s puzzles until the day was half over or later.

For what it’s worth, i did make a strong attempt on Day 15 but I just could not get it to output the correct answer, and I’m not real sure why. I couldn’t even get the sample input to work out, I was always one off. It’s possible, and likely, I was counting the space where the beacon existed, but my actual input data was off by a little over 1 million, and there are not 1 million beacons on the board. Plus it was 1 million under, where my sample input solution was 1 over.

I’m not even attempting today’s, for Day 16. I can see the logic needed, but the nuance to accomplish it will just take me too long to code out and like I said above, enjoyment and relaxation is the point. I don’t need to add hours of stress to my day.