I have been wanting to convert my Twitter Export archive into a more useful format for a while. I had vague dreams of maybe turning them into some sort of digest posts on WordPress but there are a fuckton of tweets (25,000) and it would require a LOT of scrubbing. I could probably manage to find and remove Retweets pretty easily, but then there is the issue of media and getting the images into the digest posts and it’s just not worth the hassle.
What I can, and did do, is preserve the data is a better, more digestible, and searchable format. Specifically, Markdown. Well, ok, the files are not doing anything fancy, so it’s just, plaintext, pretending to be Markdown.
I have no idea if Twitter still offers an export dump of your data, I have not visited the site at all in over a year. I left, I deleted everything, I blocked it on my DNS. But assuming they do, or you have one, it’s a big zip file that can be unrolled I to a sort of, local, Twitter-like interface. There are a lot of files in this ball, and while I am keeping the core archive, I just mostly care about the content.
If you dig in, it’s easy to find, there is a folder called data, the tweets are in a file called “tweets.js.”. It’s some sort of JSON/XML style format. If you want to media, it’s in a folder called “Tweets_Media” or something like that. I skimmed through mine, most of the images looked familiar, because I already have them, I removed the copy because I didn’t need it.
But I kept the Tweets.js file.
So, what to do with it? It has a bunch of extraneous meta data for each Tweet that makes it a cluttered mess. It’s useful for a huge website, but all I want is the date and the text. Here is a sample Tweet in the file.
So I wrote a quick and simple Python Script (it’s below). I probably could have done something fancy with Beautiful Soup or Pandas, but instead I did a quick and basic scan that pulls the data I care about. If a line contains “created_at” pull it out to get the data, if it has “full_text”, pull it out to get the text.
Once I was able to output these two lines, I went about cleaning them up a bit. I don’t need the titles, so I started by splitting on “:”. This was quickly problematic if the Tweet contained a semicolon and because the time contained several semicolons. Instead I did a split on ‘ ” : ” ‘. Specifically, quote, space, semicolon, space, quote.”. Only the breaks I wanted had the spaces and quotes, so that got me through step one. The end quotation mark was easy to slice off as well.
I considered simplifying things by using the same transformation on the date and the text, but the data also had this +0000 in it that I wanted to remove. It’s not efficient, but it was just as simple to just have two, very similar operations.
After some massaging, I was able to output something along the lines of “date – text”.
But then I noticed that for some reason the Tweets are apparently not in date order. I had decided that I was just going to create a series of year based archival files, so I needed them to be in order.
So I added a few more steps to sort each Tweet during processing into an array of arrays based on the year. Once again, this isn’t the cleanest code, It assumes a range of something like, 2004 to 2026, which covers my needs for certain. I also had some “index out of range” errors with my array of arrays, which probably have a clever loopy solution, but instead it’s just a bug pre-initialized copy/paste array.
Part of the motivation of doing the array of arrays was also that I could make the script output my sorted yearly files directly, but I just did it manually from the big ball final result.. the job is done, but it could easily be done by adjusting the lower output block a bit.
Anyway, here is the code, and a link to a Git repository for it.
# A simple script that takes an exported tweets.js file and outputs it to a markdown text file for archiving.
# In pulling data for this, I noticed that older Twitter exports use a csv file instead of a .js file.
# As such, this is for newer exports.
# The Tweets.js file is in the 'data' directory of a standard Twitter archive export file.

# Open the tweet.js file containing all the tweets, should eb in the same folder
with open("tweets.js", encoding="utf-8") as file:
    filedata = file.readlines()

tweet_data = []
current_tweet = []
# The Tweets don't seem to be in order, so I needed to sort them out, this is admitedly ugly
# but I only need to cover so many years of sorting and this was the easiest way to avoid index errors
sorted_tweets = [[], [], [], [], [], [], [], [], [], [], [], [], [], [], [], [], [], [], [], [], [], [], [], [], []]

# Does a simple search through the file.  It pulls out the date posted and the full text.
# This does not do anything with images, sorry, that gets more complicated, it would be doable
for line in filedata:
    if "created_at" in line:
        timesplit = line.split(":")
        posted_at = line.split("\" : \"")[1].replace(" +0000 ", " ")[:-3]
        current_tweet.append(posted_at)
    elif "full_text" in line:
        current_tweet.append(line.split("\" : \"")[1][:-3])
        #        current_tweet.append(line.split(":")[1].split("\"")[1])
        tweet_data.append(current_tweet)
        current_tweet = []
        # Because full text is always after the date, it just moves on after it gets both
    else:
        pass

# An ugly sort, it simply looks for the year in the date, then creates an array of arrays based on year.
# I did it this way partly in case I wanted to output to seperate files based on year, but I can copy/paste that
# It probably is still out of order based on date, but whatever, I just want a simple archive file
for each in tweet_data:
    for year in range(2004, 2026):
        if str(year) in each[0]:
            sorted_tweets[year - 2004].append(each)

# Prints the output and dumps it to a file.
with open("output.md", encoding="utf-8", mode="w") as output:
    for eachyear in sorted_tweets:
        for each in reversed(eachyear):
            output.write(each[0] + " : " + each[1] + "\n")
            print(each[0] + " : " + each[1])
Josh Miller aka “Ramen Junkie”. I write about my various hobbies here. Mostly coding, photography, and music. Sometimes I just write about life in general. I also post sometimes about toy collecting and video games at Lameazoid.com.
I have a huge pile of online courses bookmarked that I would like to run through. This does have some pitfalls, maybe I’ll get to that another day. Today I want to discuss one I finished. The FreeCodeCamp Responsive Web Design course. You get a little certification for completing these, which mostly just bolsters the part of me that, doesn’t really find much value in certifications. I didn’t really need to take this course, but it’s part of the basic “core list” on FreeCodeCamp’s website, and my obsessive completionism mind says I should do those, in addition to anything else I might find on the site. I am not a web design expert (maybe, something something Imposter Syndrome), I don’t really need to take this course. Of all of the coding I have done, web design is what I’ve done the most. I figure this would be a breeze.
Boy was it not.
And not because it was hard.
I have been doing some other courses on this website, and there is a lot of variety in teaching styles, so this is less a criticism of FCC and more a criticism of this course. I also will add that if you were a complete beginner, it probably would be, less tedious. It touches a bit on the “maybe I’ll get to that another day” back at the top of this post, in that soooo much online learning is sooooo beginner oriented it’s a bit of a trap.
But anyway, the Responsive Web Design course. I’ll run through some of the stuff built in a bit, but I want to address some issues I had with the course, not even the content, just the structure. It’s probably just a limitation of the automated system more than anything else.
It’s incredibly hand holdey.
To the point of being a bit tedious, and possibly to some extent being bad for actually learning. One of the praises I have had for that Angela Yu Python course was how well it ramped up its projects. It presented an idea, it hand held you through a project, it guided you through a second project using that concept, then it would tell you to free-form a related project. Repeat, for each new concept. Where I felt that this FCC course missed is the part where eventually it lets you do more on your own. One easy example, early on, it covers the basic structure of an HTML page and things to put in the header, like the link to the style sheet or metadata. And then, every lesson after, it just, keeps repeating the same 3 or 4 steps to add these items.
Ideally, at some point, it would just be a step to “Add the standard boilerplate HTML and header”. With no prompts on what goes in there, so that you have to do it entirely on your own.
This sort of thing shows up a lot in later lessons too. It will do things you have done several times before, in this clunky step-by-step fashion. “Add a width of XXX to this class”, “Now set the background color to #XXXXXX”, now set the positioning. At some point, it really feels like it would be beneficial to just say, “Set up this div block with these parameters, so you are forced to do it on your own completely. instead of one step at a time, explicitly spelled out each time.
You can skip anything that isn’t part of the actual 5 main tests. Which is totally doable, because another issue I found was that the previous teaching, rarely had anything to do with the “free-form test” part. For the first one you build a survey form, and that one matched pretty well. The Tribute Page was close-ish, but starting to stray. The following two sections end with a Product Landing Page and a Technical Documentation Page. Which are basically just, slight variations of the Tribute Page. As is the final project of a Personal Portfolio page. The exercises though are these slightly painfully slow little CSS-based art projects. You kind of learn some neat techniques, but honestly, as someone who has done some front-end dev work, a lot of it is simply not practical. The CSS penguin is neat, but if I want a penguin on my webpage, I’m just going to find a PNG.
The final challenges themselves are kind of simple to cheese through as well. There is a checklist of what it’s looking for, if you meet those requirements, you pass. It doesn’t matter if the end result is even functional. For the Profile page, I took the code from my existing Github.io page and added some ID tags to it.
There is also this weird inconsistency of methodology. It’s most obvious in colors. There are several ways to assign colors in CSS. Which one is used in this course is inconsistent, though it seems to prefer RGB (R G B). Personally, I prefer just using hex, it’s simple and easy Just an easy #aaaaaa, that sort of thing. There is a lot in this course that actually kind of feels like there is an instructor trying to push some supremely anal-retentive and less-used CSS concepts on the world. using rgb instead of hex doesn’t make you a graphic designer even though it feels fancier. Also, classes are much preferred to ids. There are a lot of places using ids in this course where it should use classes.
Anyway, the projects themselves. I’ve posted the whole thing on GitHub, and I’ll point out my personal highlights.
CSS Colored markers – As tedious as the course was in its teaching methods, the little artsy CSS things do turn out neat like these little markers. This was probably the most interesting from the first section.
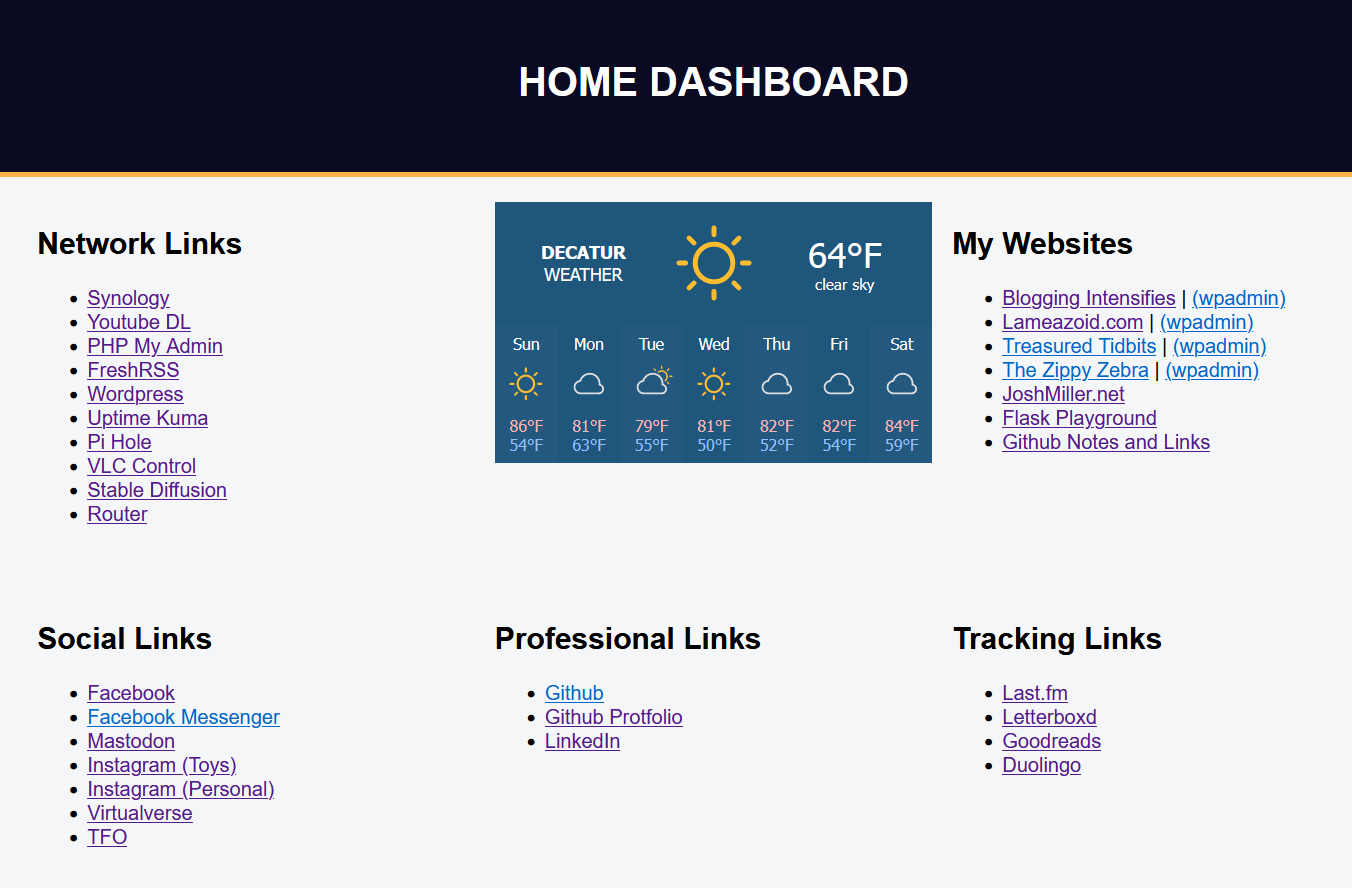
Flexbox Photo Gallery – I actually reused this code to build a new version of my home dashboard to replace the one I lost when my Raspberry Pi crapped out. This is probably the most valuable lesson in this whole lesson set.
CHVRCHES Tribute Page – Not that exciting of a design, but the final project was to build a tribute page, so I made one for CHVRCHES.
Balance Sheet – It’s nice looking, but there are jQuery libraries that basically just do this, with tables.
Picasso Painting – I have no idea WTF this is supposed to be. Apparently, others don’t either because I noticed that at some point this lesson was replaced with one where you build a cat painting.
Josh Miller aka “Ramen Junkie”. I write about my various hobbies here. Mostly coding, photography, and music. Sometimes I just write about life in general. I also post sometimes about toy collecting and video games at Lameazoid.com.
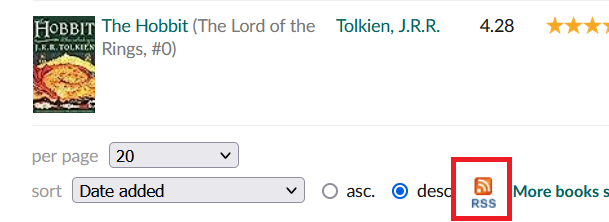
I already have my Letterboxed watches set up to syndicate here, to this blog, for archival purposes mostly. When I log a movie in Letterboxed, a plug-in catches it from the RSS feed and makes a post. This is done using a plug-in called “RSS Importer” They aren’t the prettiest posts, I may look into adjusting the formatting with some CSS, but they are there. I really want to do the same for my Goodreads reading. Goodreads lists all have an RSS feed, so reason would have it that I could simply, put that feed into RSS Importer and have the same syndication happen.
For some reason, it throws out an error.
The feed shows as valid and even gives me a preview post, but for whatever reason, it won’t create the actual posts. This is probably actually ok, since the Goodreads RSS feed is weird and ugly. I’ll get more into that in a bit.
The Feed URL Is Here, at the bottom of each list.
I decided that I could simply, do it myself, with Python. One thing Python is excellent for is data retrieval and manipulation. I’m already doing something similar with my FreshRSS Syndication posts. I wanted to run through a bit of the process flow here though I used for creating this script. Partially because it might help people who are trying to learn programming and understand a bit more about how creating a program, at least a simple one, actually sort of works.
There were some basic maintenance tasks needing to be done. Firstly, I made sure I had a category on my WordPress site to accept the posts into. I had this already because I needed it trying to get RSS Importer to work. Secondly, I created a new project in PyCharm. Visual Studio Code works as well, any number of IDEs work, I just prefer PyCharm for Python. In my main.py file, I also added some commented-out bit at the header with URLs cut and pasted from Goodreads. I also verified these feeds actually worked with an RSS Reader.
For the actual code there are basically three steps to this process needed:
Retrieve the RSS feed
Process the RSS Feed
Post the processed data.
Part three here, is essentially already done. I can easily lift the code from my FreshRSS poster, replace the actual post data payload, and let it go. I can’t process data at all without data to process, so step one is to get the RSS data. I could probably work it out also from my FreshRSS script, but instead, I decided to just refresh my memory by searching for “Python Get RSS Feed”. Which brings up one of the two core points I want to make here in this post.
Programming is not about knowing all the code.
Programming is more often about knowing what process needs to be done, and knowing where and how to use the code needed. I don’t remember the exact libraries and syntax to get an RSS feed and feed it through Beautiful Soup. I know that I need to get an RSS feed, and I know I need Beautiful Soup.
My search returned this link, which I cribbed some code from, modifying the variables as needed. I basically skimmed through to just before “Outputting to a file”. I don’t need to output to a file, I can just do some print statements during debugging and then later it will all output to WordPress through a constructed string.
I did several runs along the way, finding that I needed to use lxml instead of xml in the features on the Beautiful Soup Call. I also opted to put the feed URL in a variable instead of directly in the code as the original post had it. It’s easy to swap out. I also did some testing by simply printing the output of “books” to make sure I was actually getting useful data, which I was.
At this point, my code looks something like this (not exactly but something like it:
import requests
from bs4 import BeautifulSoup
feedurl = "Goodreads URL HERE"
def goodreads_rss(feedurl):
article_list = [] try:
r = requests.get(feedurl)
soup = BeautifulSoup(r.content, features='lxml')
books = soup.findAll('item')
for a in books:
title = a.find('title').text
link = a.find('link').text
published = a.find('pubDate').text
book = {
'title': title,
'link': link,
'published': published
}
book_list.append(book)
return print(book_list)
print('Starting scraping')
goodreads_rss()
print('Finished scraping')
I was getting good data, and so Step 1 (above) was done. The real meat here is processing the data. I mentioned before, Goodreads gives a really ugly RSS feed. It has several tags for data in it, but they aren’t actually used for some reason. Here is a single sample of what a single book looks like:
<item>
<guid></guid>
<pubdate></pubdate>
<title></title>
<link/>
<book_id>5907</book_id>
<book_image_url></book_image_url>
<book_small_image_url></book_small_image_url>
<book_medium_image_url></book_medium_image_url>
<book_large_image_url></book_large_image_url>
<book_description>Written for J.R.R. Tolkien’s own children, The Hobbit met with instant critical acclaim when it was first published in 1937. Now recognized as a timeless classic, this introduction to the hobbit Bilbo Baggins, the wizard Gandalf, Gollum, and the spectacular world of Middle-earth recounts of the adventures of a reluctant hero, a powerful and dangerous ring, and the cruel dragon Smaug the Magnificent. The text in this 372-page paperback edition is based on that first published in Great Britain by Collins Modern Classics (1998), and includes a note on the text by Douglas A. Anderson (2001).]]></book_description>
<book id="5907">
<num_pages>366</num_pages>
</book>
<author_name>J.R.R. Tolkien</author_name>
<isbn></isbn>
<user_name>Josh</user_name>
<user_rating>4</user_rating>
<user_read_at></user_read_at>
<user_date_added></user_date_added>
<user_date_created></user_date_created>
<user_shelves>2008-reads</user_shelves>
<user_review></user_review>
<average_rating>4.28</average_rating>
<book_published>1937</book_published>
<description>
<img alt="The Hobbit (The Lord of the Rings, #0)" src="https://i.gr-assets.com/images/S/compressed.photo.goodreads.com/books/1546071216l/5907._SY75_.jpg"/><br/>
author: J.R.R. Tolkien<br/>
name: Josh<br/>
average rating: 4.28<br/>
book published: 1937<br/>
rating: 4<br/>
read at: <br/>
date added: 2011/02/22<br/>
shelves: 2008-reads<br/>
review: <br/><br/>
]]>
</description>
</item>
Half the data isn’t within the useful tags, instead, it’s just down below the image tag inside the Description. Not all of it though. It’s ugly and weird. The other thing that REALLY sticks out here, if you skim through it, there is NO “title” attribute. The boot title isn’t (quite) even in the feed. Instead, it just has a Book ID, which is a number that, presumably, relates to something on Goodreads.
In the above code, there is a line “for a in books”, which starts a loop and builds an array of book objects. This is where all the data I’ll need later will go, for each book. in a format similar to what is show “title = a.find(‘title’).text”. First I pulled out the easy ones that I might want when later constructing the actual post.
num_pages
book_description
author_name
user_rating
isbn (Not every book has one, but some do)
book_published
img
Lastly, I also pulled out the “description” and set to work parsing it out. It’s just a big string, and it’s regularly formatted across all books, so I split it on the br tags. This gave me a list with each line as an entry in the list. I counted out the index for each list element and then split them again on “: “, assigning the value at index [1] (the second value) to various variables.
The end result is an array of book objects with usable data that I can later build into a string that will be delivered to WordPress as a post. The code at this point looks like this:
import requests
from bs4 import BeautifulSoup
url = "GOODREADS URL"
book_list = []
def goodreads_rss(feed_url):
try:
r = requests.get(feed_url)
soup = BeautifulSoup(r.content, features='lxml')
books = soup.findAll('item')
for a in books:
print(a)
book_blob = a.find('description').text.split('<br/>')
book_data = book_blob[0].split('\n ')
author = a.find('author_name').text
isbn = a.find('isbn').text
desc = a.find('book_description').text
image = str(a.find('img'))
title = str(image).split('"')[1]
article = {
'author': author,
'isbn': isbn,
'desc': desc,
'title': title,
'image': image,
'published': book_data[4].split(": ")[1],
'my_rating': book_data[5].split(": ")[1],
'date_read': book_data[7].split(": ")[1],
'my_review': book_data[9].split(": ")[1],
# Uncomment for debugging
#'payload': book_data,
}
book_list.append(article)
return book_list
except Exception as e:
print('The scraping job failed. See exception: ')
print(e)
print('Starting scraping')
for_feed = goodreads_rss(url)
for each in for_feed:
print(each)
And a sample of the output looks something like this (3 books):
{'author': 'George Orwell', 'isbn': '', 'desc': ' When Animal Farm was first published, Stalinist Russia was seen as its target. Today it is devastatingly clear that wherever and whenever freedom is attacked, under whatever banner, the cutting clarity and savage comedy of George Orwell’s masterpiece have a meaning and message still ferociously fresh.]]>', 'title': 'Animal Farm', 'image': '<img alt="Animal Farm" src="https://i.gr-assets.com/images/S/compressed.photo.goodreads.com/books/1424037542l/7613._SY75_.jpg"/>', 'published': '1945', 'my_rating': '4', 'date_read': '2011/02/22', 'my_review': ''}
{'author': 'Philip Pullman', 'isbn': '0679879242', 'desc': "Can one small girl make a difference in such great and terrible endeavors? This is Lyra: a savage, a schemer, a liar, and as fierce and true a champion as Roger or Asriel could want--but what Lyra doesn't know is that to help one of them will be to betray the other.]]>", 'title': 'The Golden Compass (His Dark Materials, #1)', 'image': '<img alt="The Golden Compass (His Dark Materials, #1)" src="https://i.gr-assets.com/images/S/compressed.photo.goodreads.com/books/1505766203l/119322._SX50_.jpg"/>', 'published': '1995', 'my_rating': '4', 'date_read': '2011/02/22', 'my_review': ''}
{'author': 'J.R.R. Tolkien', 'isbn': '', 'desc': 'Written for J.R.R. Tolkien’s own children, The Hobbit met with instant critical acclaim when it was first published in 1937. Now recognized as a timeless classic, this introduction to the hobbit Bilbo Baggins, the wizard Gandalf, Gollum, and the spectacular world of Middle-earth recounts of the adventures of a reluctant hero, a powerful and dangerous ring, and the cruel dragon Smaug the Magnificent. The text in this 372-page paperback edition is based on that first published in Great Britain by Collins Modern Classics (1998), and includes a note on the text by Douglas A. Anderson (2001).]]>', 'title': 'The Hobbit (The Lord of the Rings, #0)', 'image': '<img alt="The Hobbit (The Lord of the Rings, #0)" src="https://i.gr-assets.com/images/S/compressed.photo.goodreads.com/books/1546071216l/5907._SY75_.jpg"/>', 'published': '1937', 'my_rating': '4', 'date_read': '2011/02/22', 'my_review': ''}
I still would like to get the Title, which isn’t an entry, but, each Image, uses the Book Title as its alt text. I can use the previously pulled-out “image” string to get this. The image result is a complete HTML Image tag and link. It’s regularly structured, so I can split it, then take the second entry (the title) and assign it to a variable. I should not have to worry about titles with quotes being an issue, since the way Goodreads is sending the payload, these quotes should already be removed or dealt with in some way, or the image tag itself wouldn’t work.
title = str(image).split('"')[1]
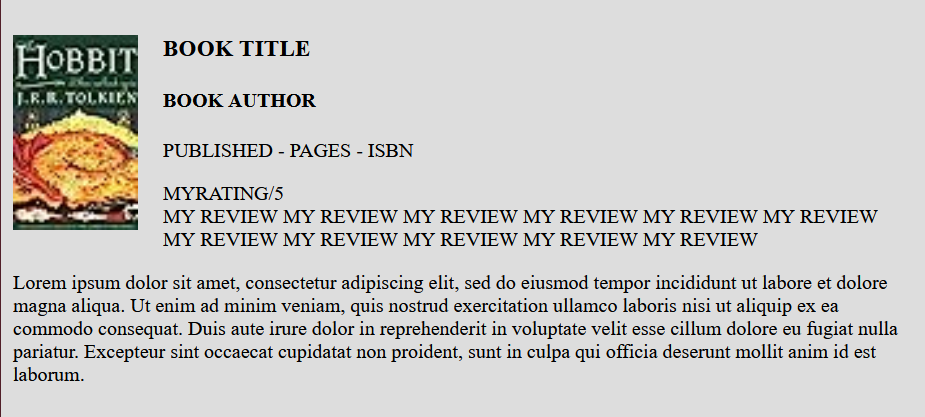
I’m not going to go super deep into the formatting process, for conciseness, but it’s not really that hard and the code will appear in my final code chunk. Basically, I want the entries to look like little cards, with a thumbnail image, and most of the data pulled into my array formatted out. I’ll mock up something using basic HTML code independently, then use that code to build the structure of my post string. It will look something like this when finished, with the variables stuck in place in the relevant points, so the code will loop through, and insert all the values:
I don’t use all of the classes added, but I did add custom classes to everything, I don’t want to have to go back and modify my code later if I want to add more formatting. I did make a bit of simple CSS that can be added to the WordPress custom CSS (or any CSS actually, if you just wanted to stick this in a webpage) to make some simple cards. They should center in whatever container they get stuck inside, in my case, it’s the WordPress column.
The end result looks something like this. Unfortunately, the images in the feed are tiny, but that’s ok, it doesn’t need to be huge.
Something I noticed along the way, I had initially been using the “all books” RSS feed, which meant it was giving all books on my profile, not JUST read books. I switched the RSS feed to “read” and things still worked, but “read” only returns a maximum of 200 books. Fortunately, I use shelves based on year for my books, so I can go through each shelf and pull out ALL the books I have read over the years.
Which leads me to a bit of a split in the process.
At some point, I’ll want to run this code, on a schedule somewhere, and have it check for newly read books (probably based on date), and post those as they are read.
But I also want to pull and post ALL the old reads, by date. These two paths will MOSTLY use the same code. For the new books, I’ll attach it to the “read” list, have it check the feed, then compare the date added in the latest entry, entry [0], to the current date. If it’s new, say, within 24 hours, it’ll post the book as a new post.
Change of plans. Rather than make individual posts, I’m going to just generate a pile of HTML code, and make backdated posts for each previous year. Much simpler and cleaner. I can then run the code once a year and make a new post on December 31st. Goodreads already serves the basic purpose of “book tracking”, I mostly just want an archive version. It’s also cleaner looking in the blog and means I don’t need to run the script all the time or have it even make the posts itself.
For the archive, I’ll pull all entries for each of my yearly shelves, then make a post for all of them, replacing the “published date” on each with the “date added” date. Because I want the entries on my Blog to match the (approximate) finished date.
I think, we’ll see.
I’ve decided to just strike out these changes of plans. After making the post, I noticed the date added, is not the date read. I know the yearly shelves are accurate, but the date added is when I added it, probably from some other notes at a later date. Unfortunately, the RSS feed doesn’t have any sort of entry for “Date Read” even though it’s a field you can set as a user, so I just removed it. It’s probably for the best, Goodreads only allows one “Date Read,” so any books I’ve read twice, will not be accurate anyway.
This whole new plan of yearly digests also means in the end I can skip step 3 above. I’m not making the script make the posts, I can cut and paste and make them manually. This lets me double-check things. One little bit I found, there was an artifact in the description of some brackets. I just added a string slice to chop it off.
I guess it’s a good idea to at some point mention the second of the two points I wanted to make here, about reusing code. Programming is all about reusing code. Your own code, someone else’s code, it doesn’t matter, code is code. There are only so many ways to do the same thing in code, they are all going to look generically the same. I picked out bits from that linked article and made them work for what I was doing, I’ll pick bits from my FreshRSS poster code, and clean it up as needed to work here. I’ll reuse 90% of the code here, to make two nearly identical scripts, one to run on a schedule, and one to be run several times manually. This also feeds back into point one, knowing what code you need and how to use it. Find the code you need, massage it together into one new block of code, and debug out the kinks. Wash, rinse, repeat.
Josh Miller aka “Ramen Junkie”. I write about my various hobbies here. Mostly coding, photography, and music. Sometimes I just write about life in general. I also post sometimes about toy collecting and video games at Lameazoid.com.
I recently picked up a neat little device called an Arduboy FX. It was a bit of an impulse buy after someone posted about getting one on Threads. It turns out it’s not actually particularly new, the community goes back quite a few years, but it’s still pretty cool none the less, and I am happy with my experience with it.
So what is it? It’s a small credit card sized handheld based on the Arduino. On a related note, it’s “credit card sized” in footprint, not so much in thickness. I wouldn’t trust putting this in a wallet at all, because I feel like my fat ass would snap it if I sat on it. The form factor is worth mentioning though. Traditionally for handhelds, I prefer the “larger options”. I had the full sized 2DS, and the XL 3DS and the large wide Retroid, and I just like, more hand real estate. Despite the Arduboy’s pretty small size, it’s still surprisingly comfortable and I don’t have any problem using it.
Also, the platform itself is open source, so one could buy components and just, build their own, if desired.
This specific version, the Arduboy FX, is different from the older original release, simply called the Arduboy. I believe the main (and possibly only) difference is that the FX includes an add on FX chip and has 200+ built in applications and games. When I ordered mine, I noticed that they sell just the FX part as an add on for the original Arduboy. They both play the same games, but the original can only play one game at a time, whatever is loaded onto it from the Arduino software. You can still load custom games to the Arduino FX.
One thing I want to mention, because it was the first question I had. What happens to the default games when you load a custom game. the answer is, they are all still there. When you upload a custom game or code from the Arduino software, the new game will load, unless you select a game from the included games list. If you choose and load another game, it will overwrite the custom game. I believe there ARE ways to overwrite the original 200 games firmware, but the standard method of upload through the Arduino IDE, does not.
As far as I can tell, most of the worthwhile available games are pre loaded on the Arduboy FX. Basically everything about this is open source in nature. I’m not going to cover any real specifics of the games here, I may do that later over on Lameazoid.com though.
The fun part here is developing games. There is a great multipart tutorial available here, though the last two parts to build Dino Smasher are not complete. The Arduboy is based on C and C++ like the Arduino is. It uses a special library to work the Arduboy functions for button presses and graphics. The tutorials are good and could be done by someone who has no programming experience, though I’ve had pretty extensive experience at this point and they were a nice refresher for my C/C++ knowledge, which I have not used in almost 20 years.
I don’t recommend the other tutorial path though, for the platform game. I’ll be blunt, its presented as beginner-ish, but it’s quite a few levels above the first set of tutorials. It introduces a lot of much more abstract coding concepts. It’s probably good information, but it’s kind of beyond a basic level and many of the comments in the community expressed as much. I was a bit worried when right out of the gate it’s starting with various types of int (integer) variables which can be used. I mean, that’s all great to know, but for the purposes of anything made here, just using int, is going to be fine.
I went through the first tutorial set myself, and built the Pong Game. This is the second time I’ve made Pong funny enough, the first being in Python. After finishing the tutorial, I went through and added a bunch of additional features. Most were things done by other commenters, but rather than pick through their code, I just made a list of ideas and added them all in. I’d recommend it for anyone looking to test their ability a bit beyond this Tutorial, especially if you have some coding ability and want to flex yourself a bit. Here is a little list of suggestions.
Add a pause option (easiest is when pressing A during a game)
Add a more complex Title screen and End Screens
Add a “net” line down the middle.
Add an ability to adjust the paddle size (this will probably also require adjusting the AI sensitivity to make the game winnable)
Add the ability to select how many wins are needed to win
Make the game a bit better by offsetting the ball starting location after scoring.
Make the game a bit better by starting the paddles in the middle (The AI tends to miss the first 2-3 shots right out of the gate otherwise)
These last couple will need to be added to the title screen.
I’m pretty happy with the result. I’m looking a bit into how to embed these games into my website here, or on my Github.io page. Until then you’ll need an Arduboy to actually run the code.
I’m not sure what I want to do next yet. I may make a go at building a simple Tic-Tac-Toe game, from scratch, just to have a simple project to test my coding chops without using a Tutorial as a base. After that, I am thinking of remaking one of the first games I ever made, a simple text based RPG I had made back in High School called Dragon Quest.
Dragon Quest was vaguely based on Dragon Warrior, which at the time, I didn’t know was actually called Dragon Quest in Japan. The game itself wasn’t actually anything LIKE Dragon Warrior though, it just, was fantasy based, and had Dragons, and the name “Dragon Warrior” was taken. (and like I said, I didn’t know at the time Dragon Quest was ALSO taken, by Dragon Warrior). That game, would be well suited to remake for the Arduboy though as it too was for a simple 2 color platform, I had built it on my TI-85 Calculator. Unfortunately, I don’t have any of the code from it. A lot of people in school had gotten copies of it on their own calculators, and Iw ould get copies back after school forced my calculator to be wiped for tests, to prevent cheating. Also, my calculator is 25 years old now, so the memory has more than wiped itself. I did eventually get a TI-85 data cable, but not in time to save my RPG game code. But I still have a basic idea of how the game worked.
I may try to make the “first game”, which was just a loop of battling and healing in town, with two monsters and an end boss. Then expand it to be more like the second game which was similar, but added equipable items, more monsters, and just more complex game play. If that works out, I can try to add in the map system I had planned to use for a 3rd iteration, written in C, that I had never finished. I do have the code for that floating around.
Josh Miller aka “Ramen Junkie”. I write about my various hobbies here. Mostly coding, photography, and music. Sometimes I just write about life in general. I also post sometimes about toy collecting and video games at Lameazoid.com.
A while back, I talked about a little simple project that I build that produces a daily RSS digest post on this blog. This of course broke when my RSS Reader died on me. I managed to get Fresh RSS up and running again in Docker, and I’ve been slowly recovering my feeds, which is incredibly slow and tedious to do because there are a shitload of feeds, and i essentially have to cut and paste each URL into FreshRSS, and select the category and half the time they don’t work, so I need to make a note of it for later checking and it’s just… slow.
But since it’s mostly working, I decided to reset up my RSS poster. I may look into setting up a Docker instance just for running Python automations, but for now, I put it on a different Pi I have floating around that plays music. The music part will be part of a different post, but for this purpose, it runs a script, once a day, that pulls a feed, formats it, and posts it. It isn’t high overhead.
While poking around on setting this up, I decided to get a bit more ambitious and found out that, basically every view has it’s own RSS feed. Previously, I was taking the feed from the Starred Articles. But it turns out that Tags each have their own feed. This allowed me to do something I wanted from the start here, which is create TWO feeds, for both of my blogs. So now, articles related to Technology, Politics, Food, and Music, get fed into Blogging Intensifies, and articles related to toys, movies, and video games, go into Lameazoid.
I’ve also filtered both of these out of the main page. I do share these little link digests for others, if they want to read them, but primarily, it’s a little record for myself, to know what I found interesting and was reading that day. This way if say, my Fresh RSS reader crashes, I still have all the old interesting links available.
The other thing I wanted to do was to use some sort of AI system to produce a summary of each article. Right now it just clips off the first 200 characters or so. At the end of the day, this is probably plenty. I’m not really trying to steal content, I just want to share links, but links are also useful with just a wee bit of context to them.
I mentioned before, making this work involved a bit to tweaking to the scrips I was using. First off is an auth.py file which has a structure like below, one dictionary for each blog, and then each dictionary gets put in a list. Adding additional blogs would be as simple as adding a new dictionary and then adding the entry to the list. I could have done this with a custom Class but this was simpler.
The script itself got a bit of modification as well, mostly, the addition of a loop to go through each blog in the list, then some variables changed to be Dictionary look ups instead of straight variables.
Also please excuse the inconsistency on the fstring use. I got errors at first so I started editing and removing the fstrings and then realized I just needed to be using Python3 instead of Python2.
from auth import *
import feedparser
from wordpress_xmlrpc import Client, WordPressPost
from wordpress_xmlrpc.methods.posts import NewPost
from wordpress_xmlrpc.methods import posts
import datetime
from io import StringIO
from html.parser import HTMLParser

cur_date = datetime.datetime.now().strftime(('%A %Y-%m-%d'))

### HTML Stripper from https://stackoverflow.com/questions/753052/strip-html-from-strings-in-python
class MLStripper(HTMLParser):
    def __init__(self):
        super().__init__()
        self.reset()
        self.strict = False
        self.convert_charrefs= True
        self.text = StringIO()
    def handle_data(self, d):
        self.text.write(d)
    def get_data(self):
        return self.text.getvalue()

def strip_tags(html):
    s = MLStripper()
    s.feed(html)
    return s.get_data()

# Get News Feed
def get_feed(feed_url):
    NewsFeed = feedparser.parse(feed_url)
    return NewsFeed

# Create the post text
def make_post(NewsFeed, cur_blog):
    # WordPress API Point
    build_url = f'https://{cur_blog["wp_url"]}/xmlrpc.php'
    #print(build_url)
    wp = Client(build_url, cur_blog["wp_user"], cur_blog["wp_pass"])

    # Create the Basic Post Info, Title, Tags, etc  This can be edited to customize the formatting if you know what you$    post = WordPressPost()
    post.title = f"{cur_date} - Link List"
    post.terms_names = {'category': ['Link List'], 'post_tag': ['links', 'FreshRSS']}
    post.content = f"<p>{cur_blog['blogtitle']} Link List for {cur_date}</p>"
    # Insert Each Feed item into the post with it's posted date, headline, and link to the item.  And a brief summary f$    for each in NewsFeed.entries:
        if len(strip_tags(each.summary)) > 100:
            post_summary = strip_tags(each.summary)[0:100]
        else:
            post_summary = strip_tags(each.summary)
        post.content += f'{each.published[5:-15].replace(" ", "-")} - <a href="{each.links[0].href}">{each.title}</a></$                        f'<p>Brief Summary: "{post_summary}"</p>'
        # print(each.summary_detail.value)
        #print(each)

    # Create the actual post.
    post.post_status = 'publish'
    #print(post.content)
    # For Troubleshooting and reworking, uncomment the above then comment out the below, this will print results instea$    post.id = wp.call(NewPost(post))

    try:
        if post.id:
            post.post_status = 'publish'
            call(posts.EditPost(post.id, post))
    except:
        pass
        #print("Error creating post.")

#Get the news feed
for each in blogs:
    newsfeed = get_feed(each["url"])
# If there are posts, make them.
    if len(newsfeed.entries) > 0:
        make_post(newsfeed, each)
        #print(NewsFeed.entries)
Josh Miller aka “Ramen Junkie”. I write about my various hobbies here. Mostly coding, photography, and music. Sometimes I just write about life in general. I also post sometimes about toy collecting and video games at Lameazoid.com.