Last year, we had all the floors in the upstairs main part of the house replaced. When purchasing the flooring, the store we purchased from was running a tiered rebate deal. Essentially, we could buy $500 worth of additional flooring than we needed for the upstairs, and tier up to the next rebate level, which was $500 additional savings. My point is, we basically ended up with a pile of free bonus flooring. The plan was to put some of it down in the basement. It wouldn’t be enough to cover the entire basement, or even half, but it would be a start.
Upstairs has doors and counters, and all sorts of things that make flooring tricky. The Basement, not so much. The basement is essentially just a square with some pillars in it. It’s also a basement, so it doesn’t need to be super perfect. I have put in some similar flooring a few houses ago when we converted the garage to a family room. I could easily do this.
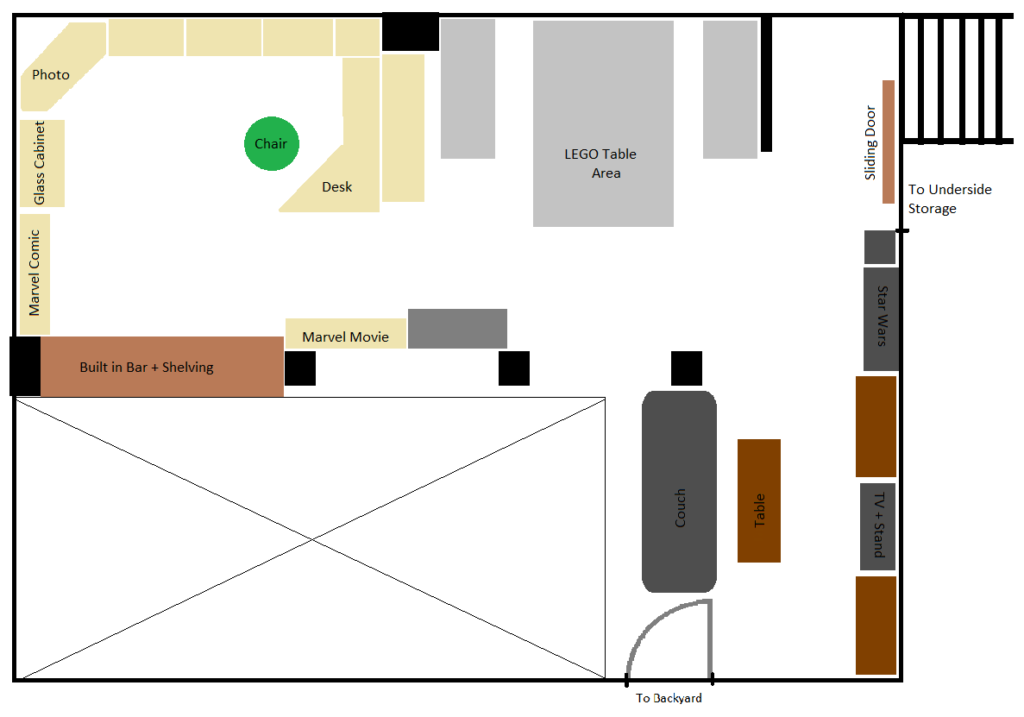
This flooring job also has been sort of the kick off of actually doing a LOT of major work and rearranging to the basement. So I figured it might be useful to have a little map. The basement, essentially has 4 “areas”. My “Office area”, in the upper left quadrant. The “LEGO area” in the upper middle. There is the “TV Area” in the lower right corner of the map. Lastly, my son has an area that constitutes his room, though there aren’t any actual walls there. It is segmented off on one side by a build in bar/counter space and a couple of shelving units in the middle of the room against the support pillars.
FWIW, my son it an adult and spends more time living with his friends elsewhere than he does actually living in our house. Before anyone gets on my about shoving my kid off in the corner.
Also, the basement actually has two halves, one half is used for storage and isn’t particularly finished out in any real great way, which is why I installed the door.
The first step of this project actually wasn’t the flooring, technically. The first step was obtaining some IKEA shelving. I’ve wanted to get some Billy shelves for several years now but I don’t have an IKEA in the area. When I finally was ready to get them, I discovered that IKEA doesn’t deliver over long distances. Which wasn’t helped by well, the current Pandemic. Things seemed to be getting better as far as the Pandemic however, and a month or so ago, I had taken a vacation day to take my wife to a Doctor’s appointment, which got rescheduled. So we opted to drive down to St Louis and go to the IKEA store.
She really liked IKEA herself, being an organizing junkie.
Another step I needed to take before the flooring was prepping the floor itself. There were a handful of nail things sticking out of the concrete, presumably from some previous wall or floor that was once in the basement. Also around each of these was a divot int he floor. I took a chisel and busted off the nails and then filled in the divots with some concrete filler. You can see these spots in the before photo above, where the dark gray spots are on the floor.
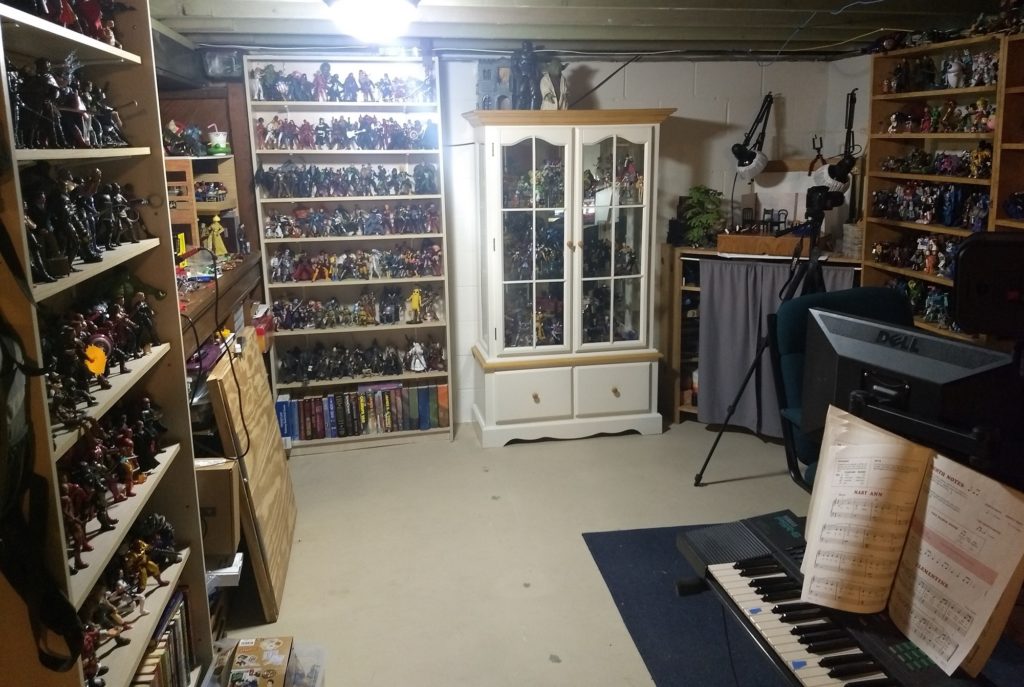
The other large step was clearing out my collection so I could move the furniture around. Despite having quite a lot of room in the basement, I did a lot the shelf clear out while installing the floor. I put a lot of the more durable stuff (Transformers) carefully into a large plastic bin, and then places a lot of the other figures on a long folding table. Another minor issue, my son basically decided he was going to come live with us again, the same day I was starting to do my work. So my original plan of putting up more tables in his space didn’t really work out.
Basically, I started at the back wall, unloading everything to a table or a tote, and moved the shelf, glass cabinet, and photo station out 3-4 feet. I did a final clean and mop of the floor, then laid several rows of the flooring down. Once I had enough flooring, I pushed those furniture pieces back and stacked stuff onto them from the other shelves, so i could move other pieces of furniture.
I also assembled and stood up the 3 IKEA shelves as I went. The other purpose for shuffling the future this way was to help hold the flooring down. I don’t really have an easy way to add trim on the concrete basement walls. So the furniture around the perimeter is what I’ve got.

After everything was finished, I started reassembling my displays over the next few days. I also found that I needed to add a short 3′ extension piece to the power strip feeding my PC, because the new shelving is a little wider than the old combination, and the cord didn’t reach far enough behind the shelves. Other minor electrical change, the Glass Cabinet has a light in it, but the cord switch is a pain to use. I also have an Alexa compatible power outlet I don’t really have a use for. I set up this power outlet so I can tell Alexa to “Turn on the Display Light” and light up the cabinet.
I am pretty pleased with the end result. It’s not perfect but it’s a bit nicer than it was. This has also spawned several additional projects which I’ll blog about in the future.
Josh Miller aka “Ramen Junkie”. I write about my various hobbies here. Mostly coding, photography, and music. Sometimes I just write about life in general. I also post sometimes about toy collecting and video games at Lameazoid.com.