I found a couple of Arduino apps in the Windows 10 App store recently, both put out by Microsoft. There is an app that allows your Windows Phone to act as a virtual shield for an Arduino board which I ave not tried yet, but I set up and ran a quick test of the second app which lets you remotely trigger and monitor the pin inputs and outputs.
I set up a simple circuit with some LEDs on pins 2, 3, and 4, and toggle them from my desktop using the app. There isn’t any special code needed for this, the Sketch used is the StandardFirmata sketch listed in the Arduino app under the example sketches.
There doesn’t seem to be a lot more that can be done with this app. As far as I can tell, it’s not really set up for any sort of customizing such as naming the triggers or causing any sort of action to be taken when a trigger is activated on the Arduino (such as pressing a button to open a URL).
There is some additional information available from Microsoft about setting up Visual Studio to build Arduino projects but I have not tested it yet, I actually have run into an error in Visual Studio when trying to load the projects.
Every so often, I’ve seen the “ethical dilemma” of Self Driving cars come up for debate. Specifically, the scenario goes something like this:
A self driving car is approaching a crowd of children, it can veer off a cliff and kill the occupants, saving the children, what choice does it make? Who is responsible for the deaths?”
Its a dilemma to be sure, but it’s also completely absurd and effectively a non issue, which is an angle no one seems to really look at or realize. This specific scenario is completely absurd because, why are a bunch of children blocking a road on the side of a cliff to begin with? It can be toned down to be a bit more realistic of course, what if it’s a blind corner, maybe the children are just on a street and it’s just a crowd of people and not children. The children are just there to appeal to your emotional “Think of the children!!” need anyway. Maybe the alternative is to smash into a building at 60 mph after turning this blind corner into the crowd of people.
No wait, why was the car screwing around any corner where people may be at 60mph? That’s highway speeds, there’s a reason we have different speed limits after all, open view open areas like highways are faster because we can see farther down the road and we have more room to swerve into other lanes or the shoulder and not into buildings or random crowds of people.
Exceeding the speed limit like that is a human problem, not a robot problem.
So, maybe the car is obeying the speed limit, maybe the brakes have suddenly, inexplicably, failed, and the car simply can’t stop…
No wait, that doesn’t work either. Brakes generally don’t just “fail”. A robot car will be loaded with sensors, it will know the instant the brakes display even a little bit of an issue and probably drive off to have itself serviced. Or at the very least it will alert the driver of the problem and when it reaches a critical stage, simply refuse to start or operate until fixed. Should have taken it into the shop, that on demand last minute fix service call will probably cost you three times as much while you are late to work.
Looks like ignoring warning signs of trouble is also a human problem, not a robot problem.
So what if there simply isn’t time to react properly because it’s a “blind corner”? Maybe some idiot is hiding behind a mailbox or tree waiting to jump out in front of your self driving car. Except this is still more of a human problem than a robot problem.
All of these self driving robot cars, are all going to talk to each other. You car will know about every crowd of people in a twenty mile radius because all of the other cars will be talking to it and saying things like “Yo dawg, main street’s closed, there’s a parade of nuns and children there,” and the car will simply plan a different route.
They will even tell each other about that suicidal fool hiding behind the tree.
Maybe your car is alone, in the dark in a deserted area. First, it’s a robot, it doesn’t care about the darkness, if there isn’t some infrared scanner attached telling it there is someone hiding somewhere, it’s going to still see the obstruction. It will be able to know “How fast could a dog or a person jump out from behind that thing, how wide should I swing around it, how slow should I pass by it.”
It knows, because this is all it does.
Speaking of dogs, or possums, or deers, this also becomes a non issue. The car will be able to see everything around it, in the dark, because it can “see” better than any human. It also constantly sees everything in a 360 degree view. The self driving robot car will never get distracted rubber necking at an accident, it will never be distracted by that “hot chick” walking along the side of the street, it will never road range because some other robot car cut it off (which won’t happen anyway).
It just drives.
And it will do it exceptionally well.
And even if our crazy scenario comes true, even if a self driving car has a freak accident and kills a buss full fo children every year or really every month, it will still kill fewer people than humans kill while driving.
So feel free to waste time debating which deserves to die, the driver or the pack of people, or debate who is responsible, you may as well ask who will be responsible for cleaning up all the poop cars make when they replace the horse and buggy.
Last post, I talked a bit about my new Multi Monitor set up. I mentioned that I use a program called Synergy to handle using multiple machines with one keyboard and mouse. It’s essentially a virtual KVM, only without the V, since everything has it’s own Video disrt play.
It’s not a free program, but it’s not expensive, and it’s well worth it if you use multiple machines in this manner.
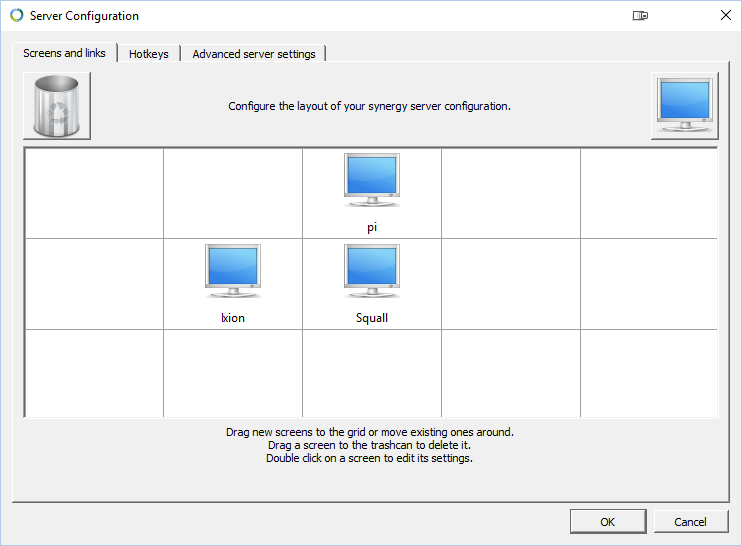
The general gist of it’s use, one machine acts as a server, and other machines connect to it. The server hosts the mouse and keyboard, and the configuration. Out of the box, Synergy actually works kind of crappy with a multi monitor involved such as my set up. The configuration is a simple drag and drop positioning grid, and it doesn’t care about how many monitors are on one system, it assumes one.
You can manually set up a more complex configuration pretty easily. I’d recommend doing a basic set up and making sure everything is working well before delving into the complex realm. I’ve found several tutorials online with complex formulas and jargon but the whole set up, in most cases, is a lot simpler.
Start off with your basic set up and save the configuration file. Now, save it again with some sort of appended name like “edited” or “custom”. This way you can always reload the original working configuration. Also, you can save this configuration anywhere but ultimately the program may need to reload it so I would recommend saving it somewhere handy but out of the way, like Documents or even a folder in Documents.
Now, find the file you just saved and open it in notepad. Find the section labeled “section:links”. This is the meat of how the program knows where to transition. It should look something like this:
section: links
pi:
down = Squall
Ixion:
right = Squall
Squall:
up = pi
left = Ixion
end
Notice the directions, up, down, left, right, these are the edges where transitions occur. You can alter these to make them more precise by adding (x1,x2) to each entry, where x1 is the starting percentage across the screen and x2 is the ending percentage.
If you have some complicated positioning, you can futz out some math on the percentages by using the number of pixels /the number of pixels total, but if you have a fairly simple set up like mine, it’s not hard to generalize these percentages. In my case, this becomes:
Note, that (0,33) is the “first third” across the top of the total width (3 monitors). The other transition is (33,66) or the second third. If I had a third monitor on top, it would end up being (66,100), however since I don’t the mouse stays locked within the monitor on the right instead of transitioning anywhere.
With my original generic set up, any upward movement always went to “pi” and going off the left hand edge went to “Ixion”. In the new set up, everything behaves as expected in a seamless up, down, and across fashion.
I just wanted to take a moment to share my new multi monitor set up. Many years ago I was turned on to the idea of using two monitors at my previous job. having the extra desktop space was great and we ended up adding a second monitor to a lot of the desktops in the office.
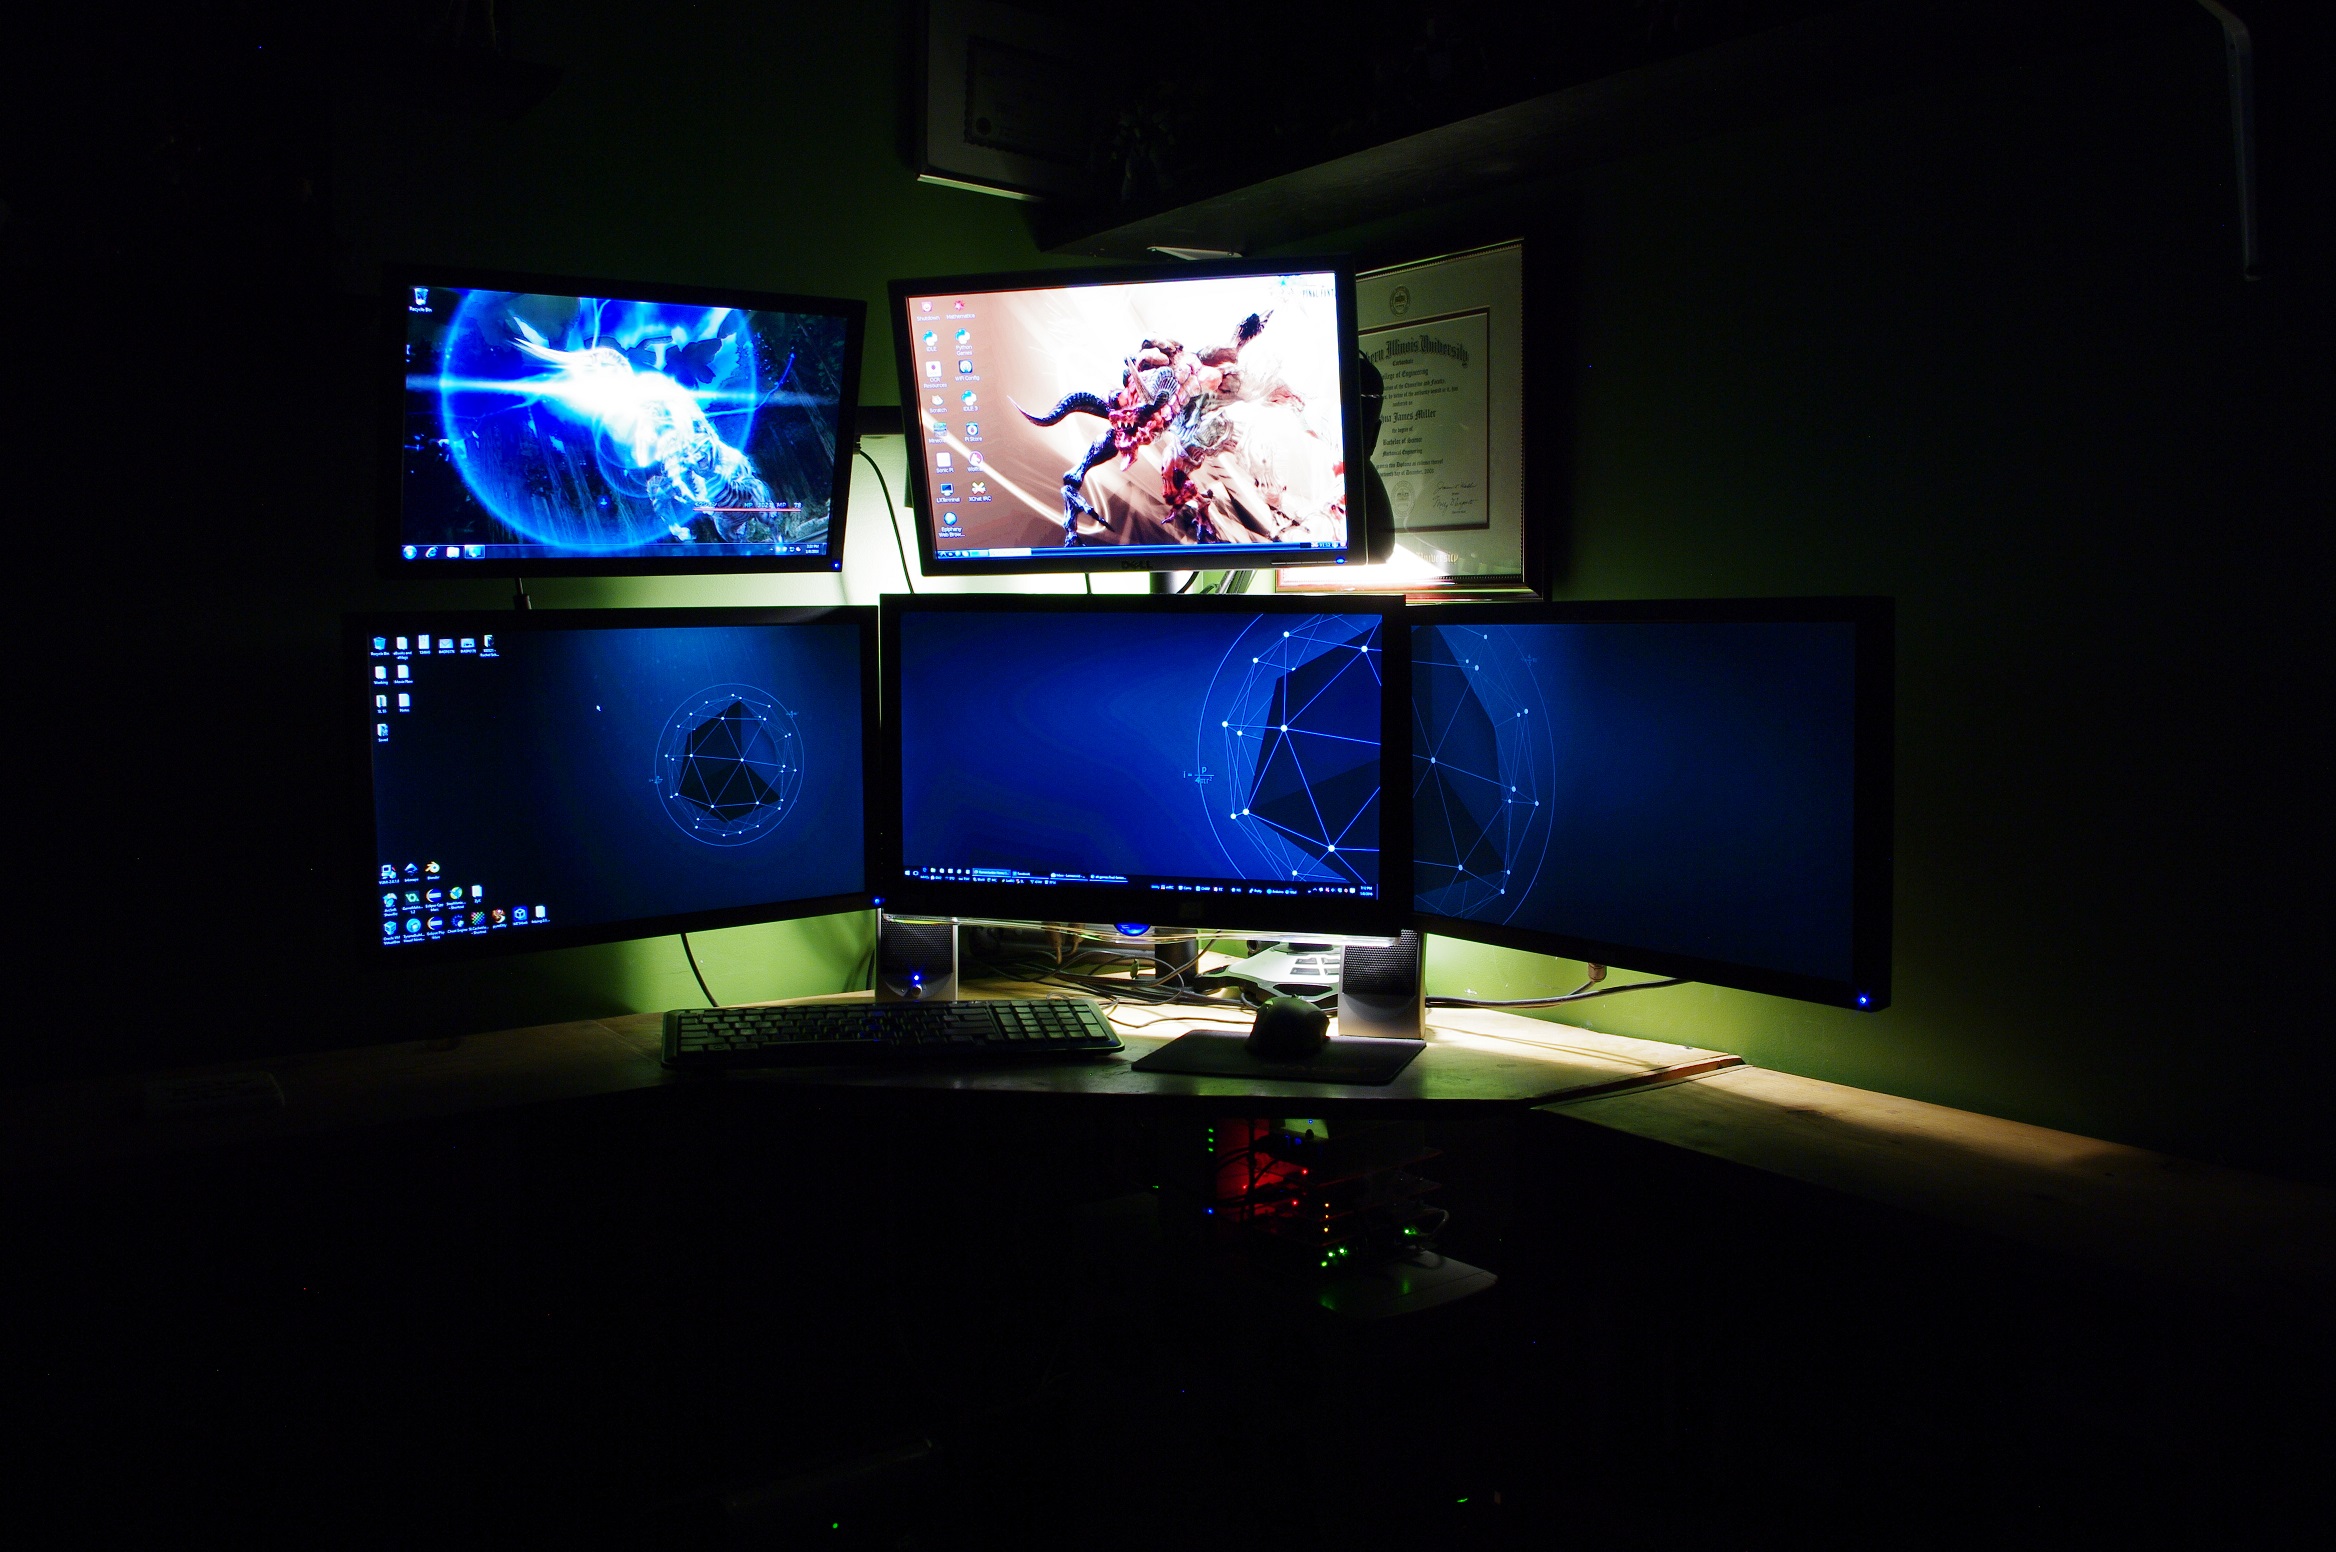
After building my home office PC, I ended up gathering a few more monitors second hand and eventually had a triple monitor set up at my desk. I’ve been planning for a while to get a stand that would hold all of the monitors together and clean up desk space but kept putting it off. When I finally set out to order a stand, I found I could get a 6 monitor stand for almost the same cost as the 3 monitor stand I was looking at, so I figured why not.
So the stand arrived, I used a drill and a hand saw to chop a slit in my desk to slide the mount into, and I went about mounting things.
Unfortunately, the monitor stand isn’t quite designed to fit in a corner, and my monitors are just just just too large to fit on it properly. Fortunately, I noticed the arms are set up with a long part and a short part, on all four arms. So I disassembled the arms on the top half and reassembled things so that each of the lower arms had two long bits, which was perfect for the lower monitors to fit together.
Back on an unfortunate note, this means that the upper arms are both really short. I opted to just pull the one arm off and use just the two monitors on the above section.
This also means I have space to rotate the lower right hand monitor into a vertical alignment if I feel like it.
So why does one need so much screen real estate for. I’ll admit, it’s probably overkill, and three is probably the most that is really necessary here. The upper monitors are mostly used for peripheral uses. The three lower monitors are all hooked to my desktop, I keep Facebook Messenger and Thunderbird (email, Usenet) on the rightmost one, the browser on the left one, and the center one is reserved for whatever the focus is, a game, Photoshop, video editing, sometimes the browser.
The upper center monitor is hooked to one of my Raspberry PiB2s and has XCHAT running connected to my ZNC server. This is also the same Pi that I host a Minecraft server from. I tried running Xchat off of the same PiB+ that runs the ZNC server but the lag made things unusable. The B2 runs things way better than the B+.
The upper left monitor is still kind of undetermined. It’s limited since it only has a VGA input on it for starters. Once I get my CHIP with VGA adapter I may stick it on the back of the monitor. For now I dug out an old Netbook and use it to monitor security cameras. I’ll probably also use it to display a home automation dashboard if I ever get around to building such a thing with my Arduino boards. It currently runs Windows 7, mostly because I haven’t been able to find any software on Linux to monitor multiple IP cameras. The only one available isn’t free, which wouldn’t be a problem but it uses an asinine license system so it’s a reoccurring yearly cost and it’s not cheap.
I really refuse to pay for “license” style software that isn’t constantly providing some some sor tof regular upkeep/service. A stand alone self run product really shouldn’t cost yearly, but that’s a rant for someplace else.
Everything is tied together using a really nice piece of software called Synergy.
On a technical note, each of the lower monitors is 21″ across the diagonal and the upper monitors are both 19″ across the diagonal.
I just want to start here by saying CHIP is kind of a shitty name for a computer thing, there is no effective way to do any sort of search for “Chip computer” since “computer chip” has been a thing for eternity and gives the same results. This thing really needs a re-branding or something.
I’m also not entirely sure it’s still an $8 computer, It looks like they are charging $9 now on their website, and there is shipping costs involved.
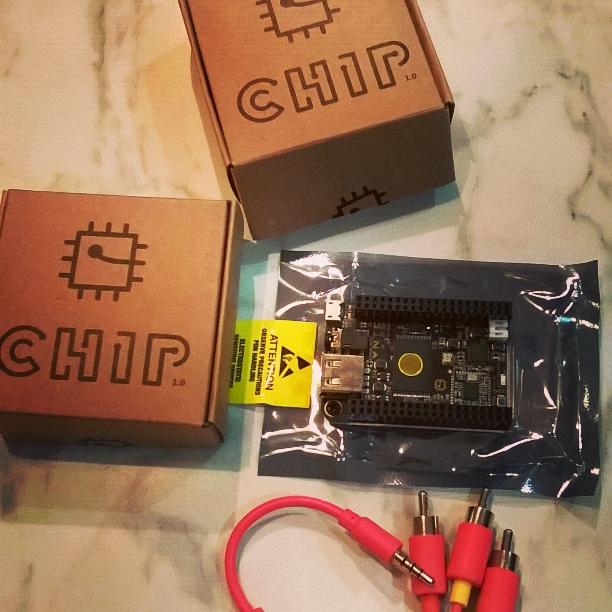
Anyway, I’ve received two of these cheap computers from my Kickstarter contribution. I have a third one coming in 4-6 months that will include a VGA adapter. For some reason all of the peripherals are delayed. I wanted to get a December release CHIP and they offered the option to buy more once the Kickstarter ended, so I ended up with two.
CHIP is essentially a micro computer in the vein of the Raspberry Pi, though it’s more like a Pi Zero than the larger models. The main advantage the CHIP has over the Pi Zero is that it has built in WiFi and Bluetooth.
I’m not entirely sure what I want to do with these yet, though I have some ideas. They are almost as cheap as my Arduino clones (probably cheaper once I add WiFi to an Arduino), and they have a slightly more versatile interface since it’s running Debian Linux. It would be really simple to add a basic web server to this device.
The board itself seems sturdy enough. It comes in a plastic cradle that covers the bottom and three of the 4 ports are on one end which is convenient. There is a normal USB port, a micro USB for power, and a headphone style jack that has an A/V breakout cable to hook it to a monitor and speakers. The molex style battery connector is on the opposite end. The base set up only has composite output for video, the breakout cable gives you a standard Red, Yellow, White set of hook ups.
I hooked both of my CHIPS to a TV so I could easily connect each to the WiFi in my house. Once they are online the video isn’t really necessary since I can SSH to them over the network using Putty.
On a side note, the default SSH log in information is username: root, password: chip .
I have not done much else with it yet, but it’s a nifty little device. I have a vague idea of building a Podcast radio for my car out of one with some push button controls but I have not checked if there is a CLI based podcatcher available, or even a CLI based audio player I could tie push button commands to.


Self Driving Cars
Every so often, I’ve seen the “ethical dilemma” of Self Driving cars come up for debate. Specifically, the scenario goes something like this:
A self driving car is approaching a crowd of children, it can veer off a cliff and kill the occupants, saving the children, what choice does it make? Who is responsible for the deaths?”
Its a dilemma to be sure, but it’s also completely absurd and effectively a non issue, which is an angle no one seems to really look at or realize. This specific scenario is completely absurd because, why are a bunch of children blocking a road on the side of a cliff to begin with? It can be toned down to be a bit more realistic of course, what if it’s a blind corner, maybe the children are just on a street and it’s just a crowd of people and not children. The children are just there to appeal to your emotional “Think of the children!!” need anyway. Maybe the alternative is to smash into a building at 60 mph after turning this blind corner into the crowd of people.
No wait, why was the car screwing around any corner where people may be at 60mph? That’s highway speeds, there’s a reason we have different speed limits after all, open view open areas like highways are faster because we can see farther down the road and we have more room to swerve into other lanes or the shoulder and not into buildings or random crowds of people.
Exceeding the speed limit like that is a human problem, not a robot problem.
So, maybe the car is obeying the speed limit, maybe the brakes have suddenly, inexplicably, failed, and the car simply can’t stop…
No wait, that doesn’t work either. Brakes generally don’t just “fail”. A robot car will be loaded with sensors, it will know the instant the brakes display even a little bit of an issue and probably drive off to have itself serviced. Or at the very least it will alert the driver of the problem and when it reaches a critical stage, simply refuse to start or operate until fixed. Should have taken it into the shop, that on demand last minute fix service call will probably cost you three times as much while you are late to work.
Looks like ignoring warning signs of trouble is also a human problem, not a robot problem.
So what if there simply isn’t time to react properly because it’s a “blind corner”? Maybe some idiot is hiding behind a mailbox or tree waiting to jump out in front of your self driving car. Except this is still more of a human problem than a robot problem.
All of these self driving robot cars, are all going to talk to each other. You car will know about every crowd of people in a twenty mile radius because all of the other cars will be talking to it and saying things like “Yo dawg, main street’s closed, there’s a parade of nuns and children there,” and the car will simply plan a different route.
They will even tell each other about that suicidal fool hiding behind the tree.
Maybe your car is alone, in the dark in a deserted area. First, it’s a robot, it doesn’t care about the darkness, if there isn’t some infrared scanner attached telling it there is someone hiding somewhere, it’s going to still see the obstruction. It will be able to know “How fast could a dog or a person jump out from behind that thing, how wide should I swing around it, how slow should I pass by it.”
It knows, because this is all it does.
Speaking of dogs, or possums, or deers, this also becomes a non issue. The car will be able to see everything around it, in the dark, because it can “see” better than any human. It also constantly sees everything in a 360 degree view. The self driving robot car will never get distracted rubber necking at an accident, it will never be distracted by that “hot chick” walking along the side of the street, it will never road range because some other robot car cut it off (which won’t happen anyway).
It just drives.
And it will do it exceptionally well.
And even if our crazy scenario comes true, even if a self driving car has a freak accident and kills a buss full fo children every year or really every month, it will still kill fewer people than humans kill while driving.
So feel free to waste time debating which deserves to die, the driver or the pack of people, or debate who is responsible, you may as well ask who will be responsible for cleaning up all the poop cars make when they replace the horse and buggy.