New Desktop Upgrade

My new desktop I mentioned at the end of my last post arrived. I am fairly good about adjusting my workflow when changes or upgrades happen, but this particular change in it’s nature, is incredibly disruptive. My whole process kind of stems out from a source, which for the most part, is either my laptop or my desktop. If I were to get a new laptop, not much would change. Most of that workflow runs off of shared drives or cloud files. On the base level, the desktop works the same way, the real trick I get to deal with is the ripple effect downstream, which I will get more into in a bit.

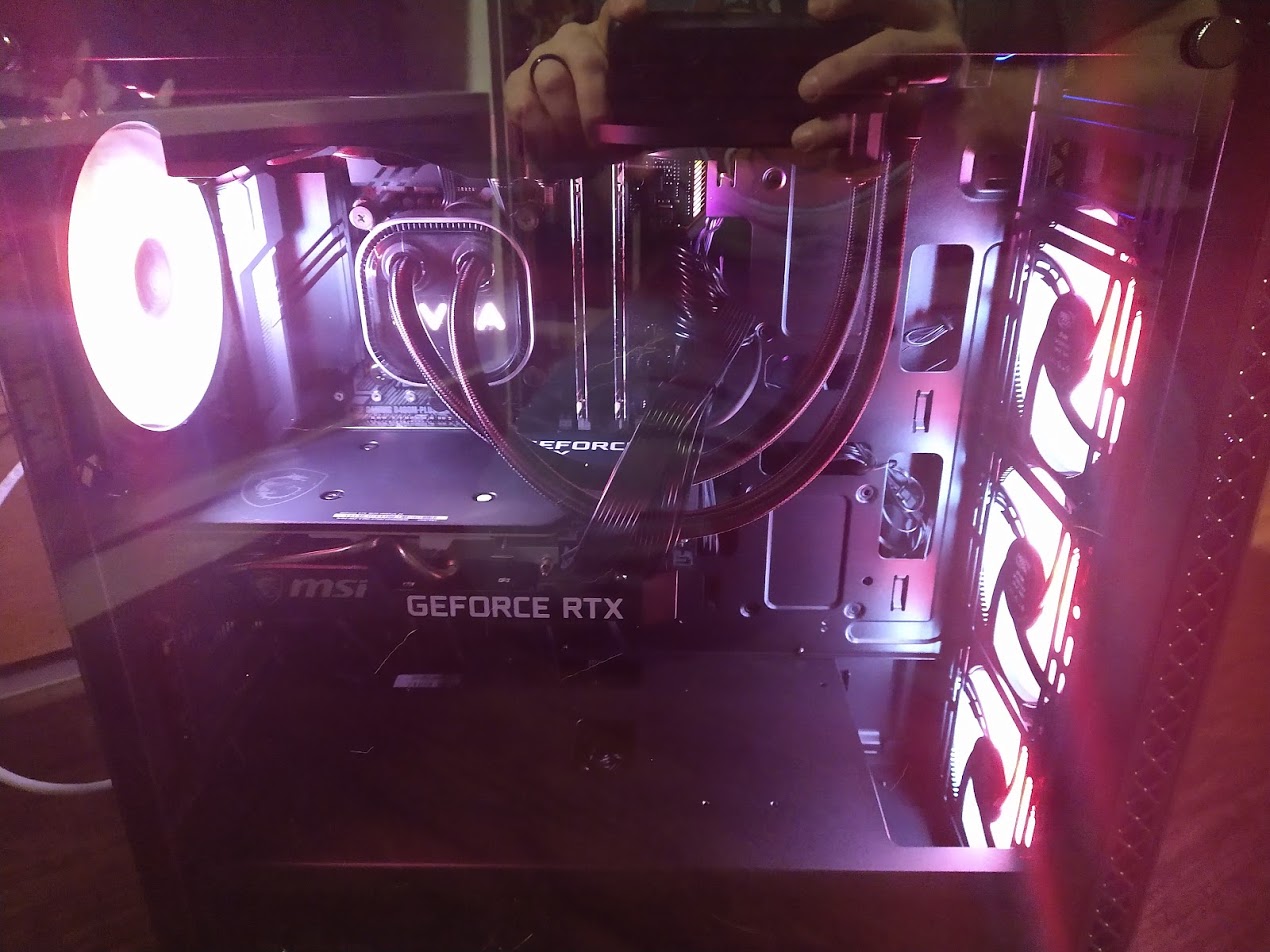
The machine itself runs fine. It’s much much quieter than I expected it to be, which is nice. The crazy Neon lights aren’t as slightly annoying as I expected, especially once I figured out how to adjust them to be a more toned down, non pulsating, single, cooler color. The day after ordering, I realized that I might need new monitor cables, I checked and sure enough, all of the outputs save one are Display Port. My old set up consisted of a display port adapter, a DVI port and an HDMI out, all three to DVI on the monitor end. I may update the monitors later but it’s not necessary now.

The inside is crazy empty and clean. I’m not quite sure yet where I would even put additional hard drives, though I suspect they mount to the sides.

It certainly handles every game I’ve thrown at it incredibly smoothly even with maxed out graphical settings. My current plan is to keep this machine relegated mostly for gaming (a bit more on this later), so i will keep it fairly clean and free from excess software. So far I’ve tried it out with Forza Horizon 4, Overwatch, Black Desert Online, Minecraft, Control, Quake 2, and Quake 2 RTX.

The RTX is really quite remarkable. The reflections are really neat and the shadows work very well. I look forward to finding more titles that take advantage of the ray tracing capabilities.

The Ripple Effect

Where the real change is happening is down the line. For the sake of maybe alleviating some confusion, I am going to go ahead and use the Network names for my computers. The old workflow consisted of my Windows 10 Desktop, Squall, that I originally put together back in 2012. It still runs everything perfectly fine, since 2012, I’ve bumped up the RAM quite a bit, updated to an SSD, and updated the video card to a 1050ti. Sitting under the desk next to that was Rinoa, am even older box, that I am pretty sure I got second hand somewhere, running Xubuntu Linux. Xubuntu because, it’s only 32bit hardware. It’s primary function was being a web server, for my Dashboard, and a file server. It’s got several old drives in it all shared on the network to dump less important files to, because I’m a digital packrat.

The new machine is Cloud. See a pattern here yet. If it helps my laptop is Selphie, my old laptop was Rikku, my old project server years ago was Quistis and before that Yuna, my family’s laptops are Ivine, Barret,and RedXIII. They are all Final Fantasy characters.

Rinoa running 32bit hardware has been a problem for a while. Several interesting projects I have found needed to run on a 64bit system to get up and running. It’s also woefully under powered for anything robust, like running a Minecraft Server. Rinoa has been desperately in need to replacing for a while. Which is where Squall comes in now. Squall, will become the “new Rinoa”. Squall will become the new project server.

Making this change isn’t easy, it’s still not done, and I’ve been working on it for the last week. Squall is also a much more capable machine, so it changes the workflow a bit. Where Rinoa ran headless, I’ve decided to keep Squall on one of my three monitors for now, and work with it using Synergy. I can offload the load of doing things like, running the web browser off of Cloud to Squall if I want. I also can use Squall for Discord and IRC.

The first thing I decided to do was to move the Web server aspect to a Raspberry Pi. I already had a Pi running a LAMP stack to host my WordPress Archive blob. Moving the basic Dashboard was easy. Copy the files, import/export the database, and it worked, no problem. The harder part was moving the backend processes. I’ve started doing a lot of combination projects, that often consist of some sort of Python or Bash script running that dumps data to a database, and a web based GUI. Like the Network Map, or my rudimentary Twitter Scheduler or the web based Download Queue system for a particular web video downloading software that shall not be named. Getting these to work on the Pi is trickier. Partially because I’d forgotten some steps. For example, I created some environmental variables to open the database with scripts, so I didn’t have to put raw log in credentials in them. I forgot how I had done that, so I converted them back to raw log in credentials for now. I have others that are looking for commands from packages that need to be installed that I’m not sure are available on the Pi.

I’ll get it worked out, I just need a bit more time.

I’m also not real sure I want to move TT-RSS to the same Raspberry Pi, just because it’s constantly polling. I am not sure I want to run that level of read/write on an SD card and risk losing my other files. I will probably just set up a second Pi JUST to run the TT-RSS Server.

The other major thing to move is the files. I started off by consolidating everything, for simplicity’s sake. I converted and consolidated up my video files on my NAS recently, which freed up a lot of space. I’ve been meaning to re-allocate some files off of Rinoa back to the NAS and I used the move as an excuse to do just that. At the same time I consolidated the remaining files onto the largest of the various drives in Rinoa, so I can start off by just moving one drive to Squall, to reshare on the network. Moving the webserver to the Pi also meant giving the Pi an extra USB drive, for more storage. The Video Downloader that Shall Not Be Named, pulls video files, which are larger. I set up a new network share from the Pi for “Working files” and moved all of the “working Files” folders from Rinoa to the Pi.

The process overall isn’t complicated, it’s just time consuming with large data moves and some configuration changes.

Physical Set Up

Another aspect to adjust was the physical set up. Initially I just pulled Rinoa out and stuck Cloud in it’s place on the floor. This was partially done because this was the best solution for cable lengths available until the new Display Port cables arrived. I’ve got some pretty good cable management going on and I am not a fan of cables just hanging all over, a side effect of 15 years of working around equipment racks with impeccable cable management standards. Once the monitor cables arrived, I undid everything and reran all the cables, putting Squall on the floor and Cloud up on the little floor shelf under my desk. The main downside in the end is that the cleaner cable solution puts the large side window on the new PC against the backside, so I don’t get to see inside my PC all the time. Thankfully, I’m not a big fan of this aspect of the machine to start with.

Rinoa is going to just sit behind the monitors on a shelf for a bit until I finish with her, but in the end, the plan is to retire that machine out.

Going Forward

I am actually almost more excited about the prospect of molding Squall into the new Project server than I am the flashy new Gaming Rig. The 64 bit hardware and 24gb of RAM means I can do a whole hell of a lot more than I ever could with Rinoa. I can set up a massive Minecraft server with a whole heap of worlds available. I can run Docker and everything that goes along with that, I can set up a robust and speedy OpenSIM world if I want. I also plan to continue to use Squall as my Video Edit machine, no need to bog down Cloud with all that extra overhead in software and disk space. I also can much more easily start playing around with VMs.

I could have done a lot of this before of course, but I find keeping all of that up and going on a machine you are also using for day to day use and gaming gets distracting, and you start running into resource use issues much more quickly.

A Long and Short Journey with Dogecoin

Something something, I am not a financial advisor and am not giving financial advice.

Everyone is talking about Dogecoin in the last few days. I’m not sure why exactly, there are a thousand different Crypto Currencies out there and DOGE isn’t new. Personally, I do not follow Cryptocurrency at all. It really feels like it’s just a digital MLM scam. Sure, people are making money but the long term use and sustainability isn’t going to last. People like it now because it’s all “deregulated” but at some point, if it ever became big enough to be mainstream, it’s going to become regulated, which would kill the appeal. It doesn’t help that your regular everyday person has no idea what Crypto even is. The best quote for “what is crypto” I’ve seen floating around…

“Imagine if keeping your car idling 24/7 produced solved sudokus you could trade for heroin.”

One of the most common points I see is that “Crypto is just as real as the dollar (or any other currency).” This is of course because the dollar is “worth” what it is “only because the US government says it is”. Which honestly is kind of a misrepresentation of why a dollar is worth a dollar, but ok, lets go with that. Dogecoin, or any crypto, is “worth” something, because a bunch of speculators trying to get rich quick and not be holding the bag when everything collapses say it is worth something. The Dollar is worth something because the entire economy of the US, and a lot of the world, and the Government, backed by it’s people and an army and a general long term trust, says it’s worth something. So technically the original statement is true, but in reality, the level of backing on the dollar is much larger than that of a bunch of random kooks online.

Anyway…

Back in 2014, Dogecoin got big on Reddit. It was literally just a meme making fun of Bitcoin and people were using it as a sort of upvote/award system with Dogetipbot. Which was fun. I bought around 5000 DOGE for around $5. I got some tips, I gave some tips, eventually I stuck in all in a local wallet and I think the Dogetipbot broke so the whole thing kind of gotten forgotten about.

Then, this year, for some reason, Dogecoin started booming. Fortunately I had my old wallet. Unfortunately, syncing the last 7 years of blockchain takes a long time. It took something like a month to get my wallet in a usable state, and the software felt really buggy, requiring many restarts to kickstart the sync. Suddenly my 5000 DOGE was “worth” about $1500. I admit I got a little caught up and figured, I’d see how far it would go. Everyone says they want to take it to a dollar per DOGE. Let’s see if that happens.

I could see the hype taking it to a dollar. I really can’t see it every getting to Bitcoin levels of thousands. At the very minimum, it would take long enough that by the time it happens, the Governments of the world would have started regulating crypto to the point where it all mostly died off anyway. DOGE kept climbing, fifty cents, sixty cents, seventy-five cents. At some point, I decided that if it managed to reach a dollar, I’d go ahead and buy myself a new PC. I’ve been considering updating my desktop, some of the components are around ten years old (the Processor specifically), and what better to spend my sudden surge of fake money on. I also decided to buy a pre-build machine. The main thing keeping me from working towards an upgrade was how hard components are starting to be to acquire, a lot thanks (no thanks) to crypto mining.

I found I could buy directly from NewEgg using BitPay, so I prepped up half my DOGE into a Bitpay wallet. When it got up to seventy-five cents I was really close to just going ahead and pulling the trigger. I got to a point where I cared more about my PC upgrade than the DOGE. I even dumped a bit more into my BitPay, ready to use. I also figured I should pull the trigger at eighty or ninety cents, since it seemed like a lot of people were planning to dump at $1.

But then I saw news about Elon Musk going on SNL, and being a mechanism to propel DOGE to $1. I’m not a fan of Elon Musk at all, for reasons I’m not getting into here, but I figure if anyone can make this go up, it’s probably Elon Musk. So the decision was made to just wait for SNL.

Then Elon was on SNL, and DOGE dropped from $0.70 to around $0.50. It seems to have leveled off around this point as well, even dropping a bit at times. At this point, I had to remind myself, that I am not a “cyrpto guy” and I have no interest in becoming a “crypto guy”. This was just a dumb meme that I had jumped on years ago.

Long story short, I dumped the rest of my DOGE into BitPay, and ordered up a new kick ass gaming desktop PC.

I am now super looking forward to running games in blazing FPS with RTX and all the Ultra Super Graphical bells and whistles. In the meantime I’ve got to work on shuffling some files around to make everything work once the new desktop arrives. I currently run two desktops, one is my “main PC” and the other is an old 32bit Linux PC that mostly serves as a file server and a web project server. I don’t need to run 3 PCs and the 32bit PC has been a thorn in my side for a while with it’s 32bit limitations, so I plan to shift my current main desktop to be the new Project server and dump the old Linux machine. I look forward to being able to actually host a sweet Minecraft server and OpenSIM server and getting the chance to better learn how to use Docker.

Organizing Digitally – Backups

Backups are the real key and benefit to digital media. It’s also best to have a multi layered plan for back ups. Specifically, i like the 3-2-1 plan that is often pushed. Three copies, Two different storage devices or media, One copy off site. I would like to add that it’s best if at least one of these is automatic. Ideally, you should have some sort of versioning, in case the backup becomes infected or locked by malware, but that tends to be more costly to do, and it’s kind of overkill unless your data is absolutely mission critical.

Old Backup Methods\

I wanted to touch on some old back up methods I’ve used over the year before going on to my current set up. Many of them were alright, but often had pitfalls. Though I am sure my current system has holes as well, it works well enough, for now.

The classic “oldest” would be CD-Rs. And an extension of this with DVD-Rs. I have not really relied on this method for something like 15-20 years but it’s one of the easiest methods of doing back ups of important data. Burn the data to disc, label the disc, store it away, A plus is that if you date the discs, you can also end up with redundant copies easily, in case one disk is damage or fails. Basic DVDs do have a shelf life, though which is a downside. There are long lasting archival discs available, and I’ve actually considered adding these into my Backup workflow again. I have since pulled all of my old archival DVDs and CDs forward to more modern solutions and sorted the data.

For a while I used a large capacity USB drive. It was something like 500GB, which was huge at the time. Eventually, unfortunately, this drive failed. I had also failed to have a second copy of the data, it was just an archive of data, so, while I managed to recover a lot of the data, I lost some family photos files.

For a while I used Amazon Photos as a backup. This worked fairly well, I get unlimited storage with Amazon Prime for photos. There were still several problems with this method. One, it was unlimited for Photos ONLY, which meant videos absolutely had to be sifted out since other files were limited to a measly 10GB. Eventually support for the automatic part that worked with my NAS was ended as well, so that pretty much killed that as a reliable backup. It also was flaky when deleting files. My wife had sorted out out photos and deleted fuzzy or duplicate images, and many returned and were re-synced from the cloud copies. To get around this I had to disable and disconnect the backup, purge out everything int he cloud, then let it re-sync entirely up after she finished sorting files. Not ideal.

Google photos has similar problems, coupled with Google’s new policy removing unlimited photo back ups. There also isn’t an automatic API based sync on my NAS for Google Photos.

One Drive

After shopping around on several different systems compatible with my NAS, I went ahead and chose One Drive. Specifically, Office 365 Family. I’ve considered subscribing since Office 365 was launched and based on quick rough calculations, for the same cost of something like Amazon EC2 or Glacier or Backblaze, or whatever (I can never keep all these names straight honestly), I decided I could get Office 365 Family instead, which effectively gives me 6TB of storage to work with. O365 Fmily gives 6 accounts 1 TB each. I also have 5 members in my family, all of which use Office to varying degrees (currently using an outdated copy I purchased for cheap through a work program). Except none of them are ever going to really use a lot of that 1TB, so I could easily create connections as needed through the NAS to sync backups to each account.

For now, most of the data sits in two accounts, mine, and a new account created solely for core backups. The fun part is, I could even manually push data up to one of the other accounts occasionally (say, yearly), as a slow backup if I wanted. The Core Backup has all of the Family Photos and Videos and a folder of important documents like taxes and bill statements etc pushed to it. My Onedrive has a copy of my personal document archive and personal photos archive.

The nice bonus is I can now access my documents more easily from anywhere. One Drive sharing also allows me to access the backup drive, using my main account. It also all syncs automatically, even though primary access to these files is all done over network shares. Plus it’s more reliable than Amazon Photos.

I also dumped Dropbox in favor of One Drive, with this new storage available. I had mostly been using Dropbox as a sync for “working files” between my laptop and desktop. Now I just use One Drive.

Flash Drives and Regular Drives

But hey, 3 copies right? More can be better though. I bought a couple of large capacity flash drives that I dump all of the family photos and important files to on an annual basis. These go in the fire safe.

Three Copies, Two (Three) different media types, One off Site.

I also have an external USB adapter for SATA Drives, and a pile of drives in storage. For general “data security”, I basically never throw out old hard drives. When I donate an old PC, I will always strip out the drive and dump it into storage somewhere. These are not always large drives, but they do usually still work. Hard Drives also have a longer shelf life than Flash Drives, so occasionally I will make a sort of “Deep Archive” copy of the data to a spare Hard Drive, that gets wrapped in a static bag and stored away.

The entire point of all this, is basically to avoid ever losing data again, like when my old USB drive crashed. It’s not 100% bulletproof, but it’s good enough that little damage could easily be done. If there were some sort of ransomware attack, I always have the drives backups, even if it got synced to One Drive. If the house burns down, there is always the cloud.

Organizing Digitally – Photos

On the surface, it seems a little goofy to separate Photos from Videos, but the reality is, both of these formats really deserve separate handling. For one, when backing up Photos, a lot of solutions will give you unlimited photo storage, but not unlimited video storage. Which makes automatic backup tricky.

Video is also rather massive compared to photos, from a file size perspective. A side effect of this is that having videos mixed with photos can dramatically increase load times when browsing photos later, since it takes more for the file system to chug through a video for thumbnails etc.

I have effectively two sorting systems for photos, depending on what the photos are. Also, unlike the videos, my wife does a lot of the actual sorting of Photos, at least the family photos, since she uses them for scrapbooks and such.

Family Photos

Similar to videos, I sort family photos by year, in one large blob. The difference is, I also sort them into folders by “event”. For example, there might be a folder, “2019.12.25 – Christmas at Home”. The extra details are helpful, because there might also be, “2019.12.23 – Christmas at Josh’s Parents” and “2019.12.26 – Christmas at Tina’s Parents”. (NOTE: I use the actual names of our parents). One minor mistake I made early on when I was doing all the sorting, was labeling them things like “Christmas at My Parents”. I changed all of those to be my parent’s names. I might also use “Christmas at Home with Josh’s Family”.

These folder names allow for easy sorting by date, and it allows a quick, at a glance description of who might be in the photos. I have tried several different Photo Organizing software solutions, and frankly, nothing beats just using the straight file system folders. The nice thing is a lot of software solutions will use the Folders as a way or sorting, so using these folders means the photos can easily and quickly be imported.

Each year also may have some more generic folders. These are catch all folders such as “2018 Cat Photos” or “2012 Kids School Artwork”. There might also be folders like “2014 Misc”, which is where less eventful photos might go. This would be things like, 1-2 lone photos at a local fair event, or single photos of weather or something at the house. They don’t deserve an entire folder, but they are still in the correct year.

Other Photos

I labeled this as “other photos” but it’s mostly just my photos. I take a lot of random photos of my toys and electronics projects, and random crap that is mostly unimportant. I keep these photos separate from the Family Photos, mostly because it’s just clutter my wife doesn’t care about, but because they are just different in their core nature.

These are sorted instead by type. For example, I might have folders for “Toys” then inside, “Transformers”, “Marvel”, “Imports”, “LEGO”, etc. Within those folders, I often will break it down further by lines, or individual figures, since I (used to) take little galleries for use in reviews. Other folders are broken down the same way, photos of projects, photos of electronics, photos of random scenery, sorted down and categorized.

We also use a similar set up for eBay photos, though I don’t really take any of those. I have a shared folder JUST for eBay photos, so my wife and daughters can keep everything sorted and together for the work they do selling on eBay and other online store fronts.

Not Photos

I do something similar with images that aren’t photos as well, though I don’t later back any of these up. Because I am a digital pack rat, I save a ton of random memes and images from the internet. I have a monthly reminder to clean my phone off. These files all dump onto my laptop in a folder named for the year and month, then these images are manually sorted down based on what they are. I’ve honestly gotten better about not just saving piles or random images lately.

Regular Consolidation

Speaking of the Monthly reminders, this system works best if it’s kept up regularly. I have a monthly reminder to offload my phone files, but this only works if I actually DO the sorting, which I make a point of doing.

We have also started regularly dumping everyone’s phones once a month. Though not necessarily removing the files, that’s up to everyone individually, everyone in my house is an adult at this point. But we still consolidate photos as needed for events or activities, since it’s not uncommon for say, my daughter to be taking photos at Christmas, that my wife may want to use in a scrapbook.

Old Photos

I have not gotten as far as I’d like in this project, but I have also started work scanning and archiving older printed photographs. It’s nice to have these digitized since it means they can be archived and backed up and even reproduced for scrapbook albums or whatever. My wife has made scrapbooks for each of our three kids, generally for each year (sometimes two) and so she often uses multiple copies of the same photograph.

Consolidation

The other good part of having everything together is it makes it way easier to keep backed up. I plan to do an entire separate post on the overall backup process, but having things consolidated, makes it way easier to manage and ensure everything is being captured and saved.

Organizing Digitally – Videos

While I have been pretty diligent about organizing my Digital Photos, for the longest time I have severely neglected my Digital Videos. Partially because I didn’t really have any good/easy way to watch them, partially because they were just… sort of a pain to deal with.

That isn’t to say that I don’t know how to work with video files. I have worked in the technician back end of the broadcast and cable television industry for over 15 years now, and I have done end to end production (recording, editing, mastering out) of some local events in the past. Granted, I’m not adding tons of graphics or after effects, but I do know what I am doing. The real issue is that it’s super time consuming, on top of the thankless part mentioned above, of no real convenient set up to watch them.

VHS Tapes

In 2020, I decided it was time to fix this problem. It sort of started with my wife asking if I could digitize all of her mother’s old VHS tapes of family events. This actually ended up being slightly trickier than expected. First off, I sort of had an old VCR, but it died halfway through the process, which is why it was a “sort of” to begin with. I borrowed her mom’s VCR to finish the task. The second issue was the input to the PC. I have 3 or 4 different types of digital capture devices that take RCA and cable input, but getting Windows 10 to recognize these is extremely hit and miss, even with the correct drivers.

At one point we were going to set up my daughter to do the recording part, so she could review them as she recorded them. After trying for too long, I simply could not get her laptop to recognize any of the capture devices. In fact, I could not get any of the laptops to recognize them. Using numerous different drivers, including pulling the drivers from my Desktop (where it does work) off. Even my desktop only ever manages to work with one of these devices and occasionally requires a reboot to get it to show up at all.

I’m not sure if it’s old hardware in the Capture cards or just old technology.

The second issue is recording software. There are a fair number of older TV tuner software packages out there, but as near as I can tell, most of them are also not particularly compatible with modern operating systems. What I did find worked well though was OBS, or Open Broadcast Software. It was a simple matter of adding the capture device in as a source, it basically shows up as a web-camera, then using OBS’s record function. I’d already been doing something similar doing screen captures of some concerts, so that workflow was already there.

This all leads back into the “It takes a lot of time” aspect of the original issue. There isn’t any quick way to digitize a VHS tape. You stick it in, hit record, and wait for however long it plays out. I also didn’t want stray sounds showing up in the recording (despite setting up OBS to only capture the VHS input, I just didn’t trust it), plus I didn’t want to accidentally create any heavy lead moments that might glitch the recording, so recording also meant not actually using the PC during this wait.

Digital Videos

I also had a ton of digital videos piled up and semi sorted, and somewhat renamed. I’ve used at least half a dozen cameras over the past 15+ years of recording family videos, plus probably another dozen of phones from old flip phones to cheap androids, to better androids. Each includes it’s own file naming scheme and slightly different file format.

One problem I came across as I started compiling everything into the Synology Video server, was that not every format was compatible for playback. This meant finding a format that DID work, and converting everything to match. I kept an archive on an old drive of the originals “just in case” but I set about using FFMPEG to convert everything to a compatible, size efficient mp4 format.

I did this on my secondary project server, which has a ton of storage for temporarily holding a lot of video, and a convenient command line interface for running the conversion. It takes a long time for the conversion, but it’s something I can easily run through Screen over SSH, then leave to run for a few days, while it chugs through a year’s worth of video. The command I used was:

for i in *; do ffmpeg -i "$i" "${i%.*}-c.mp4"; done

For each file in the directory, run ffmpeg on it to convert it, then name it [Original Filename]-c.mp4.

The -c added tot he file name was for “converted”, and it prevented the program for stopping if it came across a file that was already .mp4, which would produce a “do you want to overwrite this” prompt. I didn’t want to overwrite the originals, because I often just kept the original files, but sometimes I still wanted to convert them, in case there was a significant file size savings.

One key step here that I almost forgot was renaming the files BEFORE the conversion. I use a pretty standardized convention when sorting digital files of YYYY.MM.DD – File Description.

For example: “2007.07.04 – July 4th”.

The renaming needs to be done before the conversion, because often I am pulling the date from the file metadata on the original file. Ffmpeg is creating a new file, so all of the NEW metadata is inaccurate. The Date Created, Date Modified, etc, is all based on the day the conversion was done. Sometimes you can still pick the date out from the original file name, for example, one of the phones would make files like “VID_20070704_193606_001” which would be cone for something like “VID_Date_Time_Filenumber”, so I could still find the original date after conversion, but often they are just “IMG4089.AVI”. Which is just a sequential number of which file was created.

Combining Videos

Another step I took during the sorting of the videos was to combine video segments into meaningful, single videos. This also meant deleting out short nothing videos of the floor, or a restless crowd while waiting for a school function. It also meant cutting down some of the cruft around the edges. Part of the motivation for doing this was, after getting the Synology Video set up going, it was clear that playing a series of single videos such as:

2015.05.20 - Concert Band Concert 01.mp4
2015.05.20 - Concert Band Concert 02.mp4
2015.05.20 - Concert Band Concert 03.mp4
2015.05.20 - Concert Band Concert 04.mp4
2015.05.20 - Concert Band Concert 05.mp4

Was incredibly cumbersome. Often when recording kid’s school programs, I would record the opening, then stop and restart for the first song or act, then break in between songs for band or chorus. Sometimes it would just be a series of short, but related events, like videos of people sledding.

I took these individual videos, dumped them into Adobe Premier in order, trimmed them up, then exported them out as a single video, for example:

2015.05.20 - Concert Band Concert.mp4

Cat Videos

We have had a total of something like 15 cats, and currently have 7 cats. Everyone loves recording videos of the cats. When getting to the end of the process, it became clear that the cat videos needed to be pulled out into their own folders, so that if someone wanted to just watch cats, they could do so, and someone wanting to watch family videos, could just see family videos.

Youtube

I have several mostly neglected Youtube channels. As I finished up videos, I selected some that I’ve been slowly uploading to Youtube, on my “Personal Channel“. I’ve been trying to sort of “get into” the idea of actually doing some more produced videos, and this is mostly a push to try to motivate myself to do so. In case you were wondering, I also have a more popular channel that’s basically for Lameazoid.

Process Flow

The overall process flow started with renaming the original “Home Movies” folder on the NAS to “Home Movies to Convert”, then copying all of the files to a folder on my secondary server titles “Home Movies Originals Backup”. The copy, as you might expect, took a very long time, as it was 341 GB of video files.

The next step was to move the files out of each yearly folder to a different folder on the File Server. this also meant watching each video, at least a little, to rename the ones that needed renamed. Afterwards, i would run the ffmpeg conversion on the folder and wait.

Once the videos were converted, I would set about combining them in Premier and rendering the files out. In some cases the video didn’t need edited and was already a single file.

Often while working in Premier, which took a few days and sessions to get through a year, I would start the next batch of conversions for the next year.

Once the videos were converted, or not if not needed, I would dump them all back into a new Home Videos folder, named for the year of those videos.

Each video is named per the convention above, with “YYYY.MM.DD – Description”, chosen because it means everything always sorts in chronological order by name, and the videos are sorted into folders by year, or “Cats”, then by year. The VHS videos are sporadically placed across the 90s, so they are simply in a folder together titled “VHS”.

The End Result

The final end all of this work was two fold. One, I wanted it to be usable in DS Video on the Fire TV. Second, I wanted it backed up in One Drive.

One of the biggest secondary benefits of this process was file size savings. The end result was that the new Home Videos folder is a mere 133GB in size, over 200GB less. It doesn’t seem like a lot, but it helps. Some of the original videos, particularly the ones I had recorded on my Panasonic DVC camera, would clock in at close to 25GB in a single file.

the nice thing is that going forward, keeping this up to date will be easy. Most of the newer videos we as a family record, are compatible with the Video Station software by default. So no need to convert them all. Also, all of my kids are out of school. So I will be producing way less videos in that regard. Basically around 2017 or so, you would think all the kids transformed into cats. This was around the time they were all done with school events and the time they all got modern cell phones. The number of kid videos dropped to almost nothing while the number of Cat videos skyrocketed.