Programming Projects

Code Project: Network Map Webpage

I want to start off by saying, there isn’t going to be a ton of code here, and if there is code, it’s going to be super dirty. I’m fairly good at making code for “private use” that is pretty insecure, and not so great at code that’s scrubbed up and user friendly to distribute to others.

I’ve been working a bit on some local code projects, specifically for my little private “Dashboard” that runs on my file server. One project I’ve wanted to try for a while is a dynamic network tracker tool. I’ve looked into some options available, and they all seem to run as a plug in for some complicated 3rd party analytics software that often has some goofy complicated set up procedure that’s beyond “apt-get” or even just dumping a bunch of files in a web server directory.

This project is both kind of simple and not. It was fairly simple in set up and execution, but it’s somewhat complex in design. The first job was getting a list of currently connected devices on the network. This is easily done via the command line with an arp-scan request.

sudo arp-scan --localnet

The output of which looks something like this:

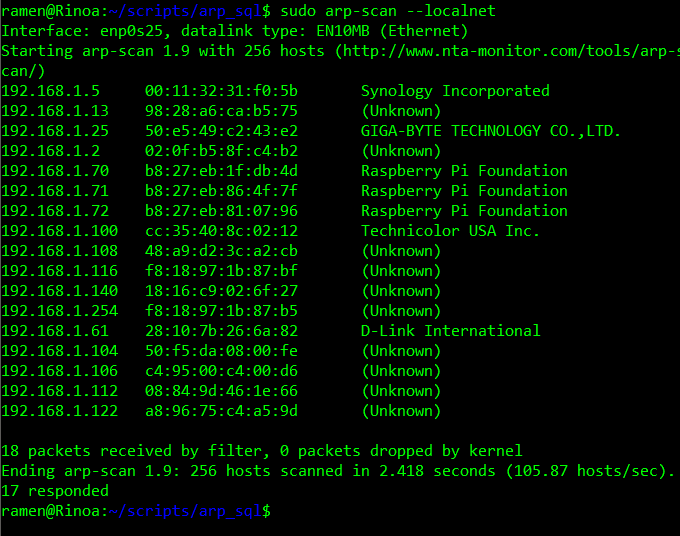
Using a pipe, I can shove all of this into a text file, which contains everything above.

sudo arp-scan --localnet | scan.txt

The trick is, how to display this output on a webpage. One way would be to pull it from a database. Pulling data from MySQL is pretty easy, dumping it to a pretty looking table is also easy. The harder part is getting the output of arp-scan to MySQL in a useful manner.

This is where Python comes into play. I am sure there are other methods or languages available, but like Python, and mostly know how to use Python. Essentially, I wrote a script that would open the file, scan.txt, that was created above. I am only concerned with lines that contain IP addresses, so I used the function “is_number()” to check if the first character of each line is numeric, if it is, it runs through a couple of operations.

Firstly, the output of arp-scan is tab delimited, so I can use the “split” function on “\t”, and dump the result into an array. This gives me an array of the IP address, MAC address, and Manufacturer. This sticks a new line in with the Manufacturer, so I did a “replace” on \n in the third item of the list. Lastly, I wanted the IPs to be uniformly formatted, so I write a little function that would add in leading zeros to the IP octets.

Finally, the Python builds an SQL statement from the line’s list, and make a call to the server to insert the values. A modified version of this code that just displays the resulting SQL commands instead of executing them is below.

#!/usr/bin/python

# Open a file

def is_number(s):
        try:
                float(s)
                return True                                                         except ValueError:
                return False

def format_ip(ipstring):
        octets = ipstring.split(".")
        n=0
        for i in octets:
                while(len(i)<3):
                        i=add_zero(i)
                octets[n]=i
                n=n+1
        return octets[0]+"."+octets[1]+"."+octets[2]+"."+octets[3]
        #return ipstring

def add_zero(shortstring):                                                          return "0"+shortstring


import MySQLdb

mydb = MySQLdb.connect(
  host="localhost",
  user="YOURSQLUSERNAME",
  passwd="YOURSQLPASSWORD",
  database="YOURTARGETDATABASE"
)

mycursor = mydb.cursor()

fo = open("scan.txt", "r")
#print ("Name of the file: ", fo.name)

fo.seek(0)

# read each line of the list
for line in fo:
        #check for lines that contain IP addresses
        if is_number(line[0]):                                                              #Convert lines into list
                line_list = line.split("\t")
                #remove line delimitors
                line_list[2]=line_list[2].replace("\n","")
                #Make IP Octets 3 digits
                line_list[0] = format_ip(line_list[0])
                SQL = "INSERT INTO arpscans (ip, mac, mfg) VALUES ("+line_l$                print SQL                                                   
fo.close()

It’s not super pretty, but it was a quick way to make sure everything came out looking correct. The table I used is called “arpscans” and contains columns called, “ip”, “mac”, “mfg”, and “last_seen”. The time stamp is an automatically generated time stamp.

I then created a shell script that would run the arp-scan piped into scan.txt then runt he python script. I set up this script in the root crontab to run once every half hour. Root is required to run the arp-scan command, so my user crontab wouldn’t cut it. Everything ran fine when I manually did a run of the script using sudo. The PHP on the other end out output the latest values based on the time stamp to a webpage.

This is where I ran into my first major hurdle. The script wasn’t running in cron. After a lot of digging and futzing, I found that basically, when cron runs the script, it works off of different environmental variables. I had to specify in ,y bash file, specifically where each command existed. The end result looks something like this:

#!/usr/bin/env bash
/usr/sbin/arp-scan --localnet > /home/ramen/scripts/arp_sql/scan.txt
/usr/bin/python /home/ramen/scripts/arp_sql/arp_post.py

Eventually the scan was running and posting data automatically as expected. After a few days, I ran into my second major issue. There was simply put, way too much data for my crappy old “server” to handle. The webpage slowed to a crawl as the table contained something like 9000+ entries. It’s possible and likely that my query was also rubbish, but rather than stress more figuring it out, I modified all of the code again.

Instead of adding a new entry for every MAC address every scan, I changed it to check if there already was an entry, and simply update the last_seen time. I had originally designed the system with the idea of getting legacy data for attached devices, but decided I only really cared about a generic history.

The new webpage table now displays all devices, current and previously seen, with the last seen date.

A few issues came up on the output end as well, though none of them were super hard to correct. One, I wanted a way to sort the table by clicking the headers. There are several scripts you can toss in your code to do this online.

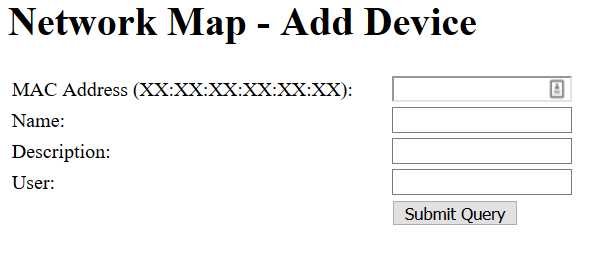
I also wanted more data about each device, so I added a form where I could fill in more data about each device. Specifically, the network name, if there was one, a description of what the device is, the User of the device (which family member or if it’s just a network device). This also checks and updates based on MAC address.

I also ran into an issue with MAC addresses and my Network extender. When devices are connected to the Network Extender, the first half of the MAC is replaced with the first part of the Extender’s MAC, though they retain the last half. I may eventually write some code to detect and merge these entries, but for now, I’ve simply been labeling them in the description as “(Extender)”, so I know it’s the same device on the other connection.

The final end result looks something like this:

I used to have the network super organized before I moved, but the new router doesn’t work nicely with my Pi DHCP server, so I have not gotten things quite as nicely sorted as I would like. Everything in the picture is sorted, but above .100, it’s a mess. I also can’t assign IPs to some devices at all, like the DirecTV gear or my Amazon Echos, which is really annoying.

One of my future projects will hopefully correct this, as I want to put a second router on the network with DD-WRT, between the ISP gateway and everything else.

Overall, it’s been a fun little exercise in coding that combined a lot different techniques together in a fun way.

Building A Cross Platform App with Xamarin

So, I made an app.  A for real, runs on things app.  More accurately, I followed a little tutorial to make an app, as part of the Xamarin Challenge over at Thurrott.com.  The app itself is a little weather app, it even includes location based weather and forecasting.  I know this isn’t particularly impressive but I think it’s pretty neat.

Part of the point of the exercise is that it show off the cross platform ability of Xamarin as a development plaform.  The end app uses the same code and runs on Windows 10, iOS and Android.  Unfortunately, I don’t own a MAC or an iOS device to test the iOS code but I was able to run both the Android and Windows 10 versions of the App.  I even ran the Android APK on my Fire Tablet.

I can’t say I learned a ton about how to actually make apps using Xamarin, though I plan to poke through the code provided more later.  What I learned more of was how to trouble shoot Visual Studio, which seems to be a bit more than buggy.  There is a forum set up for people looking for assistance on this contest and there are a lot of issues that all seem unrelated to each other but all related to issues with Visual Studio.

For example, I had issues getting the location based weather to work, until I went through and updated the Android Emulator files and build an emulator that ran on Android 7.  In a later step I found several of the NuGet packages weren’t installing properly, I never really figured out why but I ended up having to add them individually to each of the app platforms rather than the blanket “Install this on all platforms” system.

In the end, I did manage to get through and the app says everything was submitted and accepted.


Next Thing CHiP as a Twitter Bot

twitter-logoThere was a post that came across on Medium recently, How to Make a Twitter Bot in Under an Hour.  It’s pretty straight forward, though it seems to be pretty geared towards non “techie” types, mostly because it’s geared towards people making the bot on a Mac and it uses something called Heroku to run the bot.  Heroku seems alright, except that this sort of feels like an abuse of their free tier, and it’s not free for any real projects.

I already have a bunch of IOT stuff floating around that’s ideal for running periodic services.  I also have a VPS is I really wanted something dedicated.  So I adapted the article for use in a standard Linux environment.  I used one of my CHiPs but this should work on a Raspberry Pi, an Ubuntu box, a VPS, or pretty much anything running Linux.

The first part of the article is needed, set up a new Twitter account, or use one you already have if you have extras.  Go to apps.twitter.com, create an app and keys, keep it handy.

Install git and python and python’s twitter extension.

sudo apt-get install git

sudo apt-get install python-twitter

This should set up everything we’ll need later.  Once it’s done, close the repository.

git clone https://github.com/tommeagher/heroku_ebooks.git

This should download the repository and it’s files.  Next it’s time to set up the configuration files.

cd heroku_ebooks

cp local_settings_example.py local_settings.py

pico local_settings.py

This should open up an editor with the settings file open.  It’s pretty straight forwards, you’ll need to copy and paste the keys from Twitter into the file, there are 4 of them total, make sure you don’t leave any extra spaces inside the single quotes.  You’ll also need to add one or more accounts for the bot to model itself after.  You’ll also need to change DEBUG = TRUE to DEBUG = FALSE as well as adding your bot’s username to the TWEET_ACCOUNT=” entry at the bottom.

Once that is all done do a Control+O to write out the file and Control+X to exit.  Now it’s time to test out the bot with the following…

python ebooks.py

It may pause for a second while it does it’s magic.  If you get the message ” No, sorry, not this time.” it means the bot decided not to tweet, just run the command again until it tweets, since we’re testing it at the moment.  If it worked, it should print a tweet to the command line and the tweet should show up in the bot’s timeline.  If you get some errors, you may need to do some searching and troubleshooting, and double check the settings file.

Next we need to automate the Twitter Bot Tweets.  This is done using Linux’s built in cron.  But first we need to make our script executable.

 chmod 755 ebooks.py

Next, enter the following….

sudo crontab -e

Then select the default option, which should be nano.  This will open the cron scheduler file.  You’ll want to schedule the bot to run according to whatever schedule you want.  Follow the columns above as a guide.  For example:

# m h  dom mon dow   command

*/15 * * * * python /home/chip/heroku_ebooks/ebooks.py

m = minutes = */15 = every 15 minutes of an hour (0, 15, 30, 45)

h = hour = * (every hour)

dom = day of month = * = every day and so on.  The command to run, in this case, is “python /home/chip/heroku_ebooks/ebooks.py”.  If you’re running this on a Raspberry Pi, or your own server, you will need to change “chip” to be the username who’s directory has the files.  Or, if you want to put the files elsewhere, it just needs to b e the path to the files.  For example, on a Raspberry Pi, it would be “python /home/pi/heroku_ebooks/ebooks.py”.

If everything works out, the bot should tweet on schedule as long as the CHIP is powered on and connected.  Remember, by default the bot only tweets 1/8th of the time when the script is run (this can be adjusted in the settings file), so you may not see it tweet immediately.

This is also a pretty low overhead operation, you could conceivably run several Twitter Bots on one small IOT device, with a staggered schedule even.  Simply copy the heruko_ebooks directory to a new directory, change the keys and account names and set up a new cron job pointing to the new directory.

Project: Radio DJ Automation

If I earned a nickel for everything I’ve ever created that no one else cares about I’d probably be about to earn another nickel with this next post.

Anyway, one of my many pet projects has been setting up a private internet radio stream.  I actually toyed with the idea for a bit of building a small FM transmitter and going full on Pirate Radio but I decided that the current state of media doesn’t necessitate the need for radio waves when the internet is right there just waiting with a much broader reach.  The real issue is that it mostly just reaches me.

The nice part is, I don’t really mind.

I plan to put up a little page for Lameazoid Radio, but I’m still fleshing out the details.  A few people know the URL of the stream (hint: stream DOT) but I have no idea if they remember it and I doubt anyone listens.  I suppose the question is, why would anyone want to listen?  Can’t you get the same thing from your iPod?

This question includes myself.  Wouldn’t it be more beneficial to just load up the iPod and let it rip?  I do have some answer to this.  For example, my iPod isn’t large enough to hold my entire music library if I want it to.  It also is incredibly poor at shuffling music in a meaningful manner.  The Radio Automation software I’m using lets me sort things into nice themed play rotations.  i can interject little funny clips in at intervals as well to help break up the flow. 

I also run a lot of Podcasts.  The problem with using the iPod for Podcasts is that when it’s in my iTunes library, waiting to be played, I feel obligated to listen.  If it’s out of my control and playing on it’s own I can forgive and forget the playout if I miss one or come in partway through and leave early.  It’s expected I guess with radio that I may miss something.  It’s basically a subtle psychological point that works behind the scenes.

Anyway, I’ve managed to work the kinks out of the automated updates on Podcasts which leaves a few other projects that I want to implement on the table. 

First, I need to record some promos.  I want to make a few music based tags and a few others promoting the shows on the stream.  This basically requires time and a microphone.

Second I need to finish fleshing out the lineup.  I want to run new shows 7 days a week at 4 and 7.  I’ve got both slots about half filled now.  I also would like to find another short bit repeating news segment to compliment Tech 5 which plays every hour where there isn’t a show right now.

I also need to come up with something for the over night.  It’s likely no one will ever listen in the overnight so just running music all night is the easiest bet but I do like the idea of having some sort of “programming” there.  I’m thinking of pushing some audiobooks or something for lengthy periods but missing part of an audiobook is worse than missing part of a podcast.  I’m also thinking of compiling together my longform Techno mixes and running those.  Also possible some concerts in order.  Basically I’m looking to run longer blocks of related content in the overnight.

Thirdly i want to add Live Reporting.  I’ve set up Skype on this PC with auto answer for known callers.  This means i can call in and it’ll pick up.  Right now doing this kills the stream audio and it doesn’t return.  I have some software (freeware) that I believe I can use to create a gate that will shut off the stream when a call comes in and then resume it afterwards.  This would mean if I wanted to do “live reporting (to no one) I could call in through Skype on my phone.  Or better yet, if say, the GNR crew wanted to broadcast live they would simply call into the Skype and it would play.  On top of this I want to set up Skype to auto record and possibly auto rotate these short news bits.

Finally, at least on the list now, is to set up an automatic “now playing” Tweet.  I’m not sure the best way to accomplish this yet though the software does support a now playing.txt that is used by Icecast to set the title.  What wil be more likely is I’ll set up timed tweets for the time each show starts, like on @lameazoid.