Coding

Pushing Arduino Data to MySQL via PHP Part 2: The Server

tempdataIn the last post, I talked about how to send data from the Arduino to the MySQL server.

Today, I’ll cover how I’m receiving and displaying that data on the server side.  I’ll put the code for the webpages into this post but I’ll put everything together in a nice little package at the end of everything.  I mentioned last post that the end trick was to let the server worry about processing the data instead of the Arduino.  I’m running this on my NAS but it could be run on any standard web server with PHP and SQL.

For the purposes of this code, I’ve placed the files in a directory called “temps” on the root of the web server.  If you want to put them elsewhere, such as “temperaturelog” or “home/temps” or wherever, you’d need to alter the code of the Arduino in the previous points to replace the temps directory with the directory you plan to use.  I’m going to assume that the reader has a basic LAMP (Linux, Apache, MySQL, PHP) stack style server and knows the basics of how to create databases and run things on it.  If not you can Google the basic set up, though I may do a quick write up and reference it here eventually.

You’ll need to create a database called “housetemps” and import the linked structure file into it.  (If you know what you’re doing in PHP you can rename housetemps)   This will create a table int he database called “temperature” with the following columns: id, event, sensor, celsius, humidity, datestamp.  This will give you the basic structure needed to run the php code on the server.  A quick rundown of what these values are used for…

  • id – A standard auto incriminating id value for SQL
  • event – Time and date of when the event happened
  • sensor – A text based identifier for each probe.  This example uses one probe but could be altered for more.
  • celsius – The temperature reading, it doesn’t actually have to be Celsius, that’s just the default of the probe.
  • humidity – Humidity reading in percent humidity
  • datestamp – A date only time stamp, used for sorting the data when you review it later.

Now that you have the core database structure set up, the server needs to know the credentials for connecting to the database.  Since this is used by several files, it’s best to put the info in it’s own file and use an include statement int he PHP to add it.

In the “temps” directory create a file dbconnect.php and add int he following code, changing the values listed for the values used when setting up the database…

<?php
$MyUsername = “USERNAME”;  // enter your username for mysql
$MyPassword = “PASSWORD”;  // enter your password for mysql
$MyHostname = “localhost”;      // this is usually “localhost” unless your database resides on a different server

$dbh = mysql_pconnect($MyHostname , $MyUsername, $MyPassword);
$selected = mysql_select_db(“housetemps”,$dbh);
?>

Next you’ll need a way to get data into the table.  This is done using add_data.php, which is called by the Arduino in the code shown previously.

Make a file in the “temps” directory called add_data.php, and add the following code.

<?php
// Connect to MySQL
include(‘dbconnect.php’);

{
$dateget = date(“Y-m-d”);
// Prepare the SQL statement
$SQL = “INSERT INTO housetemps.temperature (sensor ,celsius, humidity, datestamp) VALUES (‘”.$_GET[“serial”].”‘, ‘”.$_GET[“temperature”].”‘, ‘”.$_GET[“humid”].”‘, ‘$dateget’)”;

// Execute SQL statement
mysql_query($SQL);
}

// Go to the review_data.php (optional)
header(“Location: review_data.php”);
?>

The code is pretty straight forward. The first section includes our previously created log on credentials.  The last section forwards the page on to review the data.  The meat is in the middle with the SQL statement.  The line $dateget = date(“Y-m-d”); creates a Year-Month-Day date for sorting later.  The next line creates the SQL query using variables passed via the url, the third part executes this query adding the data to the database.

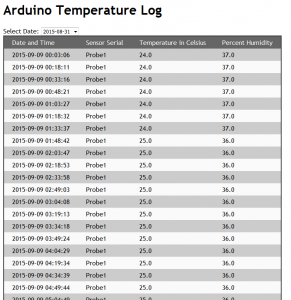
The final piece of this whole thing is the review_data.php file.  This file displays the results in a nice looking table.

<?php
// Start MySQL Connection
include(‘dbconnect.php’);
?>

<html>
<head>
<title>Arduino Temperature Log</title>
<style type=”text/css”>
.table_titles, .table_cells_odd, .table_cells_even {
padding-right: 20px;
padding-left: 20px;
color: #000;
}
.table_titles {
color: #FFF;
background-color: #666;
}
.table_cells_odd {
background-color: #CCC;
}
.table_cells_even {
background-color: #FAFAFA;
}
table {
border: 2px solid #333;
}
body { font-family: “Trebuchet MS”, Arial; }
</style>
</head>

<body>
<h1>Arduino Temperature Log</h1>

<p>Select Date:
<?php

$sql = “SELECT DISTINCT datestamp FROM temperature”;
$result = mysql_query($sql);

echo “<select name=’datestamp’ onchange=’location = this.options[this.selectedIndex].value;'”;
while ($row = mysql_fetch_array($result)) {
$current = $row[‘datestamp’];
echo “<option value=’review_data.php?dateselect=$current’>$current</option>”;
}
echo “</select>”;
?>

<table border=”0″ cellspacing=”0″ cellpadding=”4″>
<tr>
<!–    <td class=”table_titles”>ID</td> –>
<td class=”table_titles”>Date and Time</td>
<td class=”table_titles”>Sensor Serial</td>
<td class=”table_titles”>Temperature in Celsius</td>
<td class=”table_titles”>Percent Humidity</td>
</tr>
<?php
// Retrieve all records and display them
$SQL = “SELECT * FROM temperature WHERE datestamp LIKE ‘”.$_GET[“dateselect”].”%’ ORDER BY id ASC”;

//Execute the SQL
$result = mysql_query($SQL);

// Used for row color toggle
$oddrow = true;

// process every record
while( $row = mysql_fetch_array($result) )
{
if ($oddrow)
{
$css_class=’ class=”table_cells_odd”‘;
}
else
{
$css_class=’ class=”table_cells_even”‘;
}

$oddrow = !$oddrow;

echo ‘<tr>’;
//       echo ‘   <td’.$css_class.’>’.$row[“id”].'</td>’;
echo ‘   <td’.$css_class.’>’.$row[“event”].'</td>’;
echo ‘   <td’.$css_class.’>’.$row[“sensor”].'</td>’;
echo ‘   <td’.$css_class.’>’.$row[“celsius”].'</td>’;
echo ‘   <td’.$css_class.’>’.$row[“humidity”].'</td>’;
echo ‘</tr>’;
}
?>
</table>
</body>
</html>

The core of this file was lifted from the previously mentioned guide on Tweaking4All.  The problem I had with their results was that it simply displayed an endless list.  I am polling every 15 minutes, so this list tends to grow unwieldy very quickly.  This is where the datestamp marker comes into play.  I added this little chunk of code at the top of the table.

<?php

$sql = “SELECT DISTINCT datestamp FROM temperature”;
$result = mysql_query($sql);

echo “<select name=’datestamp’ onchange=’location = this.options[this.selectedIndex].value;'”;
while ($row = mysql_fetch_array($result)) {
$current = $row[‘datestamp’];
echo “<option value=’review_data.php?dateselect=$current’>$current</option>”;
}
echo “</select>”;
?>

This creates a menu based on unique values of datestamp.  Selecting a value forwards you to review_data.php with a date attached, then review_data.php only shows data that matches that datestamp.  This allows a single day to be viewed easily.  In the future I may add a bit more to this menu, eventually, the list of dates will also become unwieldy in length.  I also plan to run numerous sensors at once with different names so I’ll likely also add a second menu so the list can be sorted down by sensor name.

I’m also looking to add a bit more functionality to the code in the form of a graph, so it will be easier to see trend lines in the data.  The data I have now is from my office, in a well insulated basement room, so the trend lines are rather boring, but when there are several sensors in different rooms in the main area of the house, or even outside, this data becomes more interesting and useful.  I’ll go into this at a later day though…


Pushing Arduino Data to MySQL via PHP

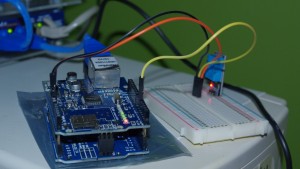
Arduino+EthernetThis is part of my little ongoing project of learning with the Arduino.  I want to give a mention to Tweaking4all’s guide to PHP, SQL and Arduino, because I started out using it as a base for this section of the project, though I altered a few parts to work with my sensors and Ethernet board.  That guide definitely pointed me in the right direction and made me realize just how simple it would be to actually push data to the server.

My initial approach to the problem was that I needed the Arduino to run some SQL queries and interact directly with the database and insert readings and other variables.  In the end, all I needed was a PHP file on the server to interact with the database, and the proper call from the Arduino to the PHP file.

I started out with basic code to dump dummy data (ie not variables) to a database running on my laptop.  I couldn’t get UIPEthernet linked int he Tweaking4all guide to work so I just used the default Arduino Ethernet libraries.  I also simplified the code down to one probe, though adding more temperature probes will be trivial.  After I managed to get the dummy data to post reliably, I moved on to adding variables in place of the dummy values.  Once again, I couldn’t get the OneWire library to load properly and work with my senors, so I went back to the basic DHT-11 library that I knew work.  This actually simplified things considerably, I used the same calls I had done previously in testing and instead of pushing them directly tot he serial port, I dumped them to some variables which are then passed to the SQL statement.

I also added variables and functions to read Humidity, since he original article doesn’t have humidity readings included.

The final hurdle I came across, for some reason, the delay() function wasn’t working properly.  I set it to poll every 15 minutes (in milliseconds) but it never posted a new update beyond the initial one when powered on.  If I tried a shorter interval, such as 5 minutes (in ms), I got new readings every 30 seconds or so.   In the end, I used a better method of handling time with currentmills.  This reads the current number of milliseconds since the last reading.  By reading currentmills and comparing it to the last reading “time” I can verify if it’s been 15 minutes since the last reading.  This method is not super precise and has some play on interval but I’m not doing anything requiring perfect timing with this project.

In the end, I ended up with the following code for the Arduino:

#include <SPI.h>
#include <Ethernet.h> // Used for Ethernet
#include “dht.h”

dht DHT;

#define DHT11_PIN 5

// **** ETHERNET SETTING ****
// Arduino Uno pins: 10 = CS, 11 = MOSI, 12 = MISO, 13 = SCK
// Ethernet MAC address – must be unique on your network – MAC Reads T4A001 in hex (unique in your network)
byte mac[] = { 0x54, 0x34, 0x41, 0x30, 0x30, 0x31 };
// For the rest we use DHCP (IP address and such)

EthernetClient client;
char server[] = “SERVERIP“; // IP Adres (or name) of server to dump data to
int  interval = 360000; // Wait between dumps
unsigned long previousMillis=0;

void setup() {

Serial.begin(9600);
Ethernet.begin(mac);

Serial.println(“RamenJunkie’s Ethernet Temperature Probe based on Tweaking4All Probe”);
Serial.println(“-=-=-=-=-=-=-=-=-=-=-=-=-=-=-=-=-=-=-=-=-=-\n”);
Serial.print(“IP Address        : “);
Serial.println(Ethernet.localIP());
Serial.print(“Subnet Mask       : “);
Serial.println(Ethernet.subnetMask());
Serial.print(“Default Gateway IP: “);
Serial.println(Ethernet.gatewayIP());
Serial.print(“DNS Server IP     : “);
Serial.println(Ethernet.dnsServerIP());
}

void loop() {

unsigned long currentMillis=millis();

if((currentMillis – previousMillis) > 900000)
{
previousMillis=currentMillis;
// READ DATA
Serial.print(“DHT11, \t”);
int chk = DHT.read11(DHT11_PIN);
switch (chk)
{
case DHTLIB_OK:
Serial.print(“OK,\t”);
break;
case DHTLIB_ERROR_CHECKSUM:
Serial.print(“Checksum error,\t”);
break;
case DHTLIB_ERROR_TIMEOUT:
Serial.print(“Time out error,\t”);
break;
default:
Serial.print(“Unknown error,\t”);
break;
}

// if you get a connection, report back via serial:
if (client.connect(server, 80)) {
Serial.println(“-> Connected”);
// Make a HTTP request:
client.print( “GET /temps/add_data.php?”);
client.print(“serial=”);
client.print( “Probe1” );
client.print(“&”);
client.print(“temperature=”);
client.print(DHT.temperature,1);
//      client.print(“88”);
client.print(“&”);
client.print(“humid=”);
client.print(DHT.humidity,1);
//      client.print(“88″);
client.println( ” HTTP/1.1″);
client.print( “Host: ” );
client.println(server);
client.println( “Connection: close” );
client.println();
client.println();
client.stop();
}
else {
// you didn’t get a connection to the server:
Serial.println(“–> connection failed/n”);
}

}

Serial.print(currentMillis);
Serial.print(”  “);
Serial.println(previousMillis);

delay(10000);
}

A few notes to anyone wanting to try to use this.

  • You will need to set the server IP to the IP of your database.
  • You can alter the time interval between readings with the interval variable as well.
  • If you plan to use more than one Arduino probe (which you can), you’ll want to change the MAC address settings.  it can be any MAC value really since you’re just assigning it manually but having multiple devices with the same MAC will cause issues.  I’d recommend simply increasing the last value (31) by one.
  • You can change the line “client.print( “Probe1″ );” to name the probe whatever you want.  The original code read serial numbers but I’m not sure if DHT-11 handles serial numbers or not.  I’d also recommend changing it if you run more than one Arduino probe to the same database.

This will create basic output from the Arduino.  The other half of this is to set up a server running SQL to receive the data, but I’ll cover that in the next entry.  I based it off the code linked above in Tweaking4all but altered it to take in the Humidity as well as allow for viewing individual dates.

Security Phase 2 – Doors and Windows (Planning)

I just wanted to start off by saying, this isn’t a how to at all, it’s more some general ideas I’ve been looking over for how to add door and window security to my recently set up video monitoring system.  Basically, I want a log of when and if the doors and windows are opened and closed.  I’d prefer not to run a bunch of wires, so wireless sensors are in order.

What I ultimately want is for an indicator light on a webpage to change based on the status of the door or window, a timestamp log to be created and possibly for some sort of email or text alert to occur.  ULTIMATELY I may even use this whole project as an excuse to finally develop my Phone app skills and build an app that I can view it all on, but that’s farther down the road.  A basic web page is fine for now, and it’s something I can manage.

My worry with wireless sensors was that I’d have to constantly change the batteries.  Until I realized that it would be trivial to design the sensor so that it only transmits when the window is open, and while I am not building my own sensors (I probably could) I imagine the makers of such sensors realize that you could save a ton of battery life by designing the sensors to only work when open.  I did a bit of searching on Amazon and found a6 pack of sensors for less than ten dollars.  It appears that each sensor has it’s own receiver/indicator which emits an audible tone.

This is actually probably alright for my needs.

While I am not an Electrical Engineer, I am familiar with basic circuit flow and basic electronics.  I don’t have any of these sensors yet but I can make some basic assumptions based on what I know.   When the window/door is opened, some trigger is closed and the sensor starts transmitting some sort of radio signal.  The fob thing which is always listening will receive the signal and activate some sort of internal speaker. 

There are a couple of issues that need to be solved here.  One, while the sensors hopefully are designed to conserve battery power, the FOBs are probably not.  I also want the signal to go to a computer and not sound a mostly useless audible alarm.  The power issue isn’t a huge issue.  With the right transformer brick providing the proper voltage, it wouldn’t be hard to rewire the contacts to allow for the units to be plugged into the wall, all at once, off of one power supply.  They look to be small enough that they could be mounted inside an electrical box in a small array and wired for power.

A similar method can be used to transform the speaker signal into a trigger for some sort of simple IO board.  To activate the speaker, some sort of voltage is applied to the speaker, the speaker can easily be removed and the contact points that would previously have fed the speaker could be wired to am IO board.  When the voltage is supplied to the "speaker" it will instead be read by the IO board, triggering a signal that "the Window/Door is open."

The main puzzle I have right now is, what would work best for the IO board.  I see two options here, and both would function differently, and I may even require both.  I could go with an Arduino board or a Raspberry Pi.  Both of these options seem to have advantages and disadvantages, and there may even be a third option which corrects the disadvantages.

arduino

Let’s look at the Arduino.  The Arduino is ideal for dealing with the IO board.  It is, by design, meant to work with this sort of "hands on" electronics systems.  It even has build in contacts for working with two wire IO interfaces.  I don’t know anything about Process, the programming language of the Arduino, but I’ve been meaning to learn and I am capable of learning it.  The problem is on the output.  Arduino is not designed to work with PCs in any simple way.  From some quick research online, the Arduino would require a serial interface and likely special software running on the server to poll the Arduino at set intervals.  Which brings up another issue.  As near as I can tell, the Arduino is a "pull" interface, meaning the server would have to pull the status from the Arduino, as opposed to "push" where the Arduino would push the data to the server as it changes.

Raspberry_Pi_Photo

So there is also the Raspberry Pi.  The Raspberry Pi is a computer itself, which makes interfacing with the server simple and easy.  It runs a simplified OS but connecting the Pi to the network is simple and telling it to push even a text file status update to the server via FTP or some similar network protocol is trivial.  the issue comes in the need to read the sensors.  I’m not entirely sure the Raspberry Pi is even capable of reading an analogue IO interface right out of the box.  Some searching suggests it is possible through an additional interface board of some sort but not right out of the box.  Looks like there are a handful of GPIO points build into the PI.  The PI also feels like much more than is really needed for this simple application.

Its kind of a tricky decision, I’ve been wanting to play around with both the Pi and the Arduino so I may just pick up one of each and see what works.  Both are around the same price and the whole system in the end will end up costing around $50-$75, which is almost nothing.  The final step once the sensor data lands on the server is updating the web page but I already am familiar enough with building webpages and simple polling scripts that this step is the easy part.  Whatever I end up going with I’ll certainly document the results in the future.

Learning Python with Udacity

udacity_cs101

Just a note, this is not any sort of advertisement…

So I know some basic programming syntax, generally centered around C and C++ which I learned in college.  The C was through several Engineering based classes and the C++ was from a single Computer Science course I took when I had a semester to fill before transferring schools and didn’t want to completely lapse on the studying, schooling lifestyle.  I also know how to code HTML but that is barely programming by any stretch. 

I have tried various self taught methods to teach myself more C++ and some Java with little success.  I have some books to make Android apps but I have yet to get anywhere with them.  Then, I believe through the Windows Weekly podcast, I found out about this deal called Udacity. The first course offering is to learn how to code a basic Search Engine using Python.  I’ve found it pretty well designed though a handful of the examples were a little too abstract to be meaningful (I’m looking at the one about cost and RAM and memory and compute cycles which I still don’t understand).

Anyway, I’m done three out of the seven modules and I’m rather proud of the fact that I’ve actually managed to stick with it and learn some things.  I’ve got a little script now that I could use to extract links from any webpage or even a number of webpages, though right now all I know how to do is display them.  Presumably we’ll learn how to compile them into some sort of file or database.  My biggest hurdle really is I keep wanting to use C and C++ syntax.  Things like adding ; at the end of lines or 1++ or variable++.

It’s not a terrible problem really.

Procrastination Isn’t Always Bad

I almost always have a couple of dozen projects I’m working on.  These are not projects for work or even household projects that my wife wants me to take care of.  These are personal projects of varying importance though generally of little overall *real* importance.  For example, at the moment I am working on:

– Building a solid automated online streaming radio service.

– Playing through several video games.

– Burning old family VHS tapes to DVDs

– Building a small corner shelf for putting my games and DVDs on in the bedroom to reduce the clutter in the closet.

– Repairing several laptops i have that don’t work.

Etc…

Anyway, Several of these projects I’m “working on” are continual, like playing through various games.  Others I have not even started on, though I still would say I’m “working on them”.  Some I may never start.  The point is that I tend to think about a large string of projects in the back of my mind almost constantly.

Often when i have “free time” I do something completely different when I should be doing “a project”.  I have a tendency to procrastinate on these things.  Often this procrastination though is good because inevitably, I get an epiphany on some project that makes it extremely simple and quick and it’s the best possible solution.

The latest example, which inspired this rambling blog post involves my home network.  It’s not huge but it is larger than most people’s home networks and it “evolves” much more than most people’s home networks.  Currently, the phone line feeds the cable box thing (we’ll call this the Residential Gateway or RG for lack of  better term though I’m not sure it’s actually accurate).  It comes out of the RG and feeds a router.  This router was put in by the cable guy when he came out to replace the RG when it broke.  The thing is, he left the old router in place (also provided by the phone company).  This initially created some issues since it gave me two IP address sets which is annoying when you’re doing a lot of NAT translations for things like streaming radio and VNC access to half a dozen machines as well as hosting FTP, HTTP, etc.  I also own a switch and a hub, though I don’t use the Hub because "hubs suck”. 

I lived with forwarding all ports to the internal router for a while but inevitably I swapped the Hub for the switched, changed the IPs of all my machines and rebuilt the NAT table.  it was a one time pain but it makes things simpler.

I put the old router aside until I discovered the the new router does not support the older less secure Wireless protocols that my Nintendo DS requires.  So the old router went back in almost exclusively for use of the NDS, whoes IP address I don’t care about.  It also serves as an access point for guests or whatever to keep them off of the main network.

The issue I had recently however involves a remote location in the house in my wife’s office.  She has a PC out there for “office use” and I put a second PC out there recently with a KVM for my “experimenting etc” use.  Currently it hosts Lameazoid Radio, an OpenSIM server, a session of Outlook that is attached to archives of all of my old email PST files and I use it for downloading Torrents.  The main point is, it creates a lot of network traffic.  The problem is, there’s only one physical cable running to the office and running a second one would be a pain.  the obvious answer is, put in a switch.  I could use the hub but I fear the high traffic of the one machine would cause lots of issues for the office computer and visa versa.

I’d pretty much resolved myself that I can afford a 30 dollar switch to throw out there.  The problem is that i just got off of a huge backup with my “personal budget” from buying several expensive items “in advance” and then paying back the budget.  I’m tired of being broke for the past 2 months on my personal budget.  Also, Black Friday is coming up and I intend to have a chunk of change to spend on good deals.

So I can drop money and be short on BF, or i can wait a few weeks and listen to my wife occasionally complain that the office PC doesn’t have internet access.  So I decided to “sit on” or procrastinate this project.

Then I had the epiphany.  I can move the main Router over to where the switch is now and swap them out.  The only thing plugged into the main router besides the long network cable running across the room tot he switch is an old laptop I was trying to project but i can’t keep running anyway.  It can be dropped.  I was going to plug a media center PC into it for Hulu but Netflix on the Wii eliminates the need for that and I already have a long cable running back to the TV area from before the newer Router was there anyway I can use.

The point is, that I don’t NEED it to be where it is.  Then I get my switch back.

The real point is, because I didn’t rush into putting in the hub or rush out to buy a switch, i came up with the best solution AND it doesn’t cost me anything. I do this a lot.  I did it at my old job all the time.   I’d sit on a project until I’d realize I can combine two obsolete items into something useful or whatever.  The point is, sometimes it’s good to procrastinate.