[Blogging Intensifies]

Technology, Projects, Linux, Coding, Internet of Things, Music, Books, Life...

  • About

Devices

A Second Hard Drive in My Aspire E 15

April 19, 2019

Recently I purchased an SSD for my wife’s Thinkpad. It wasn’t a big one, 256 gig, but her laptop is a little slow all around and the bottleneck seems to be mostly in the drive, which I am pretty sure is still old school spinning platters.

Unfortunately, the drive in her laptop is 320 Gb, so I couldn’t straight clone the drives. I could have done some partition size adjustments and made it work but she was already fussing and worrying I was going to lose some of her files so I decided I’d just wait and get a larger one later.

I’d already planned to pick up a second one of these drives to add to my Laptop. The main drive is one of those funky newer styles that’s basically a circuit board, but it has an empty bay for a laptop drive. I stuck the new SSD in and went about using it. Nothing hard here at all.

To my surprise, the drive vanished a week or so later. Thankfully I didn’t stick it in my wife’s laptop, it was apparently bad. Or was it?

Turns out that because the drive is a little on the small size, even for a 2.5″ drive, and there isn’t any mechanism inside the laptop to secure the drive itself, it ended up coming lose and losing it’s connection.

It’s probably not the cleanest fix, but I stripped off a half a sheet of paper and accordion folded it and slipped it in between the drive and the Laptop chassis. This applies pressure to the drive, holding it in place.

I haven’t had any trouble with the drive since. Still it’s kind of a crummy design.

Share this:

  • Click to share on Facebook (Opens in new window)
  • Click to share on Twitter (Opens in new window)
  • Click to share on Tumblr (Opens in new window)
  • Click to share on Pinterest (Opens in new window)
  • Click to email this to a friend (Opens in new window)
Posted in: Devices, Hardware Tagged: Acer Aspire E15, Laptop

A Tale of Two PCs

November 20, 2018

As a bit or a change of pace, I did a bit of work on the two actual PCs I am currently running recently.  I’ve gone through a lot of desktops over the years, some getting more use than others, for a while I had like 5 or 6 old ones I had picked up here and there just sort of sitting around collecting dust but I’ve purged a lot of that out.  Most of what I used to do with those extra PCs I can now do with Raspberry Pis or on my VPS.  Everyone in the family uses a laptop, so no more need for a “Family Desktop”.  I am down to two boxes now, ok, techniclly 3 but the third is an old PowerMAC G4 that I mostly keep around because I think the case is cool.

First off, my personal desktop.  At the moment it just runs Windows 10, it’s sitting on a handful of drives for a total storage of 4 GB, mostly filled with games.  I built this machine almost 7 years ago.  It’s nothing particularly special, and I have bumped up the RAM since then considerably.  PC computing power really hasn’t gotten much better in the past few years and what it mostly needed was a bump up in graphics power.  So I swapped out the Radeon 6950 for an NVidia GTX 1050ti card.  It’s not a top of the line super card, but it was within my price range and the performance boost is reasonably noticeable.

The biggest change is that I can run pretty much everything at maxed out graphics settings.  So far I’ve tested it on Overwatch, World of Warcraft, Grand Theft Auto V, and Battlefield 1.  Battlefield 1 in particular used to throw out an error about my GPU not being supported and GTA V had some screwy artifacting when it rained in game.  Also, maybe it’s a placebo effect, but I have noticed that I do better in Overwatch with heroes like Hanzo and Widowmaker who both require more precise long distance aiming.

That work was pretty easy, though I was sort of worried that the newer card wouldn’t work with my older Chip and Board.

On my other desktop tower, which is primarily used as a file storage server to supplement my Synology, I replaced a couple of dying hard drives.  I don’t really remember where this tower came from but it’s at least the same vintage as my main PC.  It’s set up running Xubuntu with a collection of drives I’ve collected over time from various places and discarded PCs.  It’s been complaining for a while on boot that one of the drives was bad, and another would give read errors occasionally.  I copied everything off the read error drive, that one was easy.  The other bad drive turned out to be the main drive which finally gave up the ghost and stopped booting on me.  I ended up making this problem worse when trying to clone the drive, because I apparently accidentally overwrite the drive as a ZFS pool file system.  This is mostly notable because I’m not sure how it even happened.  I have used ZFS briefly int he past when I was testing FreeNAS but that system was a way bigger chore to use than just Ubuntu with Samba shares so I scrapped it.  So I’m not sure what was even cloned to create a 500GB ZFS partition.

Fortunately there wasn’t any important data actually on the main filesystem drive.  I think at worst I may have lost am unused Minecraft server set up and maybe a few webpages I had set up messing around with webdev stuff.

So after a ton of reboots on a live CD to determine which physical drive was witch in the machine, I pulled out the two bad drives and replaced them with two “mostly good” drives.  I then reloaded Xubuntu.  I then, reloaded Xubuntu again because an encrypted file system seemed like a good idea but I don’t want the hassle of entering a password every time the machine boots.

The real hassle here is getting everything configured.  A quick rundown of the steps needed to get things to a basic level of use.

  • Set up the proprietary drivers for the GPU and motherboard, easy
  • Set a static IP that puts the machine where it’s supposed to be on the network, mostly easy.
  • Reinstall Synergy.  Mostly easy, though I still need to get it to stat on boot.
  • Install and set up SSH, easy
  • Reinstall Samba, easy
  • Get the system to auto mount the other hard drives on boot, mostly easy
  • Configure Samba to share those drives, mostly easy
  • Reinstall the LAMP stack

Fortunately, everything went pretty smoothly, other than I havn’t quite figure out the right method to get Synergy to start on boot.  This is actually pretty critical, since unless the machine just boots up to a desktop with Synergy, I have to keep a keyboard and mouse attached.  Part of the point here is that this box can just be squired away behind the desk and hooked to a monitor.  It may already be set up but I’ll probably set up Python on it as well.  I still like to be able to putz around with scripts and web stuff so it’s handy to have.

PS, feel free to judge the dusty ass inside of that tower up there.

Share this:

  • Click to share on Facebook (Opens in new window)
  • Click to share on Twitter (Opens in new window)
  • Click to share on Tumblr (Opens in new window)
  • Click to share on Pinterest (Opens in new window)
  • Click to email this to a friend (Opens in new window)
Posted in: PCs Tagged: Desktop, Hardware, PCs, Tower, Xubuntu

Fixing my New 3DS …

January 29, 2017

So, the title there says New 3DS, which is is the “New 3DS” but it’s also New, in the sense that I bought it at the start of January.  It’s like 3 or 4 weeks old.  Then I broke it on accident.  It’s taken me years to get around to saving the money to buy one of these, not so much because I don’t have the money, but because I wanted to know it was at a point in it’s console life cycle that it was worth buying.  If it has been say, $50 cheaper, I’d have bought one years ago.  Also, unlike all of my previous Nintendo based hand helds, I wanted to wait to get the “improved version”.  I have a Game Boy, a Game Boy Advanced, a Nintendo DS, but they were all the first gen models.  I didn’t care for the 3D gimmick, so I passed on the 3DS.  Well now they have the horribly branded “New 3DS” and in my case, it’s the XL version, because I like having a big honking screen.

I’ve played it pretty regularly since buying it.  This is kind of the problem with my argument of “waiting for the right moment”.  My track record with Nintendo hand helds has always been amazing.  I measure this by one real metric, how many games do I finish on them?  I’m pretty sure I’ve completed every game I own for Nintendo’s handhelds since the Game Boy, and I own a lot.  Contrast this with say, Steam, where I’ve beaten like 20% of my 1000+ game Steam Library.

On a side note story, that’s related here, the water out of the faucet at work is awful, there’s crap floating in it and it’s scummy and possibly not healthy (probably is for legal reasons though).  So in order to make my coffee each morning, I carry a metal water bottle with water from home, usually in my lunch box.

Anyway, a week or so ago, I put my 3DS in my bag I carry and went off to work.  On this particular day, I didn’t bring a lunch, so I just had my laptop bag and no lunch box.  I stuck my water bottle in the side pocket of my bag and drove off to work.  Upon arrival I found the bottom of my bag was wet and the top of the water bottle was not fully attached.  Incidentally, the water bottle was also empty.

I headed into the office to assess the damage here.  Headphones, some notes, the bottom of the bag and my 3DS were all wet.  Bummer.  I took everything that was damp and strung it around to dry out for a while and went about my day.  Later, as things were drying I tested the 3DS.  This was my fatal mistake, it turned on, but the cursor on the bottom of the screen was flipping constantly (due to water inside making an electrical contact) and when I tried to turn if off I got a cryptic message flashed up about “There is some kind of problem something something) before it turned off, for good.

I set it out to dry some more, hoping this would correct the issue.  It still didn’t turn on some time later, so I set about opening it up.  I’d already removed the back cover and battery, now it was time to crack open the case.  It turns out it’s a pretty simple task thankfully, there’s maybe 8 small screws holding the case shut. You’ll also need to remove any SD cards.

Side not to anyone trying to do this, there are two small ribbon cables along the top edge of the system that come off with the back cover.  These operate the shoulder buttons.  To actually remove the cover, you must lift the top edge gently a bit, so they the whole thing can slide down and over the headphone jack, then the cover rolls/flips towards the upper side of the 3DS, minding these cables along the way.  The cables can be removed and may even pop off, this is ok so long as they don’t get damaged.  They ultimately need to be removed anyway, using some small pliers or a screw driver, to remove the black square from the main part of the 3DS.  These connectors are designed to be removed and reinserted easily.

After removing the cover, I had a nice view of the inside of the 3DS.

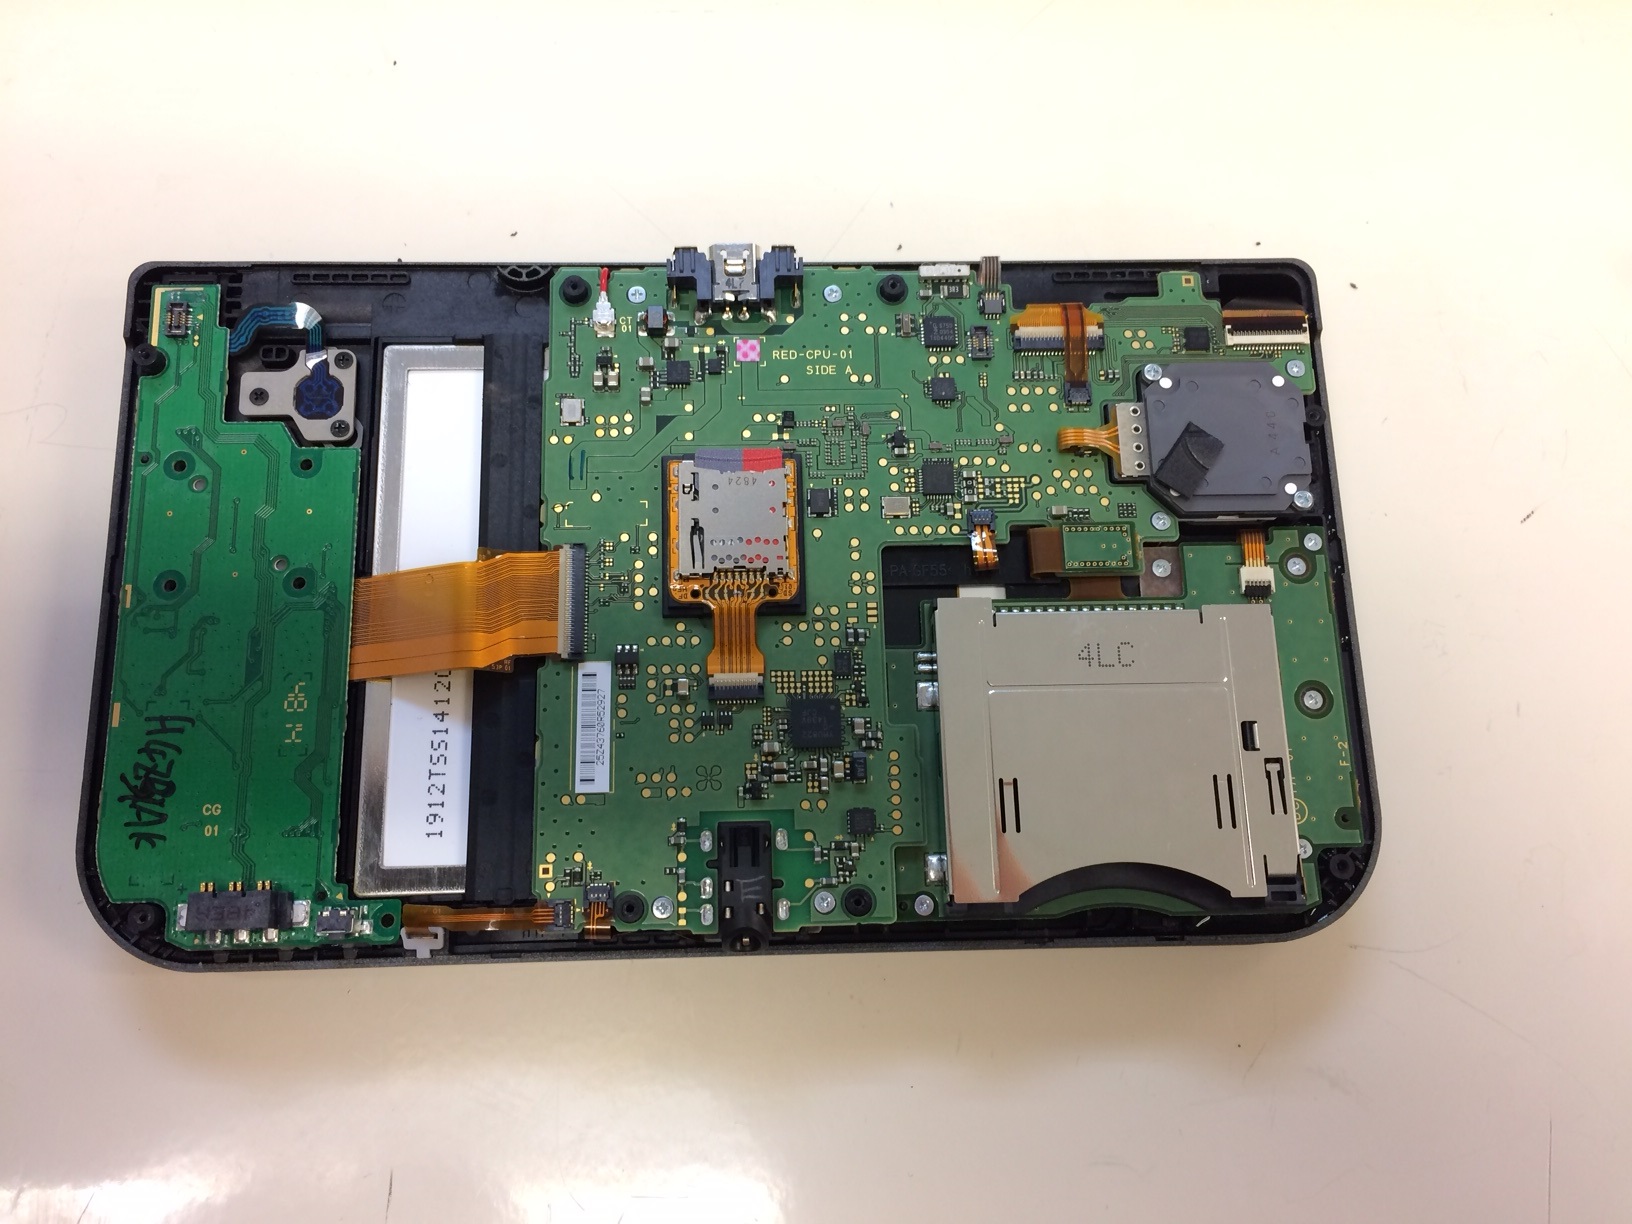
On the plus side, once inside, things were not as bad as they might seem.  The way the handheld sits in my bag, only one end of it got any sort of water (the left end shown above).  On the minus side, there was a lot of water, like I had to get paper towels and dry it up all over inside, including removing the face buttons.  To get to the underside water, I had to also remove that board on the left side, it has 5 screws, 4 in the central area, and one near the bottom ribbon cable.

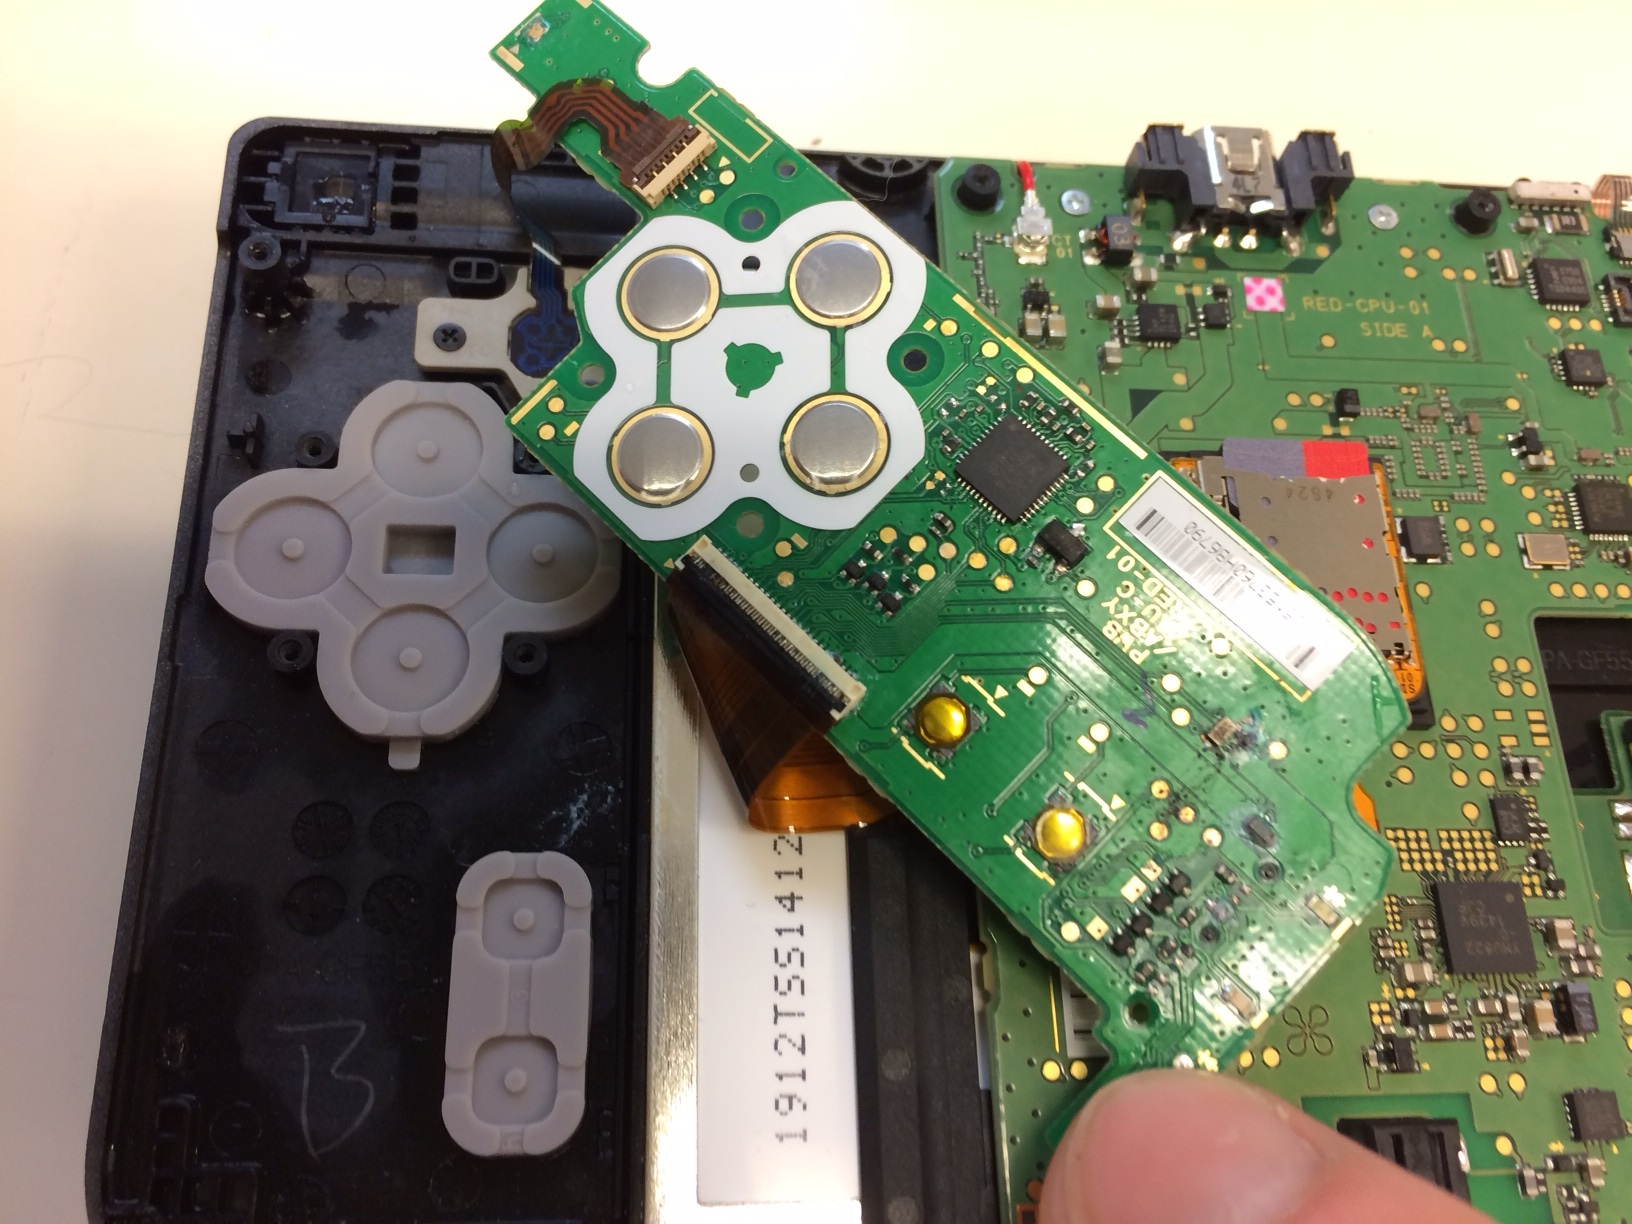
Once everything was dried, I reassemble it and tried to turn it on again, with no success.  So I opened it up again for a deeper inspection.  This was when I found what I should have noticed originally, the painfully obvious blown out components on the board.

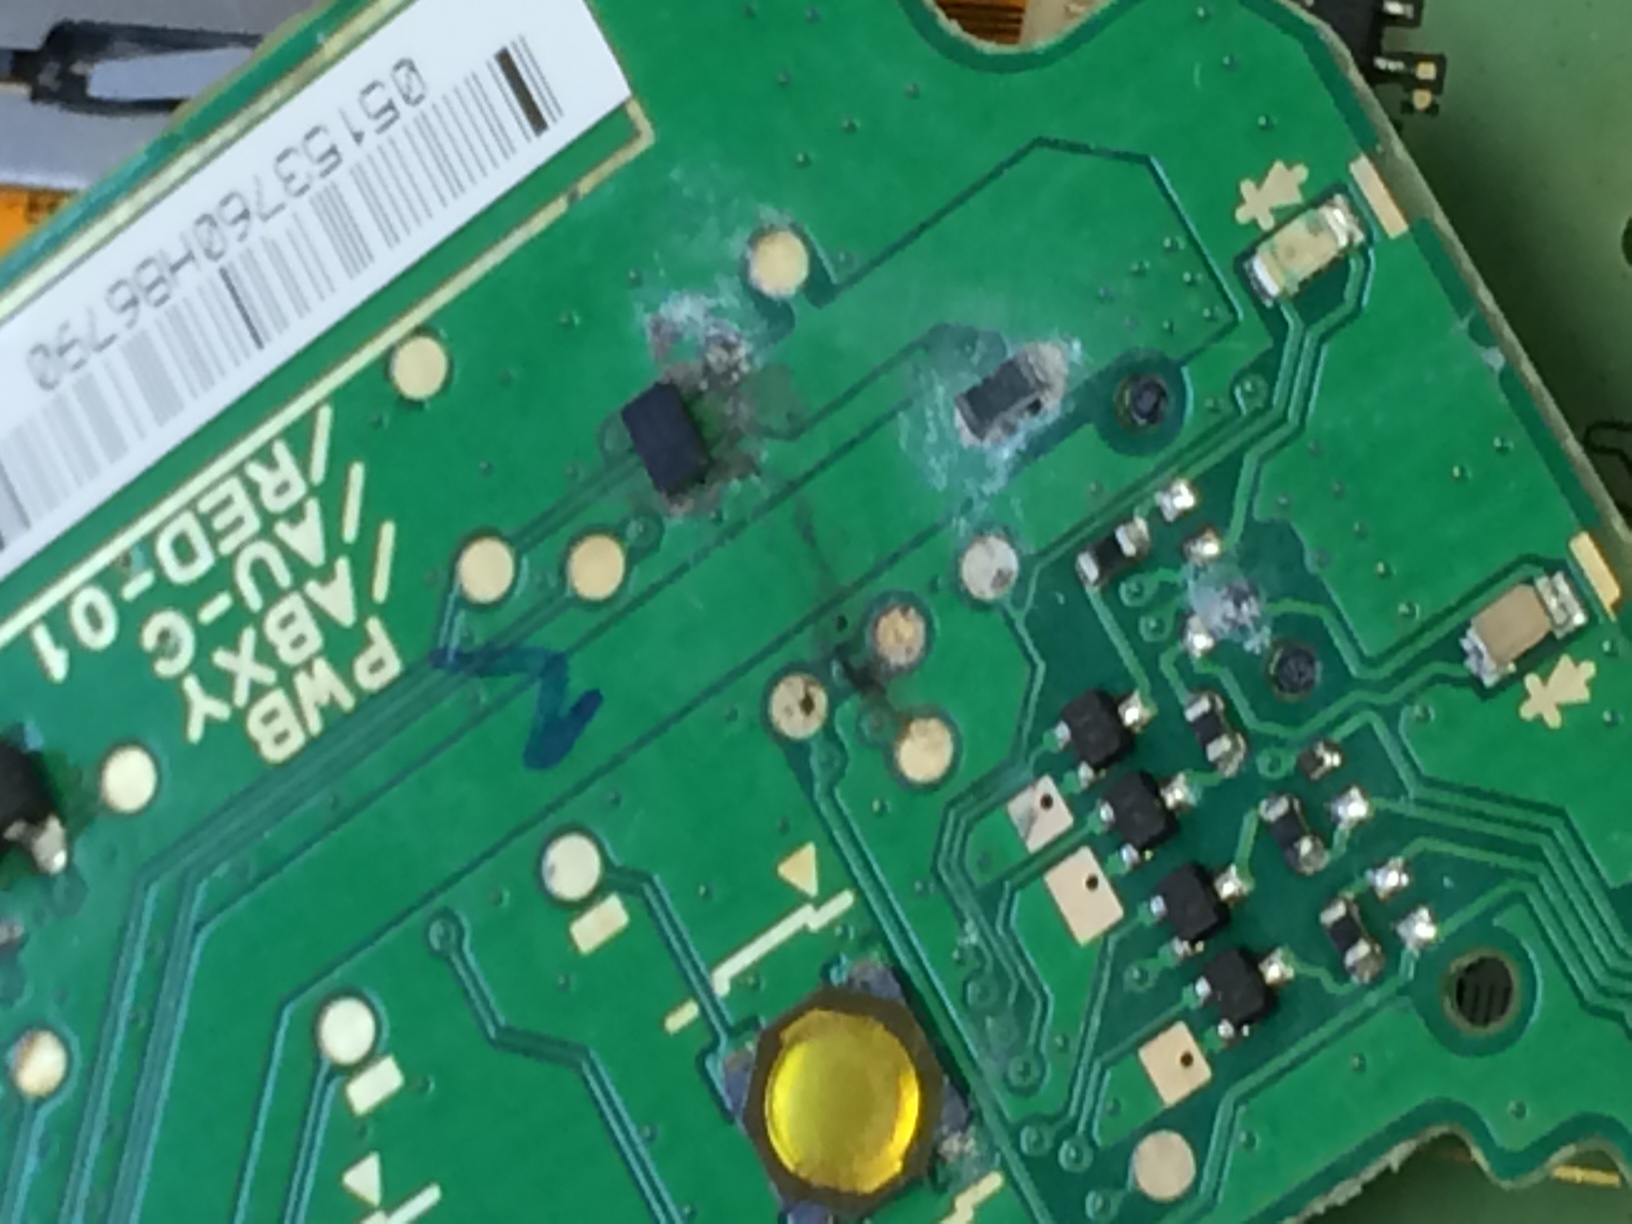
Nothing else inside seemed to be damaged at all and all of the moisture was on this end of the console.  So I figured I’d look into replacing this power board (the batter connects to this board).  I figure spending $50 on a new board would be better than $200 on a new 3DS.  Fortunately, these boards can be found all over online, and even more fortunately, it only cost me around $15 to order one, a real deal non knockoff one too.

A week later, I had the new power board, time to swap.  It’s pretty straight forward as well, I removed all of the screws first.  Next there are two small ribbon cables that attach to the board, the one broad orange one and another smaller one at the top for the secondary nubbin that is on the New 3DS models.  The large orange one was simple, since the new board came with a new ribbon cable, potentially damaging the old one wasn’t a problem.  I was still careful to slide it out of the end on the main part of the 3DS.  After removing it, the gray bar is able to flip up so the new cable can be slid in and aligned, then the gray bar snaps back down to secure it.

The second smaller cable was a bit trickier, but due to it’s small size, I was able to flip the bar piece holding it down up using a small screw driver.  Once these cables were swapped, the new board gets screwed in.  Carefully reattach the two cables on the case cover for the ribbon cables, there is a natural orientation to these when the cover is attached, though it’s slightly twisted around with it removed.  Once everything was reassembled and screwed down, I reinserted the battery for the moment of truth of powering the system back on.

Which was successful!

I’m not saying this will fix any broken 3DS, there’s all sorts of other issues that could come up, especially with water.  This is more just how I was troubleshooting and fixed mine.


Share this:

  • Click to share on Facebook (Opens in new window)
  • Click to share on Twitter (Opens in new window)
  • Click to share on Tumblr (Opens in new window)
  • Click to share on Pinterest (Opens in new window)
  • Click to email this to a friend (Opens in new window)
Posted in: Devices Tagged: 3DS, Electronics, Nintendo, repair
1 2 … 8 Next »
Twitter LinkedIn email
Instagram Instagram Instagram
GitHub
JoshMiller.net
Lameazoid.com

Categories

  • ▼Devices (24)
    • Android (4)
    • PCs (6)
    • Synology NAS (3)
    • Windows Phone (4)
  • ►Lifestyle (17)
    • Books (4)
    • Language (1)
    • Music (10)
  • ►Maker (66)
    • Arduino (8)
    • CHIP (5)
    • ►Coding (26)
      • Advent of Code 2020 (12)
    • Hardware (1)
    • Home Security (2)
    • My DIY Projects (3)
    • Non-Tech (2)
    • Raspberry Pi (9)
    • The Basement (6)
    • The Cloud (3)
  • ►Opinion/Editorial (12)
    • Copyright and You (3)
    • Privacy (3)
    • Social Media (4)
  • ►OS (4)
    • Linux & Open Source (2)
    • Windows (2)
  • Site News (2)
  • ►Technology (6)
    • Security (1)
  • ►What I Use (10)
    • Hardware (3)
    • Photography (2)
    • Software (5)

Subscribe to Blog via Email

Enter your email address to subscribe to this blog and receive notifications of new posts by email.

Join 609 other subscribers

Hosted on…


Help support hosting with our referral link!

Copyright © 2021 [Blogging Intensifies].

Me WordPress Theme by themehall.com

loading Cancel
Post was not sent - check your email addresses!
Email check failed, please try again
Sorry, your blog cannot share posts by email.