 I mentioned last post I had ordered some cheap Temperature and Humidity Sensors for my Arduino boards. Well they came in, and so I got to do some nice experimenting with code to test them out. I already had a bit of code from the DHT Test Sketch (Arduino programs are called Sketches) that would poll one sensor and display the results over serial. Sort of the ultimate goal here is potentially running several fo these sensors around the house and polling them to gather temperature data and store it in a data base that can be accessed via the web.
The first step is getting a Sketch that would poll each sensor and output the result over the serial monitor, preferably with labels. I started out cutting and pasting the original single sensor code repeatedly and altering the pin before realizing a loop would be way more efficient for this task. After some fiddling I came up with the following Sketch which polls pins 2-7 sequentially in 2 second intervals and outputs the data to the serial monitor. This code requires the basic DHT includes from the DHT library.
//
// FILE: Six Sensor Temp/Humidity Probe.ino
// AUTHOR: Josh Miller
// VERSION: 0.1.00
// PURPOSE: DHT library based sketch for multiple Temp/Hum probes on Arduino
// URL: http://www.joshmiller.net
//
// Released to the public domain
//#include “dht.h”
dht DHT;
void setup()
{
Serial.begin(115200);
Serial.println(“Multi Sensor Temp/Humidity Readings”);
Serial.println(“Version 1.0”);
Serial.println(“Modified DHT Library Version”);
Serial.println(“By Josh Miller, josh@lameazoid.com”);
Serial.println();
}void loop()
{
int i=1;while (i<7)
{
// READ DATAint chk = DHT.read11(i+1);
switch (chk)
{
case DHTLIB_OK:
Serial.print(“\t”);
break;
case DHTLIB_ERROR_CHECKSUM:
Serial.print(“Checksum error,\t”);
break;
case DHTLIB_ERROR_TIMEOUT:
Serial.print(“Time out error,\t”);
break;
default:
Serial.print(“Unknown error,\t”);
break;
}
// DISPLAY DATA
Serial.print(“Probe “);
Serial.print(i);
Serial.print(” : Humidity is: “);
Serial.print(DHT.humidity, 1);
Serial.print(“, Temperature is: “);
Serial.print(DHT.temperature, 1);
Serial.println(” C “);i++;
delay(2000);
}}
//
// END OF FILE
//
 I don’t have my Network Shields yet so I can’t play around with getting these numbers to dump into an SQL database (probably one running on my NAS) just yet. This basic proof of concept though is great since it allowed me to learn some code and test the basic functionality of the sensors. This code can be modified for any number of sensors by changing the “while (i<7)” line to “while (i<# of Pins/sensors Used)”.
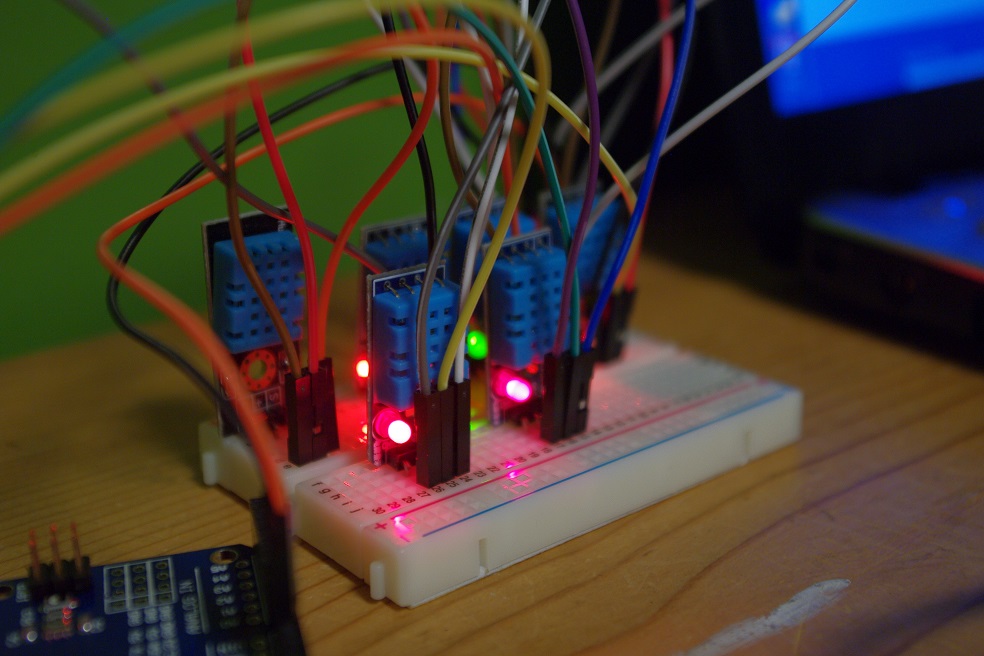
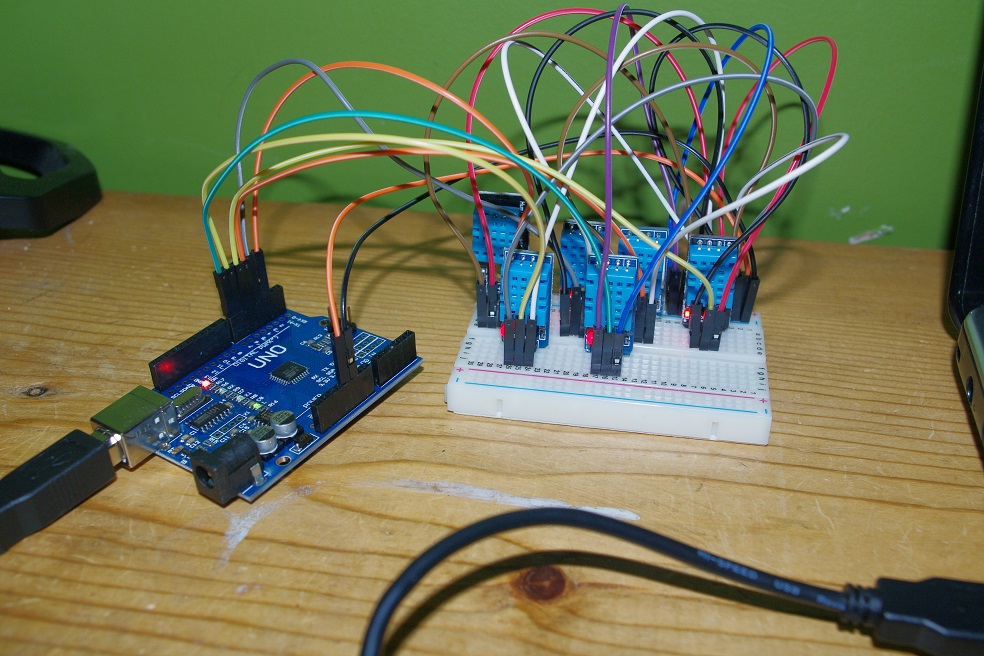
Wiring up the bread board was also a bit of a tricky task, mostly because of the sheer number of connections being made. Each sensor gets a +Voltage and Ground connection off the bus bar and a wire from the senor. The new cheap sensors use a different pin out from my “official” expensive senor, not really a problem, but something to look out for.
After wiring everything up, I could plug the Arduino into my laptop and open the serial monitor on the appropriate baud rate and record the results. The results are actually a bit worrying but further testing will be needed to verify the integrity of the results…
Multi Sensor Temp/Humidity Readings
Version 1.0
Modified DHT Library Version
By Josh Miller, josh@lameazoid.com
Probe 1 : Humidity is: 58.0, Temperature is: 25.0 C
Probe 2 : Humidity is: 46.0, Temperature is: 27.0 C
Probe 3 : Humidity is: 41.0, Temperature is: 29.0 C
Probe 4 : Humidity is: 40.0, Temperature is: 26.0 C
Probe 5 : Humidity is: 35.0, Temperature is: 30.0 C
Probe 6 : Humidity is: 36.0, Temperature is: 32.0 C
Probe 1 : Humidity is: 58.0, Temperature is: 25.0 C
Probe 2 : Humidity is: 46.0, Temperature is: 27.0 C
Probe 3 : Humidity is: 41.0, Temperature is: 29.0 C
Probe 4 : Humidity is: 40.0, Temperature is: 26.0 C
Probe 5 : Humidity is: 35.0, Temperature is: 30.0 C
Probe 6 : Humidity is: 36.0, Temperature is: 31.0 C
Probe 1 : Humidity is: 58.0, Temperature is: 25.0 C
Probe 2 : Humidity is: 46.0, Temperature is: 27.0 C
Probe 3 : Humidity is: 42.0, Temperature is: 29.0 C
Probe 4 : Humidity is: 40.0, Temperature is: 26.0 C
Probe 5 : Humidity is: 36.0, Temperature is: 30.0 C
Probe 6 : Humidity is: 37.0, Temperature is: 30.0 C
Probe 1 : Humidity is: 58.0, Temperature is: 25.0 C
Probe 2 : Humidity is: 46.0, Temperature is: 27.0 C
Probe 3 : Humidity is: 42.0, Temperature is: 29.0 C
Probe 4 : Humidity is: 40.0, Temperature is: 26.0 C
Probe 5 : Humidity is: 36.0, Temperature is: 29.0 C
Probe 6 : Humidity is: 37.0, Temperature is: 30.0 C
Probe 1 : Humidity is: 58.0, Temperature is: 25.0 C
Probe 2 : Humidity is: 46.0, Temperature is: 27.0 C
Probe 3 : Humidity is: 43.0, Temperature is: 28.0 C
Probe 4 : Humidity is: 40.0, Temperature is: 26.0 C
Probe 5 : Humidity is: 36.0, Temperature is: 29.0 C
Probe 6 : Humidity is: 38.0, Temperature is: 30.0 C
Probe 1 is the official sensor, the one that cost me $10, the other 5 are cheap probes, they cost me like $9 total. I have to assume that Probe 1 is pretty accurate and probably has gone through some quality testing before being sold. The other 5, for all I know, are rejects that were swept off of some floor in China by the janitor. The point is, all of the readings of the cheap sensors are pretty off from each other, especially the humidity. This may actually be the case if these sensors were in separate rooms or even any distance from each other, however, these senzors are all within a few centimeters of each other on the same bread board.
There may be a few things happening here causing this discrepancy, and I only say this because they are at the very least consistent with themselves.
One, it’s possible, that there isn’t enough juice to run all of the sensors at once. If they are being under powered, I would likely get bad readings. I can easily test this by running each sensor independently with the old single probe Sketch.
Two, it’s possible that while no accurate to each other, they are accurate to themselves. I don’t really know what these numbers actually mean, I am assuming % Humidity and Degrees C. It may be some sort of internal scale factor and I simple need to adapt the program to return scaled results. The issue with this will be that each probe is polled in a loop, so there isn’t really an easy way to apply a different scale factor to each sensor individually.
Whatever the case, the Temperature is at least semi precise, which is what I care more about anyway. I’ll probably continue with the project with the idea that if I really want accurate results I could eventually invest in better sensors. The next step on the software end will be to add network functionality to record the data. On the hardware end I plan to use some CAT5 wire to allow the probes to be positioned in various places beyond just the Bread Board.
Josh Miller aka “Ramen Junkie”. I write about my various hobbies here. Mostly coding, photography, and music. Sometimes I just write about life in general. I also post sometimes about toy collecting and video games at Lameazoid.com.
[…] used the default Arduino Ethernet libraries. I also simplified the code down to one probe, though adding more temperature probes will be trivial. After I managed to get the dummy data to post reliably, I moved on to adding variables in place […]