Code Project – JavaScript Pixel Camera

Sometimes I do projects that end up being entirely fruitless and pointless.

Ok, maybe not entirely fruitless, but sometimes I get caught up in an idea, and end up essentially just sort of, reinventing the wheel, in a complicated way. For starters, I got caught up with this little tutorial here: https://thecodingtrain.com/challenges/166-image-to-ascii . It uses JavaScript, to convert the input from your webcam, into ASCII art. It’s a nice little step by step process that really explains what is going on along the way so you get a good understanding of the process.

And I got it to work out just fine. I may mess with it and add the darkness saturation back in because it helps bring emphasis to the video but the finished product is neat.

I then decided I wanted to see if I could modify the code to do some different things.

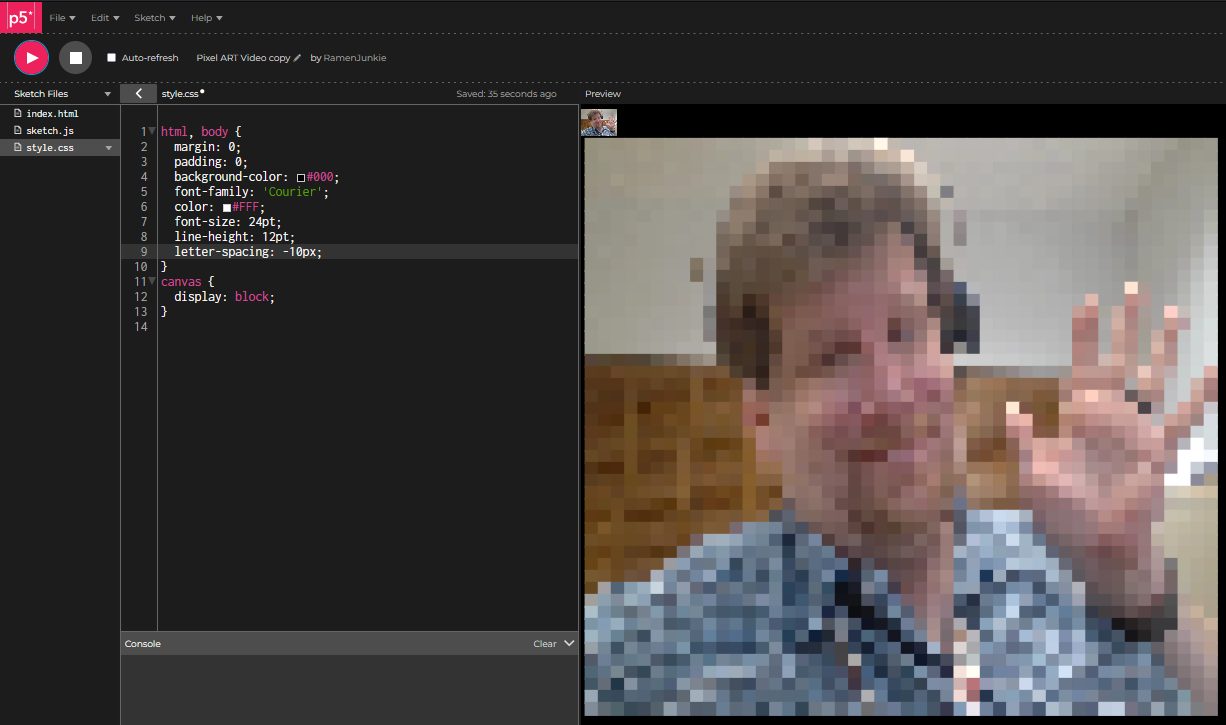
Specifically, Instead of ASCII characters, I wanted it to show colored blocks, pixels if you will. I managed to modify the code, and the output is indeed a pixilated video, but it’s not video, it’s constantly refreshing text. The problem is, it’s writing out a page where every block, is wrapped in a <font> styling tag, which means it’s writing out a ton of extremely dense HTML code and pushing it out, so it’s a little weird and laggy and pretty resource intensive to run.

I also image, there is a way to simply, downsize the input resolution, and upscale the video, to achieve the exact same effect.

One variant I made also just converts images to single page documents of “pixels”. but, ugly font based pixels, to achieve an effect you can get by resizing an image small then large.

Like I said, kind of fruitless and pointless, but I got caught up in the learning and coding part of things.

I also may go ahead and do some additional modifications to the code to make things a bit more interesting. I could try using it to make my own Game Boy Camera style interface, for example. Then make it output actual savable pictures. I found a similar project to that online but it would be cool to code my own up and give it an actual interface.

Anyway, here is the code for the jankey video JavaScript, sketch.js first then index.html after. Also a Demo is here, though I may remove it int he long run, especially if I make an improve project.

let video;
let asciiDiv;

function setup() {
  noCanvas();
  video = createCapture(VIDEO);
  video.size(48, 48);
  asciiDiv = createDiv();
}

function draw() {
  video.loadPixels();
  let asciiImage = '';
  for (let j=0; j < video.height; j++) {
     for (let i = 0; i <video.width; i++) {
      const pixelIndex = (i+j * video.width) * 4;
      const r = video.pixels[pixelIndex + 0];
      const g = video.pixels[pixelIndex + 1];
      const b = video.pixels[pixelIndex + 2];
      const pixelColor = "rgb(" + String(r) + "," + String(g) + "," + String(b) + ")";
       // console.log(pixelColor);
//      const c = '<font color=rgb('+r+','+g+','+b+')>'+asciiShades.charAt(charIndex)+'</font>';
      const c = '<span style="color: '+pixelColor+';">&#9724;</>';
      asciiImage += c;
    }
    asciiImage += "<br/>";

  }
  asciiDiv.html(asciiImage);

}

index.html:

<!DOCTYPE html>
<html lang="en">
  <head>
    <script src="https://cdnjs.cloudflare.com/ajax/libs/p5.js/1.6.0/p5.js"></script>
    <script src="https://cdnjs.cloudflare.com/ajax/libs/p5.js/1.6.0/addons/p5.sound.min.js"></script>
    <link rel="stylesheet" type="text/css" href="style.css">
    <meta charset="utf-8" />

  </head>
  <body>
    <main>
    </main>
    <script src="sketch.js"></script>
  </body>
</html>

Code Project – JavaScript Drum Kit

The second actual project from the class I’ve been doing is a simple clickable drum kit. Part of the purpose was to work with signs and to work with clickable elements. Like the dice roller game, the basic HTML and images were provided, though there was some freedom in arranging the icons and sounds.

It feel a bit flaky, when it comes to overlapping sounds, but that also feels like a bit of a limitation with the code itself, or at least, the simplicity of what is being done here. I’m sure it’s “fixable” with some more advanced work. But for now it’s pretty neat. Works with clicks and keyboard presses.

It can be played by going here, and the full repository can be found here.

var w = new Audio('sounds/snare.mp3');
var a = new Audio('sounds/tom-1.mp3');
var s = new Audio('sounds/tom-3.mp3');
var d = new Audio('sounds/kick-bass.mp3');
var j = new Audio('sounds/tom-4.mp3');
var k = new Audio('sounds/tom-2.mp3');
var l = new Audio('sounds/crash.mp3');

for(var i=0 ; i < document.querySelectorAll(".drum").length; i++) {
    document.querySelectorAll(".drum")[i].addEventListener("click", function(event) {
    clickHandler(event.target.innerHTML)});
}

document.addEventListener("keydown", function(event) {
    clickHandler(event.key);
});

function clickHandler(which_sound) {
//    console.log(which_sound)
//    alert("Clicked!"); 
    flashButton(which_sound);

    switch (which_sound){
    case "w":
        w.play();
        break;
    case "a":
        a.play();
        break;
    case "s":
        s.play();
        break;
    case "d":
        d.play();
        break;
    case "j":
        k.play();
        break;
    case "k":
        k.play();
        break;
    case "l":
        l.play();
        break;
    default:
        console.log(which_sound)
        break;
    }
}

function flashButton (whichFlash) {
    var activeButton = document.querySelector("."+whichFlash);
    activeButton.classList.add("pressed");
    setTimeout(function(){ activeButton.classList.remove("pressed"); },0.3);
}

The large bulk of the code here is handling the sound. I feel like there could almost be a more elegant way of handling this process with a list, but I’m not positive since it would mean taking the text of a list element and using it as the name of a variable. The top chunk of definitions manages creating the sound elements themselves, and the switch statement in the middle plays one based on what the user did.

This function:

function flashButton (whichFlash) {
    var activeButton = document.querySelector("."+whichFlash);
    activeButton.classList.add("pressed");
    setTimeout(function(){ activeButton.classList.remove("pressed"); },0.3);
}

Makes the flash happen. Like I did for the Python class, I tried to construct most of these on my own, so had to do a bit of research to find a way to make the button add the “pressed” class, to get the bright effect, then shortly after, remove it. This seemed to be the appropriate method based on a couple of sources.

The real “meat” of this lesson was this bit of code.

for(var i=0 ; i < document.querySelectorAll(".drum").length; i++) {
    document.querySelectorAll(".drum")[i].addEventListener("click", function(event) {
    clickHandler(event.target.innerHTML)});
}

document.addEventListener("keydown", function(event) {
    clickHandler(event.key);
});

Specifically, using the event listener function, to call an embedded function in order to pass data around. Its similar in concept to some things I’d done in Python, and I am sure it’s nothing super fancy in technique, but its “new to me” in the Javascript sense. Also, I think the instructor handled this a different way, but I’ve set these two event listeners, one for the buttons for clicks, and one for the page for key presses, in a way that made the clickHandler a lot simpler, since they both work off of the same bit of data.

Code Project – JavaScript Dice Roller Game

I mentioned in my Python Class posts that I really enjoyed the instructor and I planned to eventually move to doing her Web Dev Course. Well, I’ve started working on that one. It’s not a “100 Days of Projects” so I’ve not been quite blitzing through it like I did the Python Course, and it’s a lot of material I am already way more familiar with. Hell, I skipped over the first third of the course because it was the same HTML/CSS content included int he Python Course.

My main goal here, is to get much more familiar with JavaScript. I have dabbled, lightly, in JavaScript (ok, let’s go with JS from here on), and well, it’s a coding language, so I already have a lot of the “logic” side down. At some point, learning new programming languages just becomes about learning the syntax and maybe some of the special uses for a particular language. I’d only say I am Intermediate or above in Python and HTML/PHP, but I’m familiar with several other languages including BASIC, C, C++, LSL (Linden Scripting Language), Arduino (mostly just C), Bash Shell scripting, SQL, Cold Fusion, and probably some other I am forgetting.

It all mostly works the same on the base level, a loop is a loop, conditionals are conditional, and it’s just a matter of remembering if the language uses braces or parenthesis or semi colons and if tabs matter. And that’s where Google becomes your friend.

Anyway, the first real stand along project of this course is a simple Dice rolling game. And I have to say, “game” is the loosest sense of the word. It’s a webpage you refresh to see if Player 1 or Player 2 has the higher dice face. I might actually try to make a more complex version of this later where you select from different Dice and it rolls them, for you know, gaming. Sure there are plenty of D&D Dice roller apps, but it would be a fun exercise.

The class provided the basic HTML Structure and graphics, since the focus was on the JavaScript side of things. It’s not an overly complex project, but here is the JS Code.

function setImage(diceImage, roll) {
    console.log(roll);
    if(roll === 1) { rolled = "images/dice1.png"; }
    else if(roll === 2) { rolled = "images/dice2.png"; }
    else if(roll === 3) { rolled = "images/dice3.png"; }
    else if(roll === 4) { rolled = "images/dice4.png"; }
    else if(roll === 5) { rolled = "images/dice5.png"; }
    else { rolled = "images/dice6.png"; }


    diceImage.src = rolled;
}

let player1Roll = Math.floor(Math.random()*6)+1;
let player2Roll = Math.floor(Math.random()*6)+1;

let dice1Image = document.querySelector("img.img1");
let dice2Image = document.querySelector("img.img2");

if( player1Roll > player2Roll) {
    document.getElementById("headtext").textContent = "Player 1 Wins!";
}
else if (player2Roll > player1Roll) {
    document.getElementById("headtext").textContent = "Player 2 Wins!";
}
else {
    document.getElementById("headtext").textContent = "Its a Tie!";
}

setImage(dice1Image,player1Roll);
setImage(dice2Image,player2Roll);

So what’s the process here. Let’s skip the function at the top for now. Step one is to roll two dice. This is done with Math.random, which selects a random value between 0 and 1. Dice have 6 sides, so we multiply this by 6, to get a number between 0 and 6. But technically it’s a number between 0 and 5.999999~ into infinity, not 6. And Math.floor rounds things down, so it’s actually between 0 and 5. So we need to add one.

let player1Roll = Math.floor(Math.random()*6)+1;
let player2Roll = Math.floor(Math.random()*6)+1;

After this is some selectors to pick the the two dice images off the page, so they can be updated to reflect the rolls later.

let dice1Image = document.querySelector("img.img1");
let dice2Image = document.querySelector("img.img2");

Next we get to use a conditional chain to determine the winner and update the h1 tag on the webpage to display the winner, or if it was a tie. I’m not going to repeat that code here again.

Lastly we make two calls to that function I mentioned before, the one at the top of the script, that updates the image for each dice. The function takes the document selector, and the value of each roll as an input. It runs the roll value (1-6) through a selector and then sets the dice image on the HTML document to the appropriate image.

Could this code all be cleaner, probably, but it gets the job done and is easy to follow. There is probably a simpler way to set the images. The image selector could also just look for 0-5 mapped to 1-6 instead of adding 1. But what if I needed this function to do more based on these rolls. Maybe it becomes part of a larger game and deals damage or something. Personally, this is why I prefer code like this, that isn’t perfectly compact, because it becomes functionally more useful down the road.

Also, the game is available to play at this link.