Recently I purchased a portable phone battery on clearance. I want to use it to modify my defunct Pokemon Go Gotcha band, which no longer holds a charge, to run off the battery pack. I realized that a battery pack could also be useful for powering other small electronics, such as the Raspberry Pi.
The problem is, I wanted to get an idea of how long the battery would last powering the Raspberry Pi. Figuring this out isn’t really all that hard. The tricky part is that I can’t stand over the Pi and watch it until it dies.
So instead I set up a simple cronjob task to do the job for me. I had a spare SD card, so I threw a basic fresh install of Raspbian on the card. I configured SSH and WiFi, then did a quick run of “crontab -e”, then droped the following at the end.
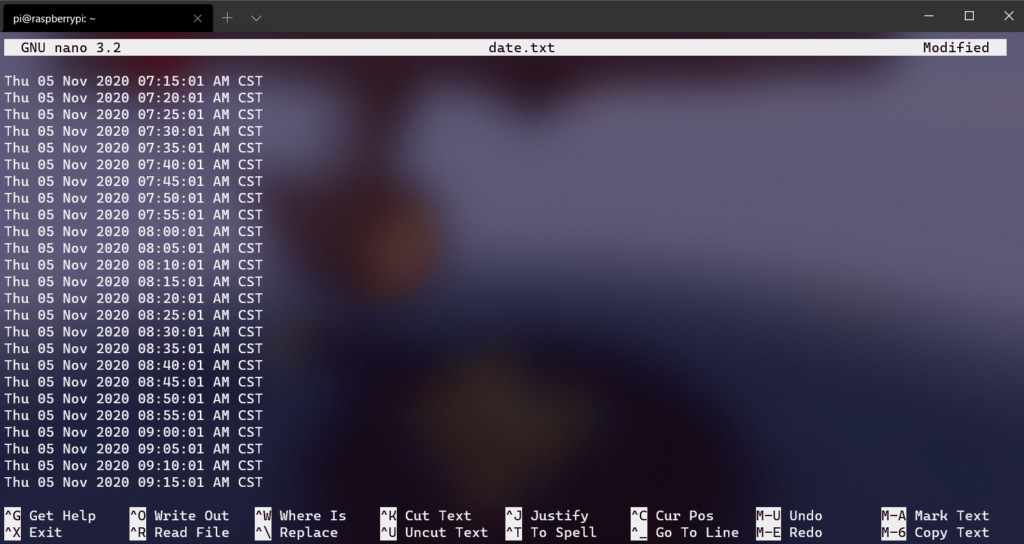
*/5 * * * * date >> /home/pi/date.txt
Simple.
Every 5 minutes, the Pi will now write the Date and Time to the file “date.txt”. It will do this until it can’t which would be after the battery dies, killing the Pi.
After charging the battery pack over night, I stuck the Pi on it and left it.
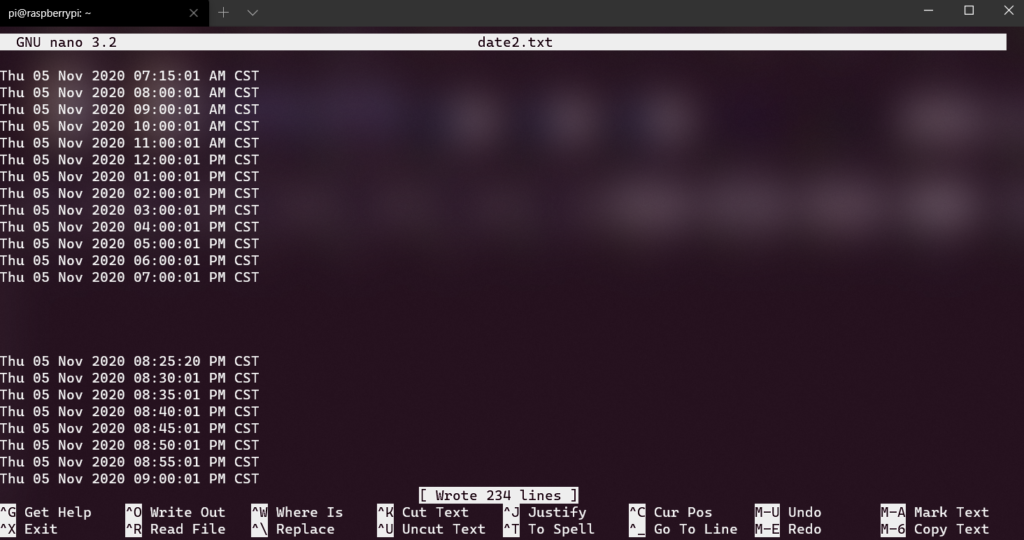
After checking back periodically, when I found the Pi was dead, I plugged it into a regular power source to retrieve the data. The result were both better than I had hoped, and not as great as I had hoped. The Pi started spitting out Time Stamps again after I plugged it back in, so I ended up having to skim through the file to find the time gap. I went ahead and truncated the data down to hour stamps until I came across the time jump from when the Pi had died and when I had plugged it back in.
So it turns out that the Battery pack will drive power for the Pi for around 12 hours. I also want to test this under a bit of a load and test how long it will power an Arduino writing to a remote database.
One thing I have always done in my life is worked to constantly be learning something. It may not actually be a useful something, but it’s something. Back when I was finishing up my degree in 2003, I was telling people that I wanted to get the RA job in the dorms so I could just live there for the rest of my life taking classes. Granted, the RA position only meant your room was covered, I don’t think it covered any of the course work expense.
Fortunately, we live in a world of connected possibilities, or whatever buzz word you want to use. While I didn’t get to work from home or even end up with extra time at home from the Pandemic, it’s really given me a ton of extra online courses to take, mostly “just because”.
I have taken and completed several single courses over at Real Python. Though I am not entirely sure how useful some of them are, to anything I’ll ever do, but it was good to get some general incite into things like, Facial Detection and Functional Programming.
I took a multi week course called The Science of Well Being, over on Coursera. It was kind of more of a psychology themed course covering concepts behind what makes us happy in our daily lives. I kind of feel like I’ve already been sort of naturally using some of the ideas discussed in my life, but it was interesting.
I’m almost at 2 years of Duolingo learning spanish as well, with a 700+ day streak. Mi Espanol no es perfecto, pero es un poco bien. I guess. I’ve actually been branching out some and have been reading a few children’s books in Spanish. I’ve also been browsing bits of Spanish speaking Twitter and Reddit as well. While I can’t really speak or listen to it well, I am doing alright and comprehending the reading and okish as getting the idea across in writing.
It doesn’t always work out the first try though. Starting at the beginning of this year I started trying to learn how to play Piano. Though the Piano part is the easy part, what I’m really doing is trying to learn how to read sheet music. Unfortunately, I have not sat down at the Piano to practice in nearly 6 months now. Maybe next year on that one.
I get access to Linked in Learning through work as well, I’ve been taking a Full stack Developer course there as well. I kind of got distracted from it doing web development work at work, but it already helped improve my technique in managing PHP file layouts.
I have been doing some tutorials on how to write Markdown, which isn’t super impressive or complicated, but it’s a skill that I feel like may actually be more useful in the future.
I finished off a tutorial on basic COBOL programming. While I don’t think I could write a COBOL program if I had to, it did a pretty good job of giving me an idea of how COBOL is structured and flows.
This is all just scratching the surface of a long list of learning resources I’ve collected up over the past few months. I am hoping to pick up doing some art again next year, I used to be pretty good at drawing in my youth. If I every finish the Spanish tree in Duolingo, I hope to either brush up on the Japanese I had in High School or learn some Norwegian. I’d like to take up 3D modeling at some point as well, I always really enjoyed doing CAD work in College and 3D modeling is essentially just a less precise version of CAD.
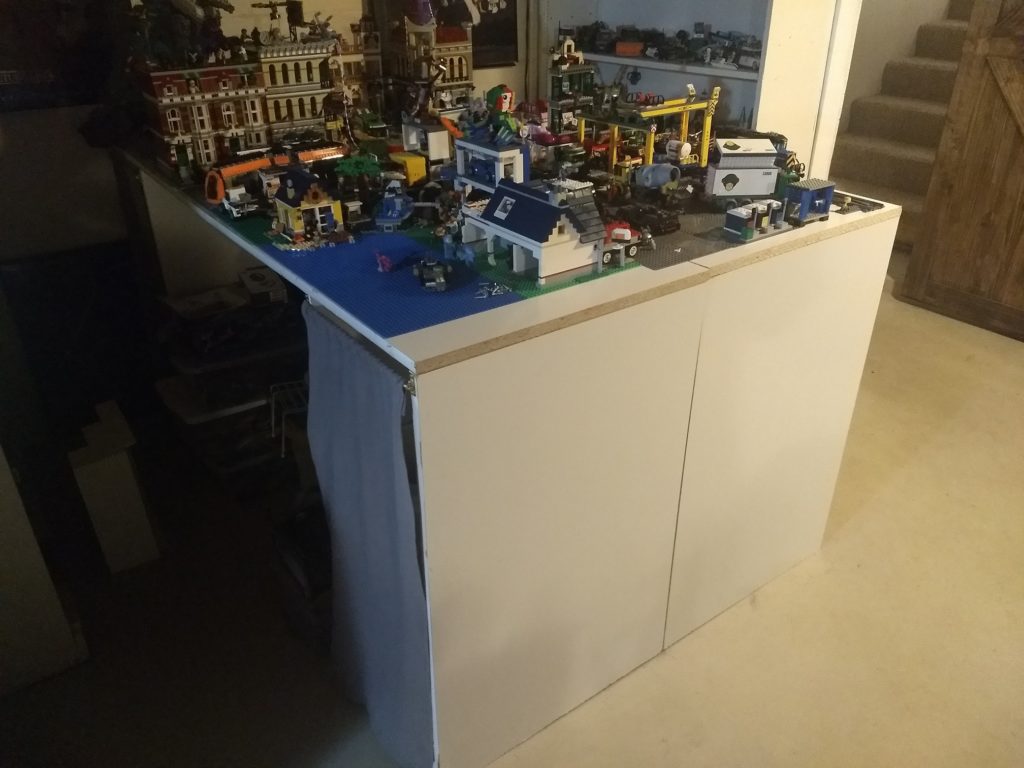
The LEGO Table space in the basement was, for the longest time, the catch all space for anything extra. It was always sort of the last space to get finished up in the basement, though it’s always going to be an ongoing project. A lot of the clean up in this space involved cleaning up other areas first. The initial set up involved a counter sort of unit that I had made years ago, that previously was in my wife’s craft room at the old house. She didn’t need it in the new house, so I inherited it and it was a place to land my LEGO Modulars.
Under was used for storage for most of my other LEGO sets, since I didn’t really have a place to put them yet. They’ve still been in boxes for a few years,
At some point we ended up with some pretty hefty book cases second hand that we were using upstairs for a while, but they were no longer needed. Originally these book cases were going to be used in the basement but they were maybe 4″ too tall, so they ended up in the upstairs space. Since they were available again, I opted to go ahead and trim them down a bit so they would fit in the basement.
This process amounted to marking a line around the top end of the book case, using a circular saw to chop all the way around on the line, then removing the top board from the chopped off scrap bit, and reattaching it to the top of the book case. I also put a fresh new coat of paint on the book cases and shelves, as well as cut a few additional shelves.
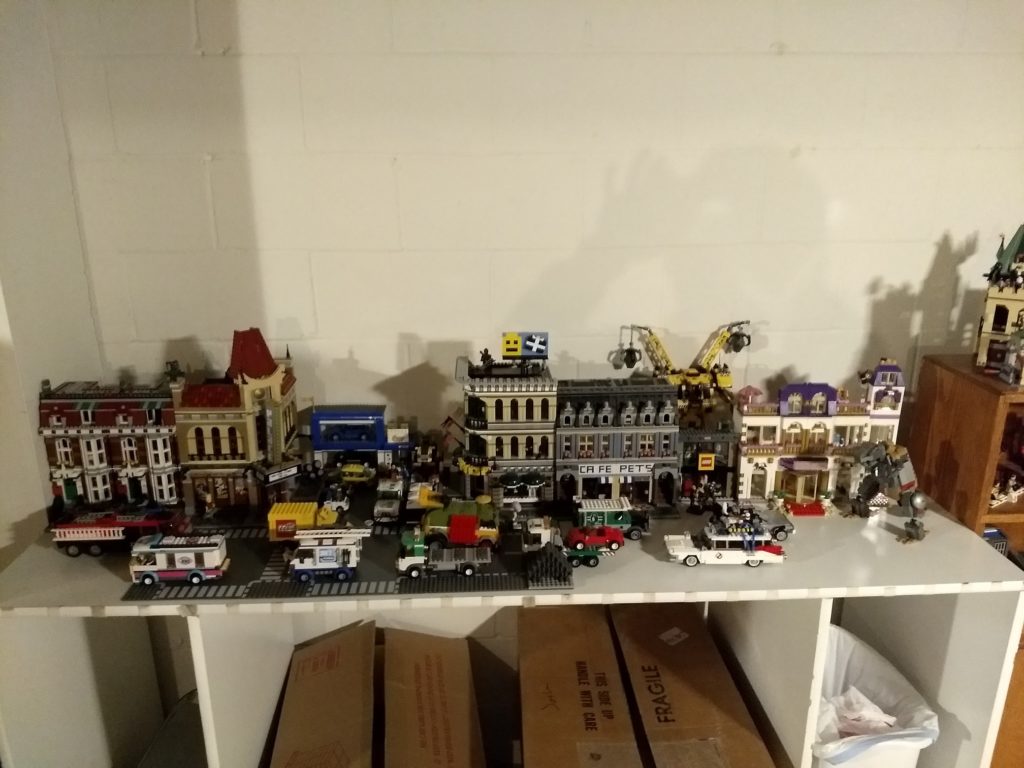
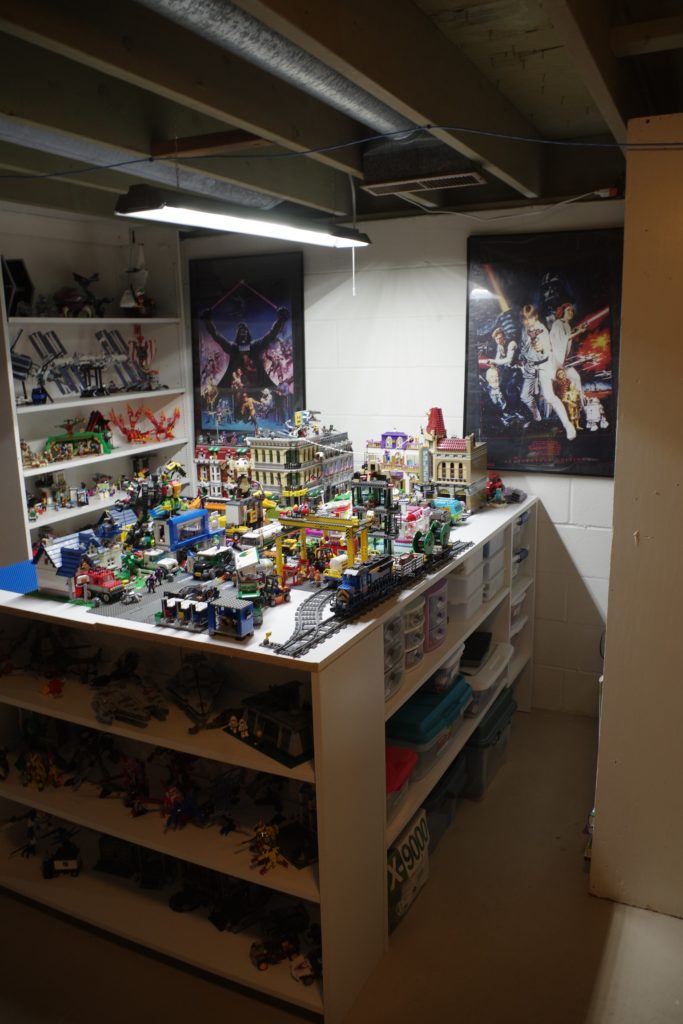
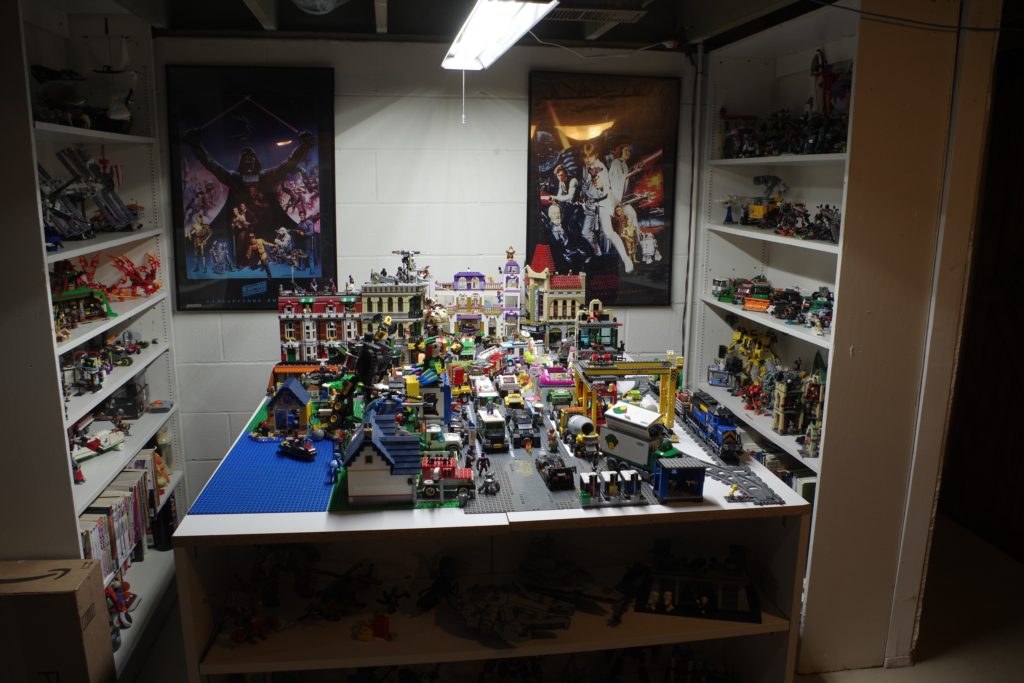
I originally wasn’t sure where these shelves would end up in the basement, but after some measuring, I decided they would work on either side of the LEGO table. This meant turning the LEGO table itself 90 degrees so it sticks out in the room. I also bought some more pre finished shelving boards, like the original table was constructed from, and build what amounted to, a second table, then strapped them together with some braces to double the available surface area.
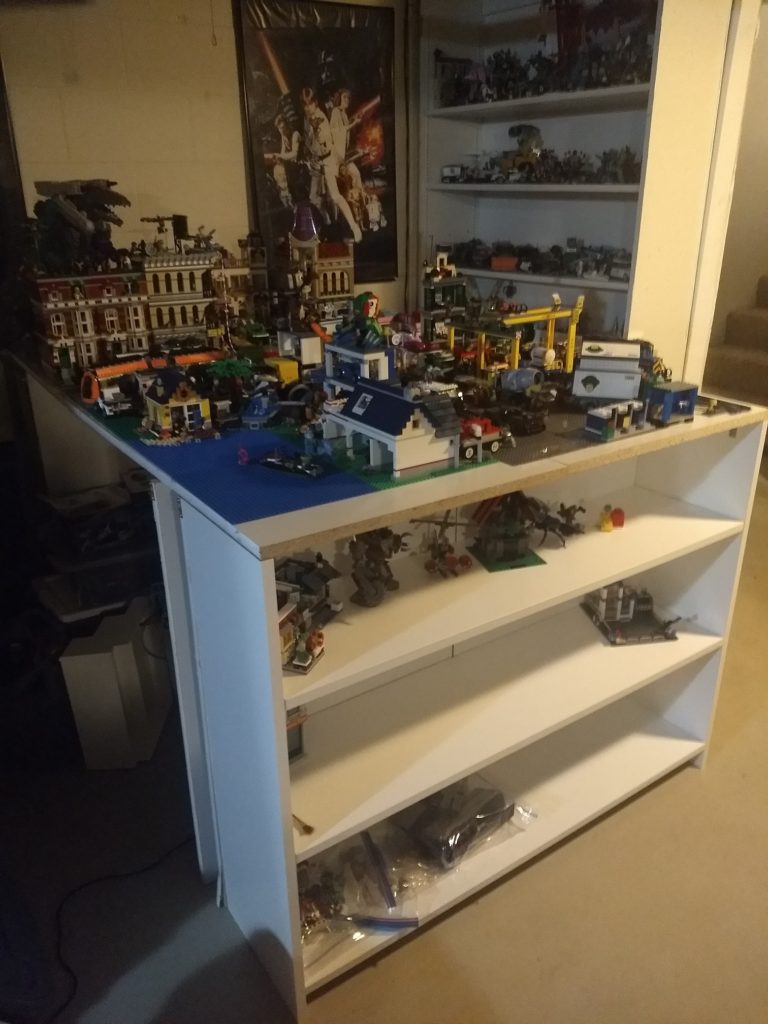
This gave me a lot more room to work with for the LEGO city, as well as shelving on either side to display and store additional sets. Which really cleaned out some of the boxes I had stored under the table. The next part of my plan was to add some additional shelving under the table for storage, which lead me to another idea. Why just add shelving on the sides, when it would be fairly easy to add shelving to the end, for a bit more display space. It also gets rid of this ugly as hell blank white surface.
For this process, I separated the two end legs, and shuffled them back the depth of a narrower (8″ I believe) shelf. Then reattached them. I then cut and assembles a smaller shelf unit and attached it to the end of the LEGO table. On the one side, I also adjusted the secondary leg back, as well as the curtain that was there, so I could keep the trash can under the table and out of view as it was. On the opposite side, I simply removed the extra leg.
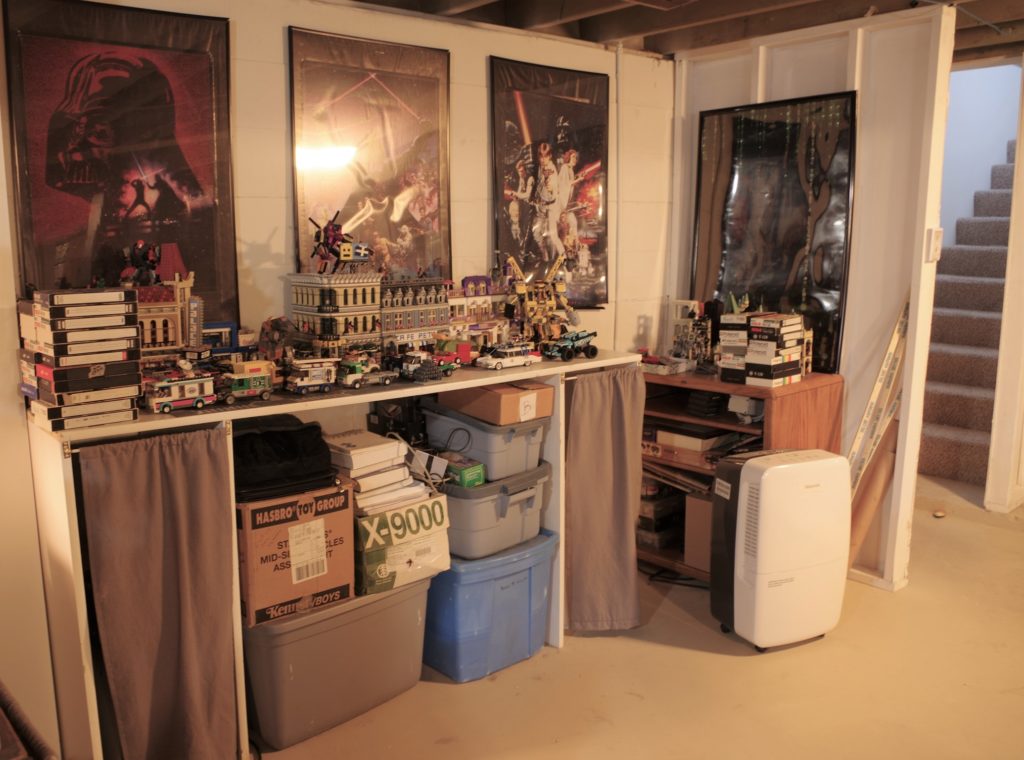
Finally, for now, I cut some more 24″ pre finished shelf boards and attached them using L braces, inside the length of the table, on both sides, so the mess inside could become a much more organized, and useful mess. I also picked up an LED shop light that I hung over the length of the table, because this particular corner of the basement is a little dark. It lights up the entire space much better than I had expected it to.
In case you noticed, the Return of the Jedi poster fell off the wall at one point. I want to buy better frames and some fresh posters anyway (these three are like 25 years old now), so I simply hadn’t replaced it on the wall yet.
The next phase of this project is to actually start sorting down the extra LEGO into bins and drawers that will go under the table. I already started this a bit with some IKEA bins but I am going to need more bins than I have and it’s slow going since right now all of the LEGO is just in a giant plastic bin.
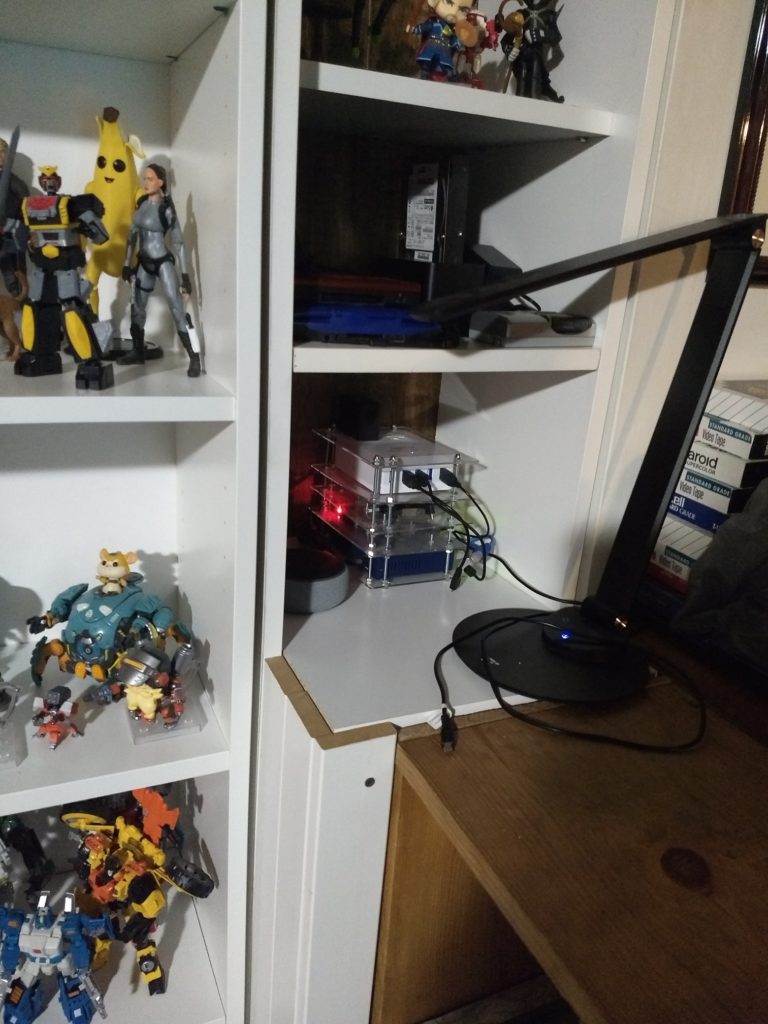
Last post I talked about putting in some flooring and shelving as part of revamping my basement space a bit. I ended up with a couple of issues after the initial work, one was sort of previously an issue, one new. The desks don’t quite fill the wall from my Photo Booth to the pillar halfway down the wall. This was, sort of an issue before. The secondary issue, I have this Raspberry Pi Rack that I previously had sitting on a shorter bookcase next to the desk. That bookcase has been relocated, and the new book cases reach the ceiling instead of, four feet or so up, so putting the rack on top is kind of out of the question.
Another potential issue with this space involves the cats. While they have not done it yet, it’s kind of the perfect sort of space for them to sneak in and start peeing on the floor.
Basically, it needed to be filled.
My original plan was to make a super basic little table that was the same height as the desk to fill in the hole. When I started planning it out, I realized that there wasn’t really any reason that the shelf could not be taller, so I opted to make it the same height as the new book cases.
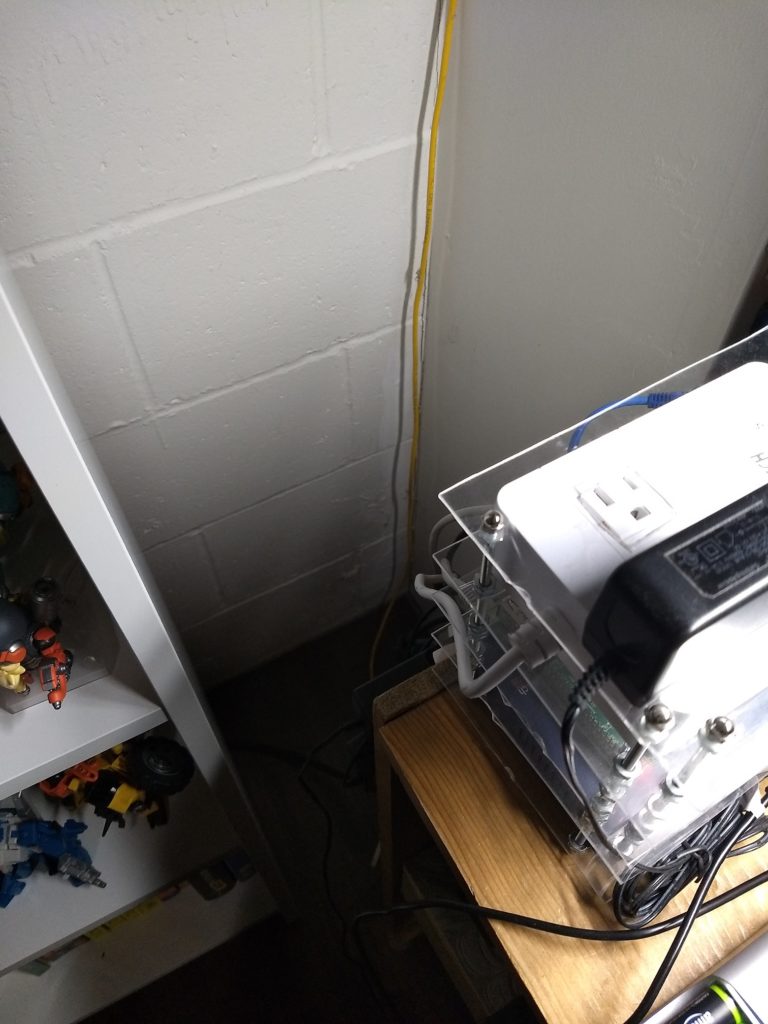
There are some other challenged in designing this shelf. I didn’t want it to be deeper than the book shelves, at least not up top, but the end of the desk doesn’t reach the front of the book shelves. So the new unit would need to be slightly “L” shaped. Another problem was the power strip hanging off the end of the desk. While the basement has water issues in places (that I’ve been working to resolve), it’s never flooded anywhere near the desk and flooring area. I’ve still taken the precaution of making sure there isn’t anything electronic on the floor, so the power strip is strapped to the end of the desk.
Part of the purpose of the new unit was to also hide this wiring mess. But I still need it to be accessible. When the shelf was just going to be a short table, this was easy, make the top removable. Since I was making the shelf taller, I had to redesign things a bit so the middle shelf was removable instead.
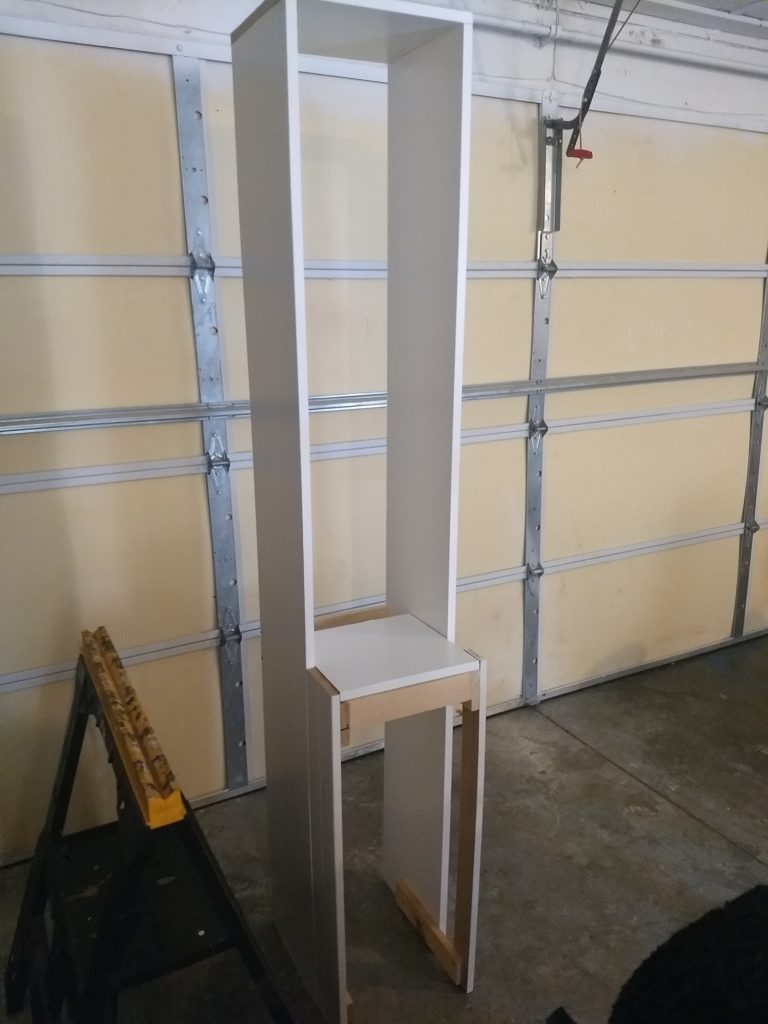
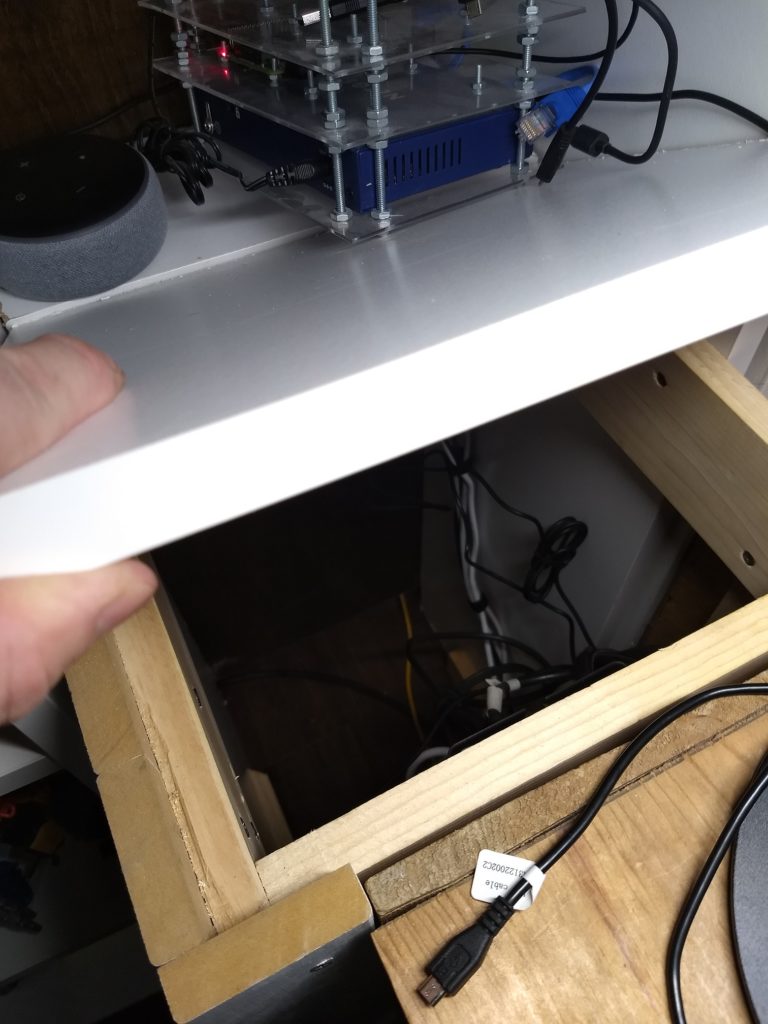
After sketching out the general idea of what I was going for, I purchased some white pre-finished boards from Menards and set about cutting and assembling the new shelf unit. I used pre-finished boards so it would match the IKEA shelving.The base of the unit is pretty straight forward. It’s a square box. For the removable shelf, I built in a square of support blocks and cut a piece to fit. Since the unit sits flush against the one wall, I opted to leave the vertical gap on the right side open. This gives a place to reach in and pick up the removable shelf, plus a path to slip cables through for anything that’s temporarily plugged in. For the more permanent connections like Network cables going to the switch in the Pi rack, I later drilled a hole in the fixed back half of the middle shelf.
For the more permanent connections like Network cables going to the switch in the Pi rack, I later drilled a hole in the fixed back half of the middle shelf. The back half being fixed in place also means that I don’t have to completely remove the Pi Rack and Alexa anytime I want to open up and get to the Power strip.
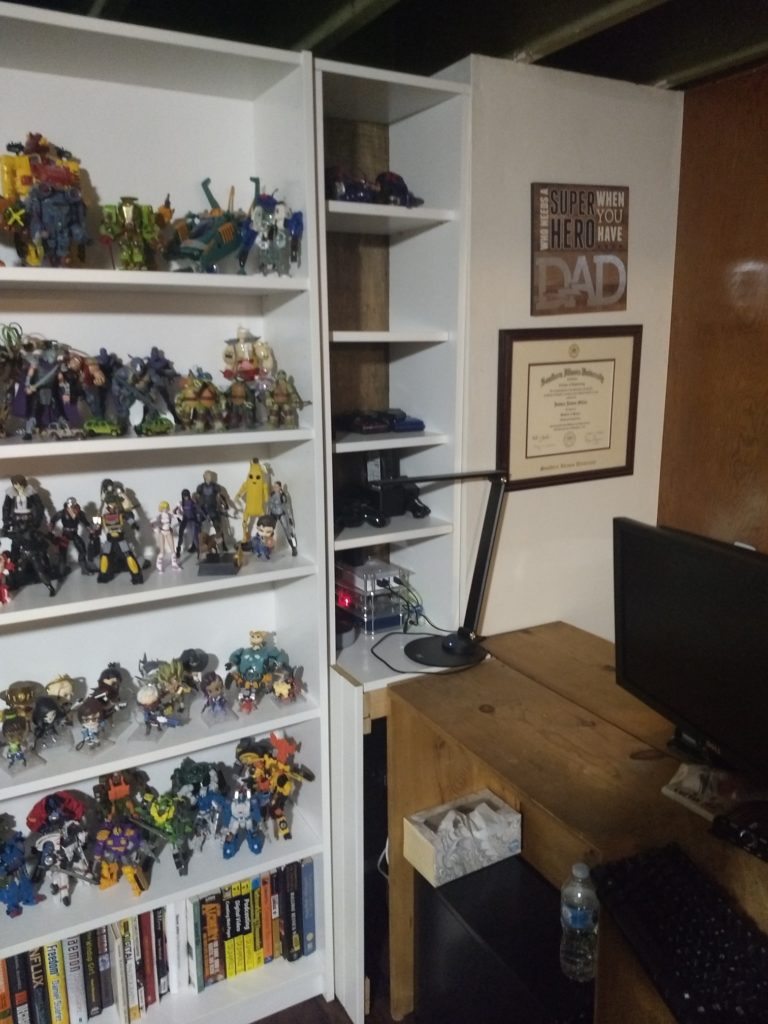
After adding a stained piece of backing to the shelf, I went up and drilled some shallow holes to add shelving. I ended up liking these small shelves much more than I expected honestly. I can put some of my tech stuff on one for easier access and I really like the additional mini display areas for some of my more favored figures.
After putting the shelf in I found I needed to make a few last bit touch ups. Firstly the front was more exposed than expected, so I added a vertical board to fill in the space. I also need to get some white paint to touch up the tops of the front vertical pieces.
Last year, we had all the floors in the upstairs main part of the house replaced. When purchasing the flooring, the store we purchased from was running a tiered rebate deal. Essentially, we could buy $500 worth of additional flooring than we needed for the upstairs, and tier up to the next rebate level, which was $500 additional savings. My point is, we basically ended up with a pile of free bonus flooring. The plan was to put some of it down in the basement. It wouldn’t be enough to cover the entire basement, or even half, but it would be a start.
Upstairs has doors and counters, and all sorts of things that make flooring tricky. The Basement, not so much. The basement is essentially just a square with some pillars in it. It’s also a basement, so it doesn’t need to be super perfect. I have put in some similar flooring a few houses ago when we converted the garage to a family room. I could easily do this.
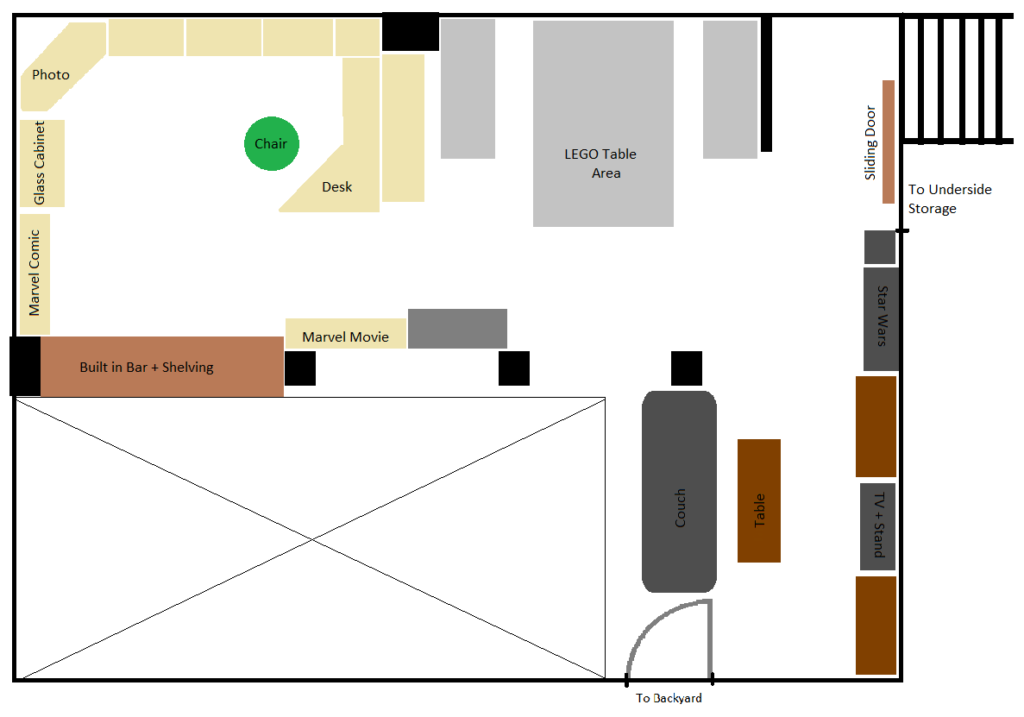
This flooring job also has been sort of the kick off of actually doing a LOT of major work and rearranging to the basement. So I figured it might be useful to have a little map. The basement, essentially has 4 “areas”. My “Office area”, in the upper left quadrant. The “LEGO area” in the upper middle. There is the “TV Area” in the lower right corner of the map. Lastly, my son has an area that constitutes his room, though there aren’t any actual walls there. It is segmented off on one side by a build in bar/counter space and a couple of shelving units in the middle of the room against the support pillars.
FWIW, my son it an adult and spends more time living with his friends elsewhere than he does actually living in our house. Before anyone gets on my about shoving my kid off in the corner.
Also, the basement actually has two halves, one half is used for storage and isn’t particularly finished out in any real great way, which is why I installed the door.
The first step of this project actually wasn’t the flooring, technically. The first step was obtaining some IKEA shelving. I’ve wanted to get some Billy shelves for several years now but I don’t have an IKEA in the area. When I finally was ready to get them, I discovered that IKEA doesn’t deliver over long distances. Which wasn’t helped by well, the current Pandemic. Things seemed to be getting better as far as the Pandemic however, and a month or so ago, I had taken a vacation day to take my wife to a Doctor’s appointment, which got rescheduled. So we opted to drive down to St Louis and go to the IKEA store.
Another step I needed to take before the flooring was prepping the floor itself. There were a handful of nail things sticking out of the concrete, presumably from some previous wall or floor that was once in the basement. Also around each of these was a divot int he floor. I took a chisel and busted off the nails and then filled in the divots with some concrete filler. You can see these spots in the before photo above, where the dark gray spots are on the floor.
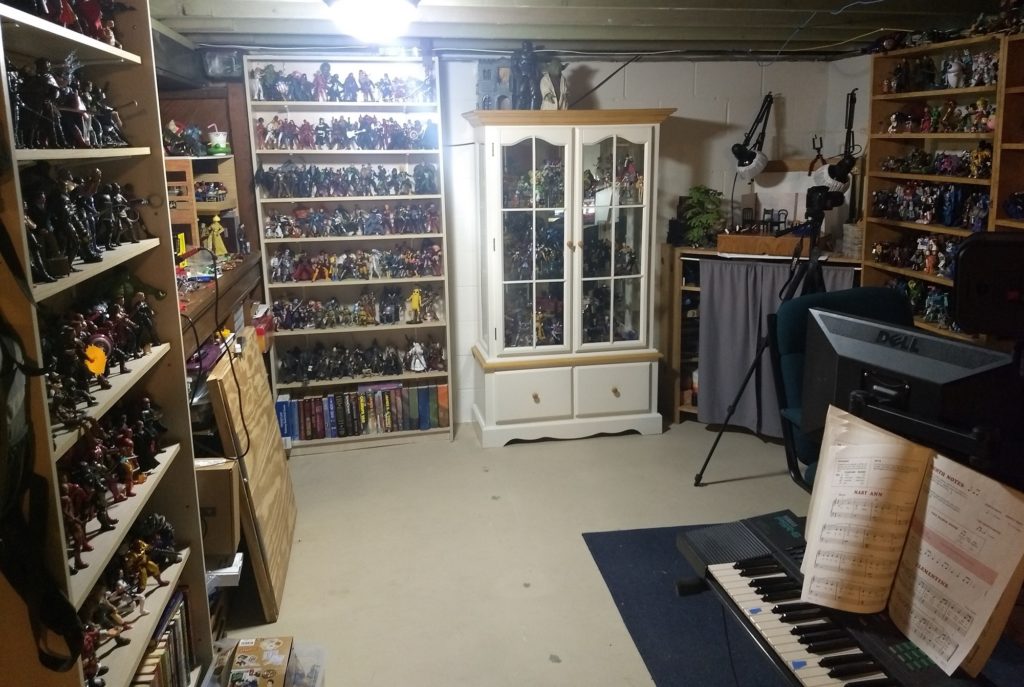
The other large step was clearing out my collection so I could move the furniture around. Despite having quite a lot of room in the basement, I did a lot the shelf clear out while installing the floor. I put a lot of the more durable stuff (Transformers) carefully into a large plastic bin, and then places a lot of the other figures on a long folding table. Another minor issue, my son basically decided he was going to come live with us again, the same day I was starting to do my work. So my original plan of putting up more tables in his space didn’t really work out.
Basically, I started at the back wall, unloading everything to a table or a tote, and moved the shelf, glass cabinet, and photo station out 3-4 feet. I did a final clean and mop of the floor, then laid several rows of the flooring down. Once I had enough flooring, I pushed those furniture pieces back and stacked stuff onto them from the other shelves, so i could move other pieces of furniture.
I also assembled and stood up the 3 IKEA shelves as I went. The other purpose for shuffling the future this way was to help hold the flooring down. I don’t really have an easy way to add trim on the concrete basement walls. So the furniture around the perimeter is what I’ve got.
After everything was finished, I started reassembling my displays over the next few days. I also found that I needed to add a short 3′ extension piece to the power strip feeding my PC, because the new shelving is a little wider than the old combination, and the cord didn’t reach far enough behind the shelves. Other minor electrical change, the Glass Cabinet has a light in it, but the cord switch is a pain to use. I also have an Alexa compatible power outlet I don’t really have a use for. I set up this power outlet so I can tell Alexa to “Turn on the Display Light” and light up the cabinet.
I am pretty pleased with the end result. It’s not perfect but it’s a bit nicer than it was. This has also spawned several additional projects which I’ll blog about in the future.